Verify your website with Google to measure your site’s search traffic and performance, fix issues, and make your site shine in Google’s search results. This guide will show you how to verify your site ownership to use Google Search Console.
While most site verification tools will ask you to add an “HTML tag” or “meta tag” to your site’s header, we’ve simplified the process by providing specific tools for adding the required tag to your WordPress.com website.
From your site’s dashboard, visit Jetpack → Traffic (or Jetpack → Settings, then click the Traffic tab, on plugin-enabled sites) to access the site verification tools.
In addition to the Google verification steps described in this guide, you can verify your site with Bing, Pinterest, Yandex, and Facebook.
We recommend two methods to verify your site with Google. You only need to complete one method.
To get started with Google Search Console, take the following steps:
- Visit the Google Search Console homepage and sign in with your Google account.
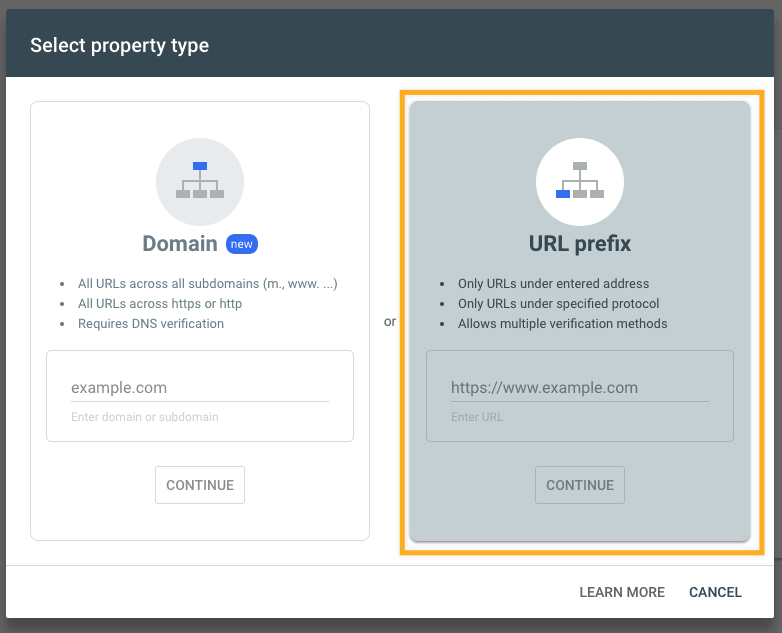
- In the upper-left corner of the Google Search Console dashboard, click “Add Property“.

- You will be provided with two “property type” options. Select the “URL prefix” method here.
- Enter your WordPress.com website’s domain address (including
https://and without thewww) and click the “Continue” button.
- On the next screen, in the “Verify ownership” pop-up, scroll down to “Other verification methods” and click on “HTML Tag“.
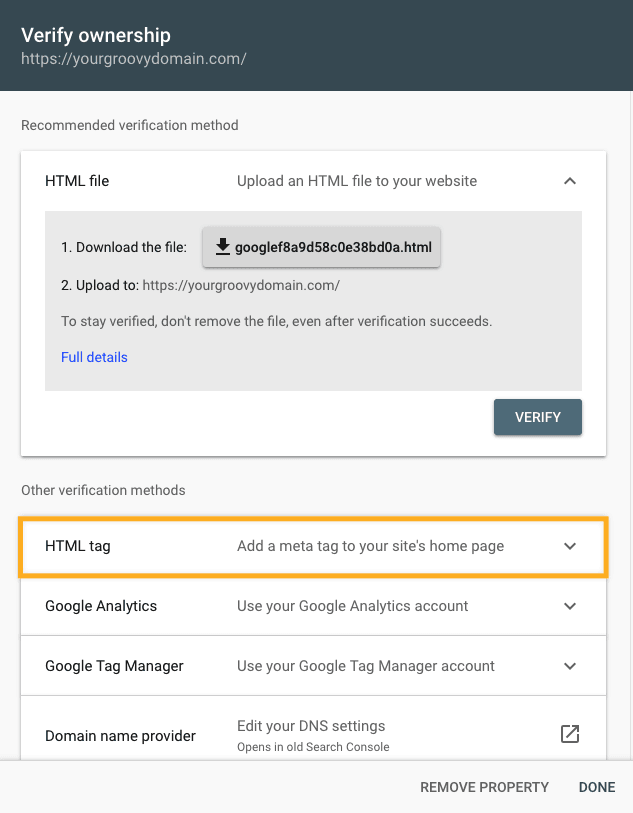
- Here, you’ll find a line of HTML code that resembles this:
<meta name="google-site-verification" content="aBcDeFghIJ-kLmNoPQ" /> 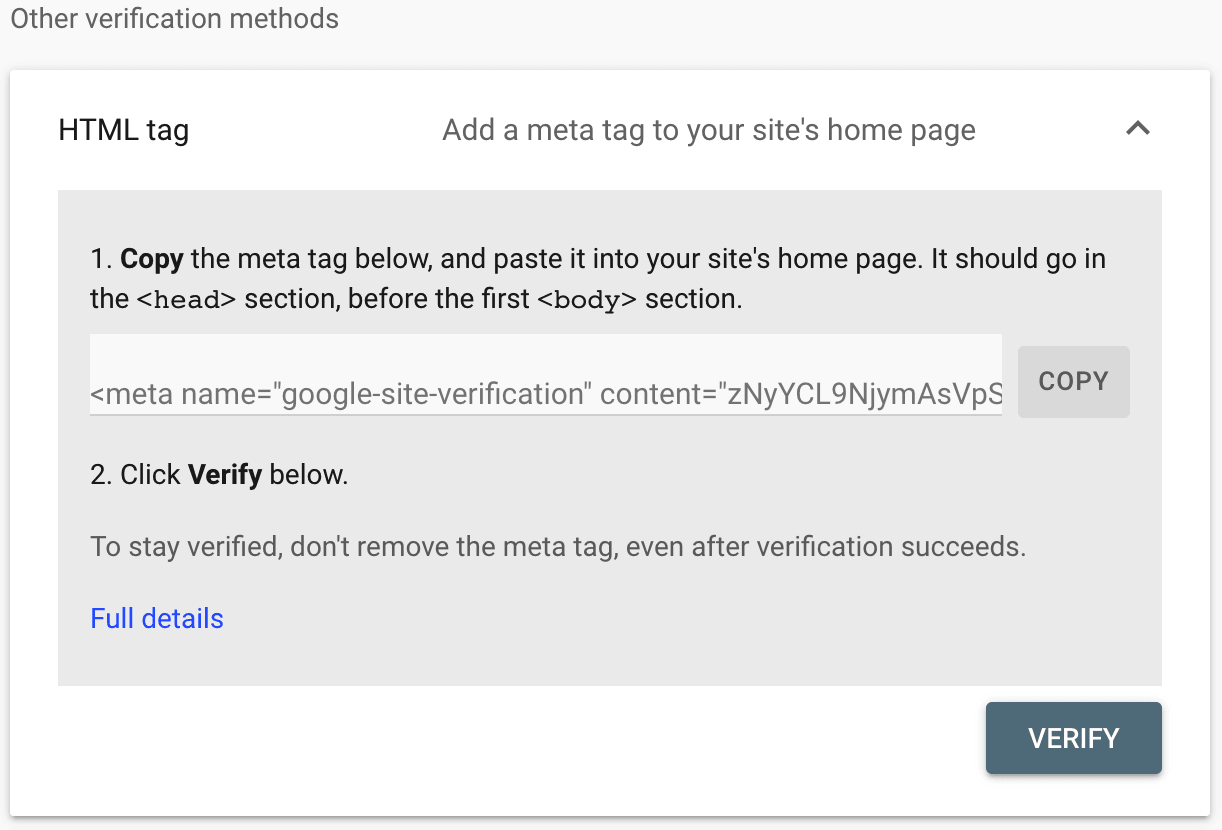
- Click the Copy button to copy the meta tag to your computer’s clipboard. Be careful to copy the full code here without missing any characters.
- Open a new browser tab or window and visit your WordPress.com site’s dashboard.
- On the left side options, navigate to Jetpack → Traffic (or Jetpack → Settings, then click the Traffic tab, on plugin-enabled sites).
- Scroll down to the “Site verification services” section and locate the box for Google.
- Paste in the code provided earlier from Google.
- Click the “Save settings” button.

- Return to the Google Search Console verification page and click the Verify button.

If you cannot use the HTML tag method described above, you can alternatively use a DNS record (specifically a TXT record) to verify your domain name with Google. You do not need to complete these steps if you successfully verified your domain using the HTML tag method described in the previous section of this guide.
To verify your site with Google using the domain method, follow these steps:
- Visit the Google Search Console homepage and sign in with your Google account.
- In the upper-left corner of the Google Search Console dashboard, click “Add Property“:

- You will be provided with two property type options. Select the Domain method here.

- Enter your site’s domain name without the
https://orwww, for example,yourgroovydomain.com, and click the “Continue” button. - Google will now attempt to validate where your domain is registered and offer the option to verify your domain with WordPress.com. You must ignore this and select the “Any DNS Provider” option to continue:

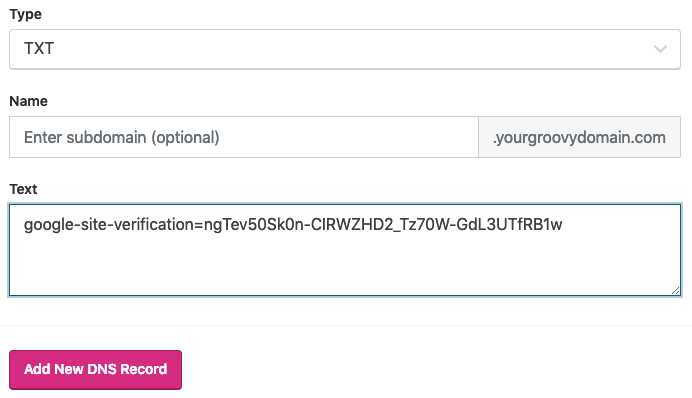
- Copy the TXT record provided in the “Verify domain ownership via DNS record” screen:

- In a new browser tab or window, open your WordPress.com account, navigate to Upgrades → Domains, and click on the domain you wish to verify.
- Click on “DNS records” and then click the “Manage” button.
- In the upper right corner, click the “Add a record” button.
- Change the Type drop-down to TXT. Do not adjust the Name or TTL fields. Paste the text code you got from Google into the Text field, as shown in the image below:
- Click the “Add New DNS Record” button to save the record.
- Finally, return to the Google screen and click the Verify button.
- In most cases, the verification is immediate, but it may take up to 72 hours for Google to recognize your domain as verified.
This section of the guide applies to sites with the WordPress.com Business and Commerce plan, and the legacy Pro plan. If you have a Business plan, make sure to activate it. For sites on the Free, Personal, and Premium plans, upgrade your plan to access this feature.
Plugin-enabled sites can automatically verify with Google. To automatically verify your site with Google, follow these steps:
- Visit your site’s dashboard.
- Navigate to Jetpack → Settings.
- Click on the Traffic tab.
- Scroll to the Site verification section, and toggle “Verify site ownership with third party services” on.
- If you don’t see the Site verification section, make sure your site is set to public.
- Click the “Auto verify with Google” button.

- A popup window will appear and will either list your Google accounts or prompt you to log in. Choose or log into the account you wish to use with Google Search Console.
- After logging in, you will be prompted to give permission to WordPress. Click Allow.
- After a few seconds, the site should confirm that it is verified with a green check mark and the message “Your site is verified with Google”.
Once you have verified your site with Google using one of the above methods, you may upload your sitemap to Google by following these steps:
- Visit your WordPress.com site’s dashboard.
- On the left side options, navigate to Jetpack → Traffic (or Jetpack → Settings, then click the Traffic tab, on plugin-enabled sites).
- Scroll down to the Sitemaps section.
- Copy your sitemap URL, which is typically your domain name followed by
/sitemap.xml. - Navigate to the Sitemaps section of Google Search Console at Index → Sitemaps:

- Insert your sitemap URL here and click the “Submit” button.

⚠️
If you receive an error after uploading the sitemap, please verify that your website is public and try to upload it again.
You may receive emails from Google highlighting issues they are having with indexing certain pages of your site. Visit our guide to Troubleshooting Google Search Console Errors.