Migrating Angular 1 Applications to Latest Angular in 5 Simple Steps

Victor Savkin is a co-founder of nrwl.io, providing Angular consulting to enterprise teams. He was previously on the Angular core team at Google, and built the dependency injection, change detection, forms, and router modules.

It’s often infeasible to rewrite a large Angular 1 app in Angular 2 all at once. In this article, you will learn how to migrate it gradually, component by component, module by module using NgUpgrade and the Angular Router.
Application
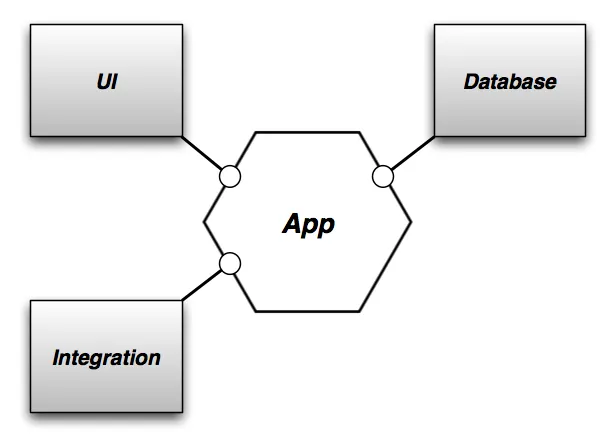
Say you have an application with three modules: main menu, messages, and settings. Every module defines components, services, and routes.
On launch the application displays the main menu. From there the user can navigate to the list of messages by either clicking on the inbox or drafts links. The user can also open individual messages. Finally, the user can go to the settings page and change the number of messages displayed.

Routes
The application supports the following URLs/routes:
Menu Module
/Messages Module
/messages/:folder
/messages/:folder/:idSettings Module
/settings
/settings/pagesize
Source Code
You can find the source of the application here: https://github.com/vsavkin/ng1ng2router.
5 Steps to Angular 2
Step 1: Bootstrap with UpgradeModule
Start by changing the bootstrap logic to use UpgradeModule.
To do that create an Angular 2 module with a simple root component rendering an element with the “ng-view” class.
Now, assuming your Angular 1 root module looks something like this:
Wire them up as follows:
Note the following things:
- We bootstrap Angular 2 first. And only when it is done, we bootstrap Angular 1 using the NgUpgrade.bootstrap method.
- The Angular 1 router uses the ng-view created by RootCmp for instantiating its templates.
At this point the app combines aspects of Angular 1 and Angular 2, although the Angular 2 code is just a wrapper around the Angular 1 application. The application logic is still written in Angular 1.
Step 2: Make all modules export an NgModule
Next, update all the modules to export an ng module. For instance, the menu module should be updated to look like this:
Right now the ng modules are empty, but, eventually, you will move all the components, services, and routes from MenuModule to MenuNgModule. Next, update your application file to import all the newly created ng modules.
At the end of this step you have started the migration of all the modules to Angular 2. You did it by creating an ng module for every Angular 1 module in the application.
Step 3: Migrate individual components and services to Angular 2, one module at a time
All the transformations you have done up to this point were mechanical. Now it is time to get creative — you can start migrating individual components and services to Angular 2.
While migrating services is usually straightforward, migrating components can require more work, depending on how the components are implemented. I won’t talk about the details of this process here. It’s a topic for another article.
Here assume the migration of the component is done, and you just need to register it, so it can be used in the rest of the application.
You can do it by downgrading it and registering it with the messages module.
Next, make the Repository service available for Angular 2 components.
Most of the migration time will be spent here, porting individual components to Angular 2 one by one. Sometimes the best strategy is to completely migrate one module and move to Step 4. Other times, it is better to migrate several modules at once, especially if they are tightly coupled. It is also a good idea to start migrating leaf components first, and then move our way up to application components.
At the end of this step you have all the components and services of a module migrated to Angular 2. Now you can start migrating its routes.
Step 4: Divide the routes between the Angular 1 and the Angular 2 routers
If you are migrating small projects, you can migrate all the components in the application to Angular 2 first, and then rewrite all the routes in one go.
It, however, does not work with larger applications, which can have hundreds of routes. There you have to migrate routes module by module. And you can do it using the Angular 2 Router.
Let’s look at the settings module as an example. It has been fully migrated to Angular 2: everything, including the routes.
Wire it up in ng2_app.ts by doing the following:
Where Ng1Ng2UrlHandlingStrategy is defined as follows:
Finally, update the root component to include an Angular 2 router outlet.
Let’s step back to understand how this part of the migration works.
In this setup the Angular 2 router and the Angular 1 router coexist on the same page. Every URL is handled by only one router, i.e., the routers handle subsets of the URLs supported by the application.
If an application module has been migrated to Angular 2, all its routes are handled by the Angular 2 router. So when navigating from an Angular 1 module to an Angular 2 module, the Angular 1 router will remove its template from the ng-view element, and the Angular 2 router will place its component into the router outlet.
Example
As we saw above, the application supports the following 5 routes/URLs:
/
/messages/:folder
/messages/:folder/:id
/settings
/settings/pagesize
And after migrating the settings module to Angular 2, this is how they are partitioned:
Angular 1
/
/messages/:folder
/messages/:folder/:id
Angular 2
/settings
/settings/pagesize
When the user navigates within the menu and messages modules, the Angular 1 router works the way it worked before. No Angular 2 is involved. The Angular 2 router still listens to URL changes, but since it knows that these URLs are handled by the Angular 1 router, it ignores those URL changes. The Angular 2 Router uses the provided UrlHandlingStrategy to distinguish the URLs it should handle from those it should ignore.
Although we discourage the practice, both routers can handle the same URL. For more information, read about the `extract` and `merge` methods in the API docs.
Only when the user navigates to the settings module, you will see something interesting. The Angular 1 router will remove its template from the ng-view element. And the Angular 2 will pick up the URL change and will react by instantiating the needed components.
While the user is navigating within the settings module, the Angular 1 router does nothing, only the Angular 2 router is “active”.
Only when the user navigates from the settings module back to the menu or the messages modules, the Angular 2 router will reset its state to “empty” and will update the URL. This will destroy all the Angular 2 components created by the router emptying the router outlet. The Angular 1 router will pick up the URL change and will instantiate corresponding Angular 1 components.
At this point, the whole module has been migrated to Angular 2.
Step 5: Remove Angular 1 when every module has been migrated
Finally, once all the modules have been migrated, update the ng2_app.ts and main.ts files to remove all the usages of UpgradeModule.
At the end of this step you have migrated the whole application to Angular 2.
Summary
It’s often infeasible to rewrite a large Angular 1 app in Angular 2 all at once. In this article, you learned how to migrate it gradually, component by component, module by module, in five steps:
- Bootstrap with UpgradeModule.
- Make all modules export an NgModule.
- Migrate individual components and services to Angular 2, one module at a time.
- Divide the routes between the Angular 1 and the Angular 2 routers.
- Remove Angular 1 when every module has been migrated.
Victor Savkin is a co-founder of Nrwl. We help companies develop like Google since 2016. We provide consulting, engineering and tools.
If you liked this, click the 👏 below so other people will see this here on Medium. Follow @victorsavkin to read more about monorepos, Nx, Angular, and React.