
Kubernetes Architecture Explained (2025): Master & Worker Nodes for DevOps Engineers
Post 2 of 70 in the series “Mastering Kubernetes: A Practical Journey from Beginner to CKA”
Table of Contents
Introduction
Picture this: You’re managing a bustling restaurant. You have a head chef (master) coordinating the kitchen, sous chefs managing different stations (worker nodes), and a complex system ensuring every order gets prepared correctly and delivered on time. This is exactly how Kubernetes orchestrates your containerized applications across a cluster of machines.
What we’ll learn today:
- The fundamental Kubernetes architecture explained
- How master nodes coordinate the entire cluster
- What worker nodes do and why they’re essential
- How these components communicate to run your applications
Why this matters: Understanding Kubernetes architecture is like learning to read a map before starting a journey. Every DevOps engineer needs this foundation to troubleshoot issues, optimize performance, and design reliable containerized systems. Companies like Netflix, Spotify, and Airbnb rely on this architecture to serve millions of users daily. By the end, you’ll diagnose cluster issues like a certified engineer.
Series context: Welcome to our comprehensive Kubernetes journey! This is where we build the foundational knowledge that every subsequent topic will build upon. Think of this as your architectural blueprint for everything we’ll explore together.
Prerequisites
What you need to know:
- Basic understanding of containers and Docker
- Familiarity with Linux command line
- Understanding of distributed systems concepts (helpful but not required)
📌 Quick Refresher: Containers are isolated processes that package applications with their dependencies. Kubernetes manages these containers at scale across multiple machines.
Tools required:
- A computer with internet access
- Text editor for taking notes
- Optional: Access to a Kubernetes cluster (we’ll set this up in future posts)
Previous posts to read:
- Post #1: Course Introduction and Learning Path (foundational context)
Estimated time: 15-20 minutes to read and understand the concepts
Step-by-Step Tutorial
Theory First: The Kubernetes Cluster Architecture
Kubernetes follows a master-worker architecture where the cluster consists of at least one master node (control plane) and multiple worker nodes. Think of it as a conductor (master) leading an orchestra (worker nodes) to create beautiful music (running applications).
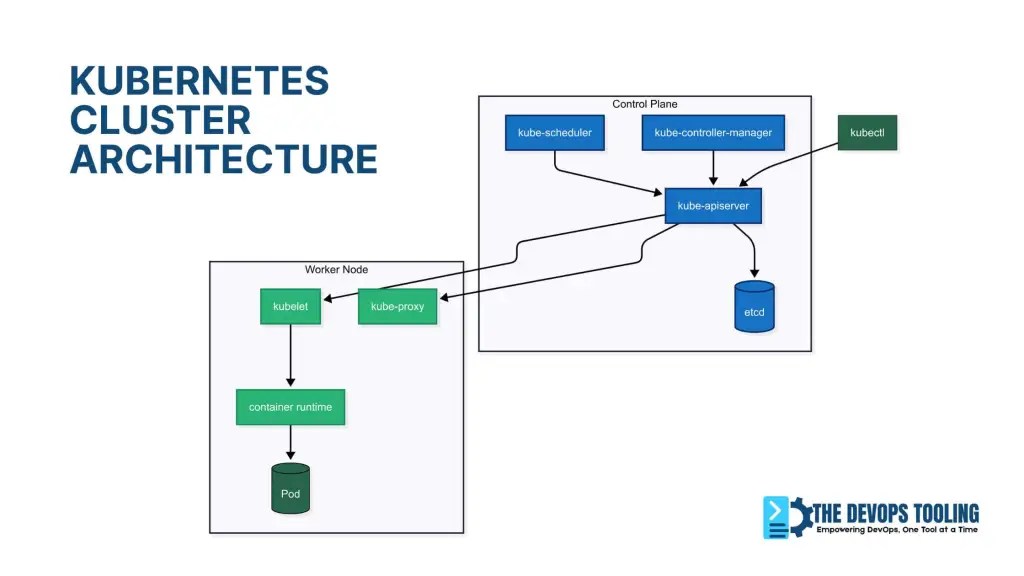
Step 1: Understanding the Master Node (Control Plane)
The master node is the brain of your Kubernetes cluster. It makes all the decisions but doesn’t run your actual applications.
Understanding the Control Plane Components (Master Node):
# Master Node Components apiVersion: v1 kind: ConfigMap metadata: name: cluster-info namespace: kube-public data: master-components: | - kube-apiserver: The front door to Kubernetes - etcd: The cluster's memory/database - kube-scheduler: Decides where pods should run - kube-controller-manager: Ensures desired state - cloud-controller-manager: Manages cloud resources (if applicable) Let’s break down each component:
1. kube-apiserver
- The only component that talks to etcd directly
- Validates and processes all REST requests
- Acts as the gateway for kubectl commands
2. etcd in Kubernetes: The Cluster’s Brain
etcd is Kubernetes’ distributed key-value store that:
- Think of it as the cluster’s “single source of truth”
- Stores all cluster state (pods, nodes, configs)
- Implements leader election for consistency
- Maintains change history through raft logs
⚠️ Production Alert: etcd requires dedicated SSDs. HDDs cause cluster instability! This is your cluster’s most critical component.
3. kube-scheduler
- Watches for newly created pods with no assigned node
- Selects the best worker node based on resource requirements
- Considers factors like CPU, memory, and affinity rules
4. kube-controller-manager
- Runs multiple controllers in a single process
- Node Controller: Monitors node health
- Replication Controller: Maintains desired number of pods
- Service Controller: Creates cloud load balancers
Step 2: Understanding Worker Nodes
Worker nodes are your compute engines – where application pods live. But here’s what most miss: A single worker can host 100+ pods, but requires careful resource planning (covered in Post #15).
Key Components of Worker Node:
# Worker Node Components apiVersion: v1 kind: Node metadata: name: worker-node-01 spec: components: - kubelet: Node agent that communicates with master - kube-proxy: Network proxy for services - container-runtime: containerd/CRI-O for running containers (Docker deprecated) Component Details:
- kubelet explained
The kubelet is Kubernetes’ primary node agent responsible for:
- The primary node agent
- Communicates with kube-apiserver
- Manages pods and containers lifecycle
- Reports node and pod status back to master
- Pod lifecycle management (start/stop containers)
- Executing health checks (liveness/readiness probes)
- Mounting storage volumes
**Critical Insight:** If kubelet crashes, the node appears as `NotReady` and stops receiving new workloads. Always monitor `kubelet_service_restarts_total` metric.
2. kube-proxy
- Maintains network rules on nodes
- Implements Kubernetes Service concept
- Handles load balancing for services
3. Container Runtime
- Downloads images and runs containers
- Current default: containerd (Docker deprecated in Kubernetes 1.24+)
- Other options: CRI-O, Docker (via dockershim compatibility)
Step 3: How Components Communicate
The magic happens through API calls and network communication:

# Example: How a pod creation flows through the system # 1. User runs kubectl command kubectl create deployment nginx --image=nginx # 2. kubectl sends REST API call to kube-apiserver # 3. kube-apiserver validates request and stores in etcd # 4. kube-scheduler notices new pod, selects node # 5. kubelet on selected node pulls image and starts container # 6. kube-proxy updates network rules for service discovery 
❓ Check Understanding: When a pod is created, which component…
- a) First stores its metadata? (Answer: etcd)
- b) Assigns it to a node? (Answer: kube-scheduler)
- c) Actually runs it? (Answer: kubelet)
Step 4: Examining a Real Cluster
If you have access to a Kubernetes cluster, you can explore the architecture:
# View cluster information kubectl cluster-info # Expected output: # Kubernetes control plane is running at https://your-cluster-api-server # CoreDNS is running at https://your-cluster-api-server/api/v1/namespaces/kube-system/services/kube-dns:dns/proxy # List all nodes in the cluster kubectl get nodes # Expected output: # NAME STATUS ROLES AGE VERSION # master-node Ready control-plane 30d v1.28.0 # worker-node-1 Ready <none> 30d v1.28.0 # worker-node-2 Ready <none> 30d v1.28.0 # Get detailed node information kubectl describe node master-node Step 5: Understanding Node Roles and Labels
# View node labels to understand roles kubectl get nodes --show-labels # Master nodes typically have: # node-role.kubernetes.io/control-plane= # node.kubernetes.io/exclude-from-external-load-balancers= # Worker nodes might have: # node-role.kubernetes.io/worker=worker Step 6: Exploring System Pods
System pods run the Kubernetes components:
# View system pods (master node components) kubectl get pods -n kube-system # Expected output includes: # etcd-master-node # kube-apiserver-master-node # kube-controller-manager-master-node # kube-scheduler-master-node # kube-proxy-xxxxx (one per node) Verification Steps:
- ✅ You can explain the role of master vs worker nodes
- ✅ You understand what each component does
- ✅ You can identify system pods in a cluster
- ✅ You grasp the communication flow
Real-World Scenarios
Scenario 1: E-commerce Platform Architecture
Imagine you’re running an e-commerce platform like Amazon:
# Production cluster might look like: # 3 Master nodes (high availability) # - Handle 1000s of API requests per second # - Store product catalog, user data, order information in etcd # - Schedule pods across multiple availability zones # 50+ Worker nodes distributed across regions # - Frontend pods (React applications) # - Backend API pods (microservices) # - Database pods (with persistent storage) # - Cache pods (Redis) Master nodes coordinate everything: when a user places an order, the scheduler decides which worker node should handle the payment processing pod, while controllers ensure the right number of inventory-checking pods are always running.
Scenario 2: Development vs Production Clusters
Development Cluster:
- Single master node (cost-effective)
- 2-3 worker nodes
- Less strict resource requirements
Production Cluster:
- 3+ master nodes (high availability)
- 10+ worker nodes (workload distribution)
- Strict resource isolation and security
Best practices:
- Never run application pods on master nodes in production
- Always have odd number of master nodes (3, 5, 7) for etcd quorum
- Monitor etcd health closely – it’s your single point of failure
- Use node taints to dedicated worker nodes for specific workloads
Common mistakes:
- Running a single master in production (no high availability)
- Not monitoring etcd disk space and performance
- Mixing master and worker roles without understanding the implications
Troubleshooting Tips
Common Error 1: “The connection to the server was refused”
Solution:
# Check if kube-apiserver is running kubectl get pods -n kube-system | grep apiserver # If not running, check the logs sudo journalctl -u kubelet -f Common Error 2: Nodes showing “NotReady” status
Solution:
# Check node status details kubectl describe node <node-name> # Common causes: # - kubelet not running # - Network plugin issues # - Disk space full Common Error 3: etcd Issues
etcd disk full:
# Check etcd health (on control plane node) sudo ETCDCTL_API=3 etcdctl --cert=/etc/kubernetes/pki/etcd/server.crt \ --key=/etc/kubernetes/pki/etcd/server.key --cacert=/etc/kubernetes/pki/etcd/ca.crt endpoint health etcd leader election failures:
- Usually indicates network partitioning between master nodes
- Check master node connectivity and etcd member status
Debug Commands:
# Essential cluster health commands kubectl get --raw='/readyz?verbose' # Control plane health (replaces deprecated componentstatuses) kubectl get nodes -o wide # Detailed node information kubectl top nodes # Resource usage kubectl get events --sort-by=.metadata.creationTimestamp # Recent events Where to get help:
- Official Kubernetes Architecture Documentation
- Kubernetes Slack Community (#kubernetes-users channel)
- Stack Overflow kubernetes tag
Kubernetes Architecture FAQs
General Architecture Questions
Kubernetes Master Node vs Worker Node: Key Differences
Master nodes (control plane) are the “brain” that makes decisions and coordinates the cluster, while worker nodes are the “muscle” that actually run your application containers. Master nodes don’t run your applications – they manage and schedule them. Worker nodes host the actual pods and containers.
Can I run application pods on master nodes?
Technically yes, but never in production. Master nodes should be dedicated to cluster management. Running applications on master nodes can cause resource contention and affect cluster stability. Use node taints to prevent pod scheduling on masters in production environments.
⚠️ **Production Warning:** Never run applications on masters! This causes: – Resource contention with control plane components – Stability risks during cluster operations – Security exposure of sensitive components
How many master nodes do I need?
Development/Testing: 1 master node is acceptable
Production: Always use an odd number (3, 5, or 7) for high availability
Most common: 3 master nodes provide good balance of availability and cost
Large enterprises: 5+ masters for critical workloads across multiple regions
📊 **Cloud Cost Tip:** For 99.95% uptime on AWS: – 3 masters across AZs = ~$300/month (t3.medium) – Single master outage risk = 30x higher
What happens if the master node fails?
If you have only one master, the cluster becomes read-only – existing pods keep running but you can’t create new ones or make changes. With multiple masters, the cluster continues operating normally. This is why HA (High Availability) setups are crucial for production.
Can Kubernetes Work Without Worker Nodes?
echnically yes but useless. Worker nodes execute workloads. Minimum functional cluster requires:
– 1 master node (control plane)
– 1 worker node (runs pods)
Without workers, you can manage the cluster but can’t run applications.
Kubernetes Node vs Pod vs Container: What’s the Hierarchy?
Nodes (machines) → Pods (logical units) → Containers (running processes)
One node hosts many pods, one pod contains one or more containers.
Component-Specific Questions
etcd in Kubernetes: Why It’s the Cluster’s Critical Database
A: etcd is Kubernetes’ distributed database that stores all cluster state and configuration. It’s the “single source of truth” for your cluster. If etcd fails, your entire cluster fails. That’s why it requires:
Dedicated SSDs (never HDDs)
Regular backups
Careful monitoring
Proper resource allocation
**Expert Insight:** Monitor these key etcd metrics: – `etcd_disk_wal_fsync_duration_seconds` > 10ms = Disk issues! – `etcd_server_leader_changes_seen_total` spikes = Network problems
What’s the difference between kube-scheduler and kubelet?
kube-scheduler (master): Decides where pods should run based on resource requirements and constraints
kubelet (worker): Actually runs the pods on worker nodes and reports status back to the master
Kubernetes Docker Deprecation: Why and What Changed
Docker wasn’t built specifically for Kubernetes and added unnecessary complexity. Kubernetes now uses Container Runtime Interface (CRI) with containerd or CRI-O, which are more efficient and secure. Docker containers still work – it’s just the runtime that changed.
**Security Bonus:** containerd reduces attack surface by:
– Removing Docker daemon overhead
– Using minimal OCI-compliant runtime
– Enabling native seccomp/AppArmor
Kubernetes Control Plane Components: What Are They and How Do They Work?
The 4 core components are:
1. kube-apiserver (cluster gateway)
2. etcd (distributed database)
3. kube-scheduler (pod placement)
4. kube-controller-manager (state reconciliation) [Diagram showing interaction]
Networking and Communication
How do all these components communicate?
Everything goes through the kube-apiserver using REST APIs:
kubectl → kube-apiserver → etcd (storage)
kube-scheduler → kube-apiserver → kubelet
kubelet → kube-apiserver (status updates)
Only the kube-apiserver talks directly to etcd for security reasons.
What does kube-proxy actually do?
kube-proxy maintains network rules on each node to enable service discovery and load balancing. When you create a Kubernetes Service, kube-proxy configures iptables rules (or IPVS) so traffic can reach the correct pods.
Do worker nodes talk to each other directly?
Worker nodes communicate through the master node’s kube-apiserver for cluster operations. For pod-to-pod communication, they use the cluster network (CNI) which allows direct communication between pods across nodes.
Practical Operations
How can I check if my cluster is healthy?
A: Use these essential commands:
kubectl get nodes # Node status kubectl get pods -n kube-system # System components kubectl get --raw='/readyz?verbose' # Control plane health kubectl top nodes # Resource usage My node shows “NotReady” – what should I check?
Common causes and solutions:
kubelet not running: sudo systemctl status kubelet
Network issues: Check CNI plugin pods
Disk space full: df -h on the node
Resource exhaustion: Check CPU/memory usage
Follow this diagnostic flow:

Can I add/remove nodes from a running cluster?
Yes! Kubernetes is designed for dynamic scaling:
Add nodes: Install kubelet, join to cluster with kubeadm token
Remove nodes: Drain the node, then delete it from cluster
No downtime required for worker node changes
Sizing and Planning
Kubernetes Pod Density: How Many Pods Per Node?
Default limit is 110 pods per node, but practical limits depend on:
Available CPU and memory
Network bandwidth
Storage I/O capacity
Application resource requirements
Typical production nodes run 10-50 pods efficiently.
**Resource Tuning Secret:**
Increase pod limit by:
# Edit kubelet config
MAX_PODS=250
sudo sed -i “s/–max-pods=.*/–max-pods=$MAX_PODS/” /etc/kubernetes/kubelet.conf
sudo systemctl restart kubelet
Kubernetes Hardware Requirements: Master and Worker Node Sizing
Master nodes: 2 CPU, 2GB RAM, 20GB storage minimum (4 CPU, 8GB RAM recommended for production)
Worker nodes: 1 CPU, 1GB RAM minimum (varies greatly based on workload)
etcd: Requires fast SSDs – this is non-negotiable for stability
Should I run databases in Kubernetes?
It depends:
Stateless apps: Perfect for Kubernetes
Databases: Possible with StatefulSets and persistent volumes, but requires expertise
Production databases: Many prefer managed services (RDS, Cloud SQL) for simplicity
Development/testing: Kubernetes is great for database containers
Troubleshooting
“The connection to the server was refused” – what’s wrong?
A: Usually means kube-apiserver is down. Check:
Is the master node running?
Are system pods healthy? kubectl get pods -n kube-system
Check kubelet logs: sudo journalctl -u kubelet -f
Verify network connectivity to the API server
How do I backup my cluster?
A: Focus on etcd backups since it contains all cluster state:
# Backup etcd ETCDCTL_API=3 etcdctl snapshot save backup.db \ –endpoints=https://127.0.0.1:2379 \ –cacert=/etc/kubernetes/pki/etcd/ca.crt \ –cert=/etc/kubernetes/pki/etcd/server.crt \ –key=/etc/kubernetes/pki/etcd/server.key
Also backup:
Kubernetes manifests and configurations
Persistent volume data
Application-specific data
Can I upgrade Kubernetes components individually?
Follow the official upgrade order:
etcd (if external)
kube-apiserver
kube-controller-manager and kube-scheduler
kubelet and kube-proxy
CNI plugins
Never skip minor versions – upgrade sequentially (1.27 → 1.28 → 1.29)
**Upgrade Hack:** Use this automated check:
kubectl get endpoints kube-scheduler -n kube-system \
-o jsonpath='{.metadata.annotations.control-plane\.alpha\.kubernetes\.io/leader}’ \
| jq .holderIdentity
Advanced Questions
What’s the difference between a node and a pod?
Node: Physical or virtual machine that runs Kubernetes components
Pod: Smallest deployable unit containing one or more containers
Relationship: One node can host many pods, but one pod runs on only one node
How does Kubernetes ensure high availability?
Multiple strategies:
Control plane HA: Multiple master nodes with etcd clustering
Pod distribution: Anti-affinity rules spread pods across nodes
Health checks: Automatic restart of failed containers
Load balancing: Services distribute traffic across healthy pods
Rolling updates: Zero-downtime deployments
What happens during a “split-brain” scenario?
When master nodes can’t communicate, etcd’s quorum mechanism prevents data corruption. The partition with majority continues operating, while the minority becomes read-only. This is why odd numbers of masters are crucial.
**Quorum Math:** For n masters:
– Working cluster requires > n/2 nodes
– 3 masters: 2 must agree
– 5 masters: 3 must agree
Always have failure tolerance = (n-1)/2
Next Steps
What’s coming next: In Post #3, we’ll dive deep into “Docker vs ContainerD: What Changed and Why It Matters.” In our container runtime deep dive, you’ll discover why Docker was replaced and how it impacts your cluster’s security.
Additional learning:
- Explore the Kubernetes Components Interactive Tutorial
- Read about cluster networking concepts
Practice challenges:
- Try This: If you have access to a cluster, run
kubectl get pods -n kube-systemand identify which pods correspond to master node components - Explore: Use
kubectl describeon both a master and worker node – what differences do you notice in their configurations? - Think: Design a cluster architecture for a social media app with 1 million users – how many master/worker nodes would you recommend?
Community engagement: Share your cluster exploration results in the comments! What interesting configurations did you discover? Ask questions about anything that wasn’t clear – the Kubernetes community loves helping fellow learners.
🔗 Series Navigation
Previous: Post #1 – Course Introduction and Learning Path
Next: Post #3 – Docker vs ContainerD: What Changed and Why It Matters
Progress: You’re now 3% through the Kubernetes Fundamentals series! 🎉
💡 Pro Tip: Bookmark this post as a reference. As we explore pods, services, and deployments in upcoming posts, you’ll frequently need to remember how these components interact with the master and worker nodes we covered today.
📧 Never miss an update: Subscribe to get notified when new posts in this series are published. We’re building something amazing together!
Tags: kubernetes, cluster-architecture, master-node, worker-node, devops, containers, orchestration, cka-prep
10 Comments