 Michael Herman
 Let's look at how to deploy a Node/Express microservice (along with Postgres) to a Kubernetes cluster on Google Kubernetes Engine (GKE).
Dependencies:
- Docker v20.10.10
- Kubectl v1.20.8
- Google Cloud SDK v365.0.1
This article assumes that you have basic working knowledge of Docker and an understanding of microservices in general. Review the Microservices with Docker, Flask, and React course bundle for more info.
Contents
Objectives
By the end of this tutorial, you should be able to:
- Explain what container orchestration is and why you may need to use an orchestration tool
- Discuss the pros and cons of using Kubernetes over other orchestration tools like Docker Swarm and AWS Elastic Container Service (ECS)
- Explain the following Kubernetes primitives: Node, Pod, Service, Label, Deployment, Ingress, and Volume
- Spin up a Node-based microservice locally with Docker Compose
- Configure a Kubernetes cluster to run on Google Cloud Platform (GCP)
- Set up a volume to hold Postgres data within a Kubernetes cluster
- Use Kubernetes Secrets to manage sensitive information
- Run Node and Postgres on Kubernetes
- Expose a Node API to external users via a Load Balancer
What is Container Orchestration?
As you move from deploying containers on a single machine to deploying them across a number of machines, you'll need an orchestration tool to manage (and automate) the arrangement, coordination, and availability of the containers across the entire system.
Orchestration tools help with:
- Cross-server container communication
- Horizontal scaling
- Service discovery
- Load balancing
- Security/TLS
- Zero-downtime deploys
- Rollbacks
- Logging
- Monitoring
This is where Kubernetes fits in along with a number of other orchestration tools, like Docker Swarm, ECS, Mesos, and Nomad.
Which one should you use?
- use Kubernetes if you need to manage large, complex clusters
- use Docker Swarm if you are just getting started and/or need to manage small to medium-sized clusters
- use ECS if you're already using a number of AWS services
| Tool | Pros | Cons |
|---|---|---|
| Kubernetes | large community, flexible, most features, hip | complex setup, high learning curve, hip |
| Docker Swarm | easy to set up, perfect for smaller clusters | limited by the Docker API |
| ECS | fully-managed service, integrated with AWS | vendor lock-in |
There's also a number of managed Kubernetes services on the market:
- Google Kubernetes Engine (GKE)
- Elastic Container Service (EKS)
- Azure Kubernetes Service (AKS)
For more, review the Choosing the Right Containerization and Cluster Management Tool blog post.
Kubernetes Concepts
Before diving in, let's look at some of the basic building blocks that you have to work with from the Kubernetes API:
- A Node is a worker machine provisioned to run Kubernetes. Each Node is managed by the Kubernetes master.
- A Pod is a logical, tightly-coupled group of application containers that run on a Node. Containers in a Pod are deployed together and share resources (like data volumes and network addresses). Multiple Pods can run on a single Node.
- A Service is a logical set of Pods that perform a similar function. It enables load balancing and service discovery. It's an abstraction layer over the Pods; Pods are meant to be ephemeral while services are much more persistent.
- Deployments are used to describe the desired state of Kubernetes. They dictate how Pods are created, deployed, and replicated.
- Labels are key/value pairs that are attached to resources (like Pods) which are used to organize related resources. You can think of them like CSS selectors. For example:
- Environment -
dev,test,prod - App version -
beta,1.2.1 - Type -
client,server,db
- Environment -
- Ingress is a set of routing rules used to control the external access to Services based on the request host or path.
- Volumes are used to persist data beyond the life of a container. They are especially important for stateful applications like Redis and Postgres.
- A PersistentVolume defines a storage volume independent of the normal Pod-lifecycle. It's managed outside of the particular Pod that it resides in.
- A PersistentVolumeClaim is a request to use the PersistentVolume by a user.
For more, review the Learn Kubernetes Basics tutorial.
Project Setup
Start by cloning down the app from the https://github.com/testdrivenio/node-kubernetes repo:
$ git clone https://github.com/testdrivenio/node-kubernetes $ cd node-kubernetes Build the image and spin up the container:
$ docker-compose up -d --build Apply the migration and seed the database:
$ docker-compose exec web knex migrate:latest $ docker-compose exec web knex seed:run Test out the following endpoints...
Get all todos:
$ curl http://localhost:3000/todos [ { "id": 1, "title": "Do something", "completed": false }, { "id": 2, "title": "Do something else", "completed": false } ] Add a new todo:
$ curl -d '{"title":"something exciting", "completed":"false"}' \ -H "Content-Type: application/json" -X POST http://localhost:3000/todos "Todo added!" Get a single todo:
$ curl http://localhost:3000/todos/3 [ { "id": 3, "title": "something exciting", "completed": false } ] Update a todo:
$ curl -d '{"title":"something exciting", "completed":"true"}' \ -H "Content-Type: application/json" -X PUT http://localhost:3000/todos/3 "Todo updated!" Delete a todo:
$ curl -X DELETE http://localhost:3000/todos/3 Take a quick look at the code before moving on:
├── .dockerignore ├── .gitignore ├── Dockerfile ├── README.md ├── docker-compose.yml ├── knexfile.js ├── kubernetes │ ├── node-deployment-updated.yaml │ ├── node-deployment.yaml │ ├── node-service.yaml │ ├── postgres-deployment.yaml │ ├── postgres-service.yaml │ ├── secret.yaml │ ├── volume-claim.yaml │ └── volume.yaml ├── package-lock.json ├── package.json └── src ├── db │ ├── knex.js │ ├── migrations │ │ └── 20181009160908_todos.js │ └── seeds │ └── todos.js └── server.js Google Cloud Setup
In this section, we'll-
- Configure the Google Cloud SDK.
- Install kubectl, a CLI tool used for running commands against Kubernetes clusters.
- Create a GCP project.
Before beginning, you'll need a Google Cloud Platform (GCP) account. If you're new to GCP, Google provides a free trial with a $300 credit.
Start by installing the Google Cloud SDK.
If you’re on a Mac, we recommend installing the SDK with Homebrew:
$ brew update $ brew install google-cloud-sdk --cask
Test:
$ gcloud --version Google Cloud SDK 365.0.1 bq 2.0.71 core 2021.11.19 gsutil 5.5 Once installed, run gcloud init to configure the SDK so that it has access to your GCP credentials. You'll also need to either pick an existing GCP project or create a new project to work with.
Set the project:
$ gcloud config set project <PROJECT_ID> Finally, install kubectl:
$ gcloud components install kubectl Kubernetes Cluster
Next, let's create a cluster on Kubernetes Engine:
$ gcloud container clusters create node-kubernetes \ --num-nodes=3 --zone us-central1-a --machine-type g1-small This will create a three-node cluster called node-kubernetes in the us-central1-a region with g1-small machines. It will take a few minutes to spin up.
$ kubectl get nodes NAME STATUS ROLES AGE VERSION gke-node-kubernetes-default-pool-139e0343-0hbt Ready <none> 75s v1.21.5-gke.1302 gke-node-kubernetes-default-pool-139e0343-p4s3 Ready <none> 75s v1.21.5-gke.1302 gke-node-kubernetes-default-pool-139e0343-rxnc Ready <none> 75s v1.21.5-gke.1302 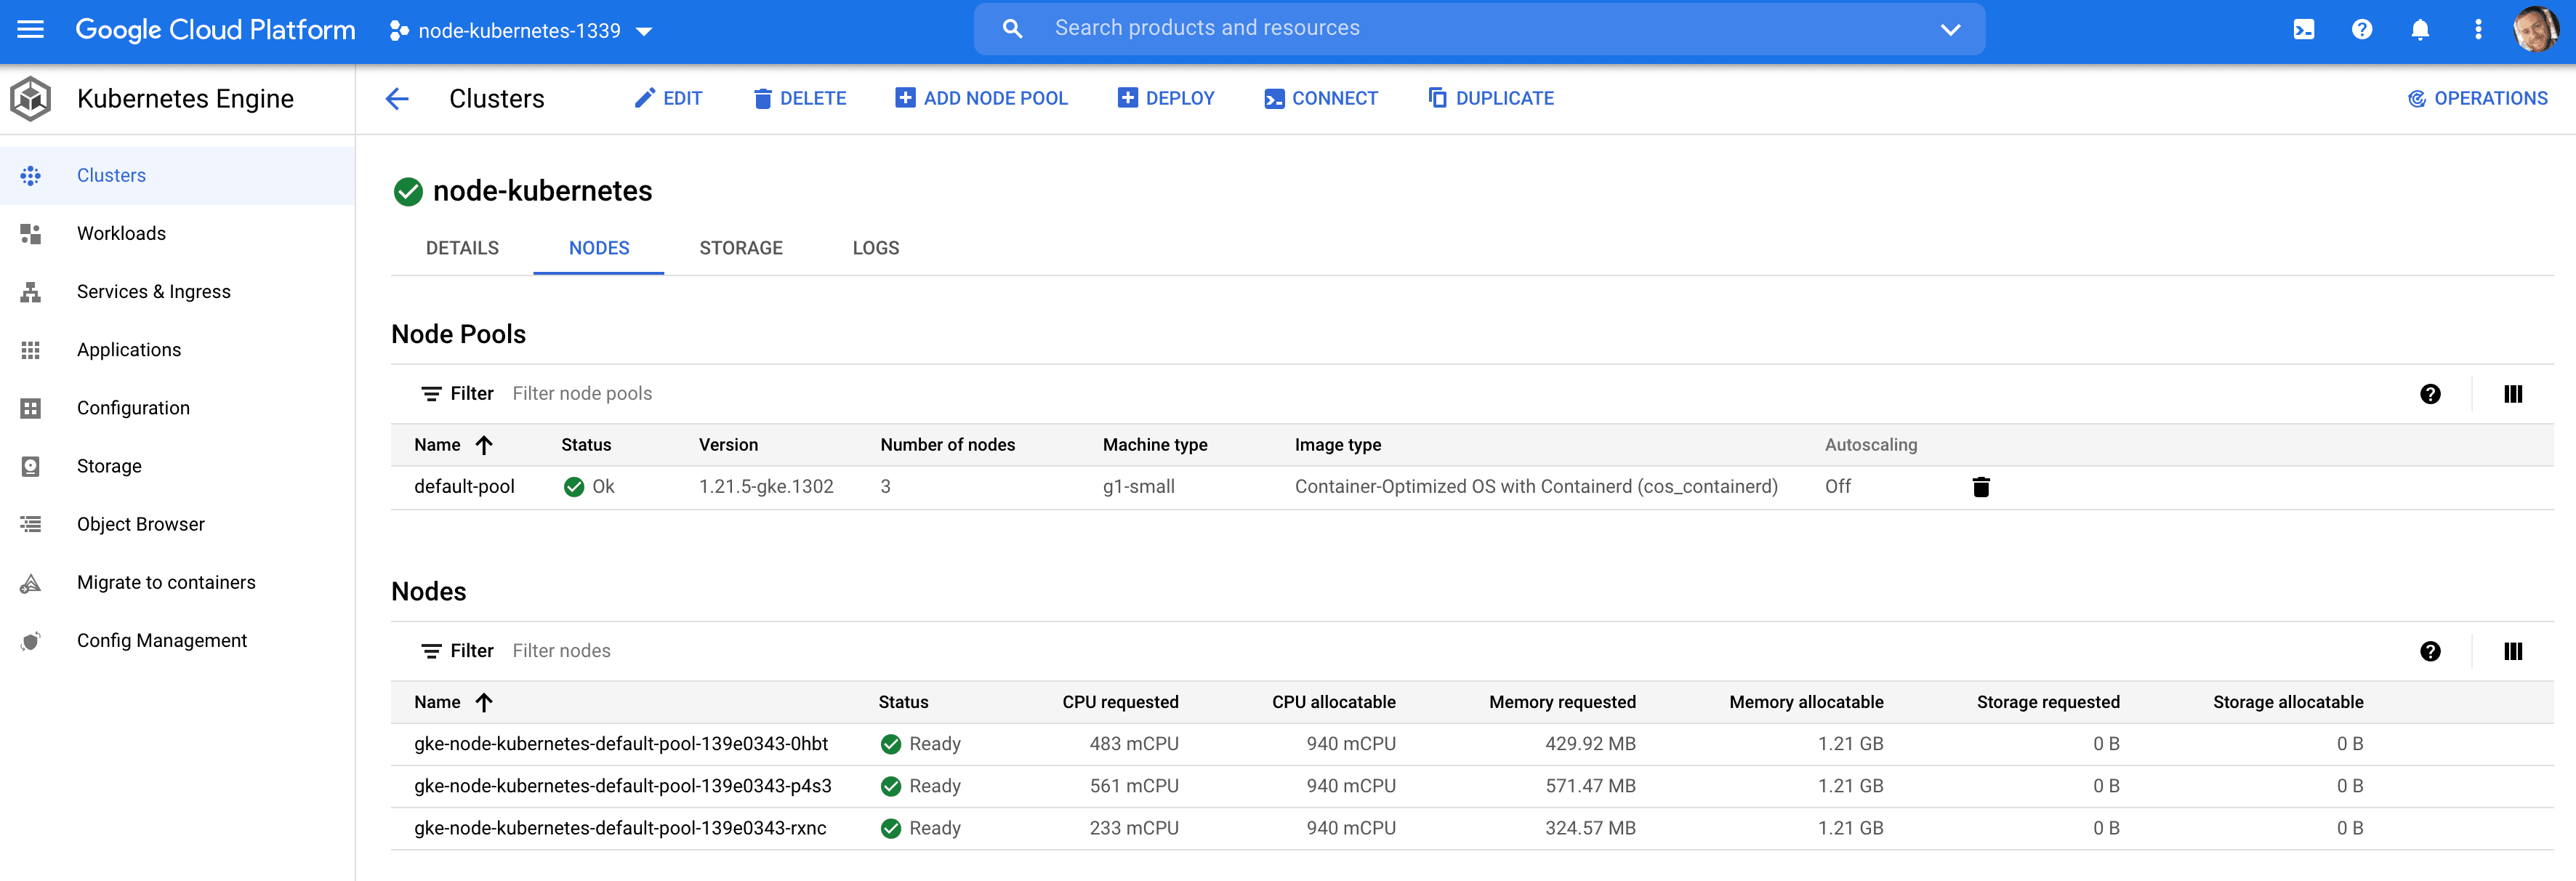
Connect the kubectl client to the cluster:
$ gcloud container clusters get-credentials node-kubernetes --zone us-central1-a Fetching cluster endpoint and auth data. kubeconfig entry generated for node-kubernetes. For help with Kubernetes Engine, please review the official docs.
Docker Registry
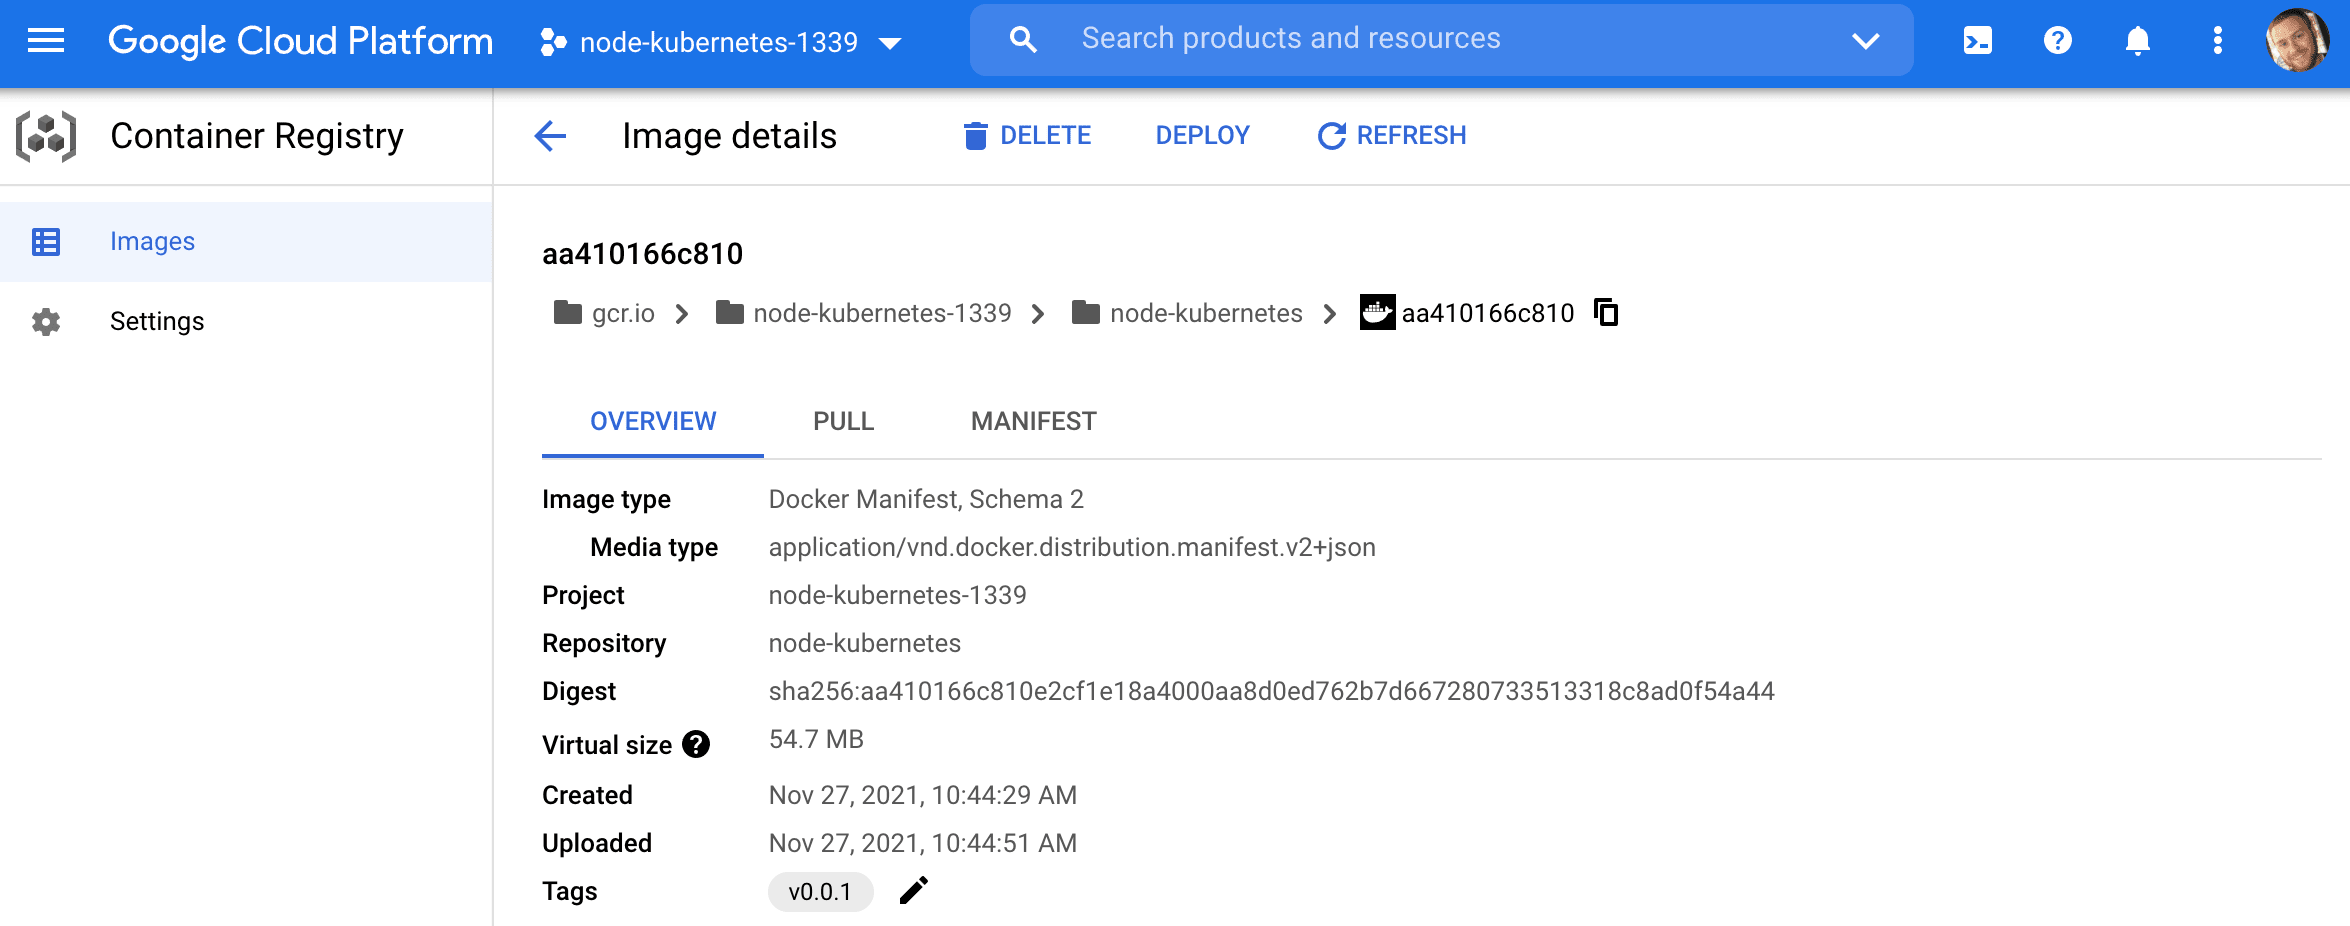
Using the gcr.io/<PROJECT_ID>/<IMAGE_NAME>:<TAG> Docker tag format, build and then push the local Docker image, for the Node API, to the Container Registry:
$ gcloud auth configure-docker $ docker build -t gcr.io/<PROJECT_ID>/node-kubernetes:v0.0.1 . $ docker push gcr.io/<PROJECT_ID>/node-kubernetes:v0.0.1 Be sure to replace
<PROJECT_ID>with the ID of your project.
Node Setup
With that, we can now run the image on a pod by creating a deployment.
kubernetes/node-deployment.yaml:
apiVersion: apps/v1 kind: Deployment metadata: name: node labels: name: node spec: replicas: 1 selector: matchLabels: app: node template: metadata: labels: app: node spec: containers: - name: node image: gcr.io/<PROJECT_ID>/node-kubernetes:v0.0.1 env: - name: NODE_ENV value: "development" - name: PORT value: "3000" restartPolicy: Always Again, be sure to replace
<PROJECT_ID>with the ID of your project.
What's happening here?
metadata- The
namefield defines the deployment name -node labelsdefine the labels for the deployment -name: node
- The
specreplicasdefine the number of pods to run -1selectorspecifies a label for the pods (must match.spec.template.metadata.labels)templatemetadatalabelsindicate which labels should be assigned to the pod -app: node
speccontainersdefine the containers associated with each podrestartPolicydefines the restart policy -Always
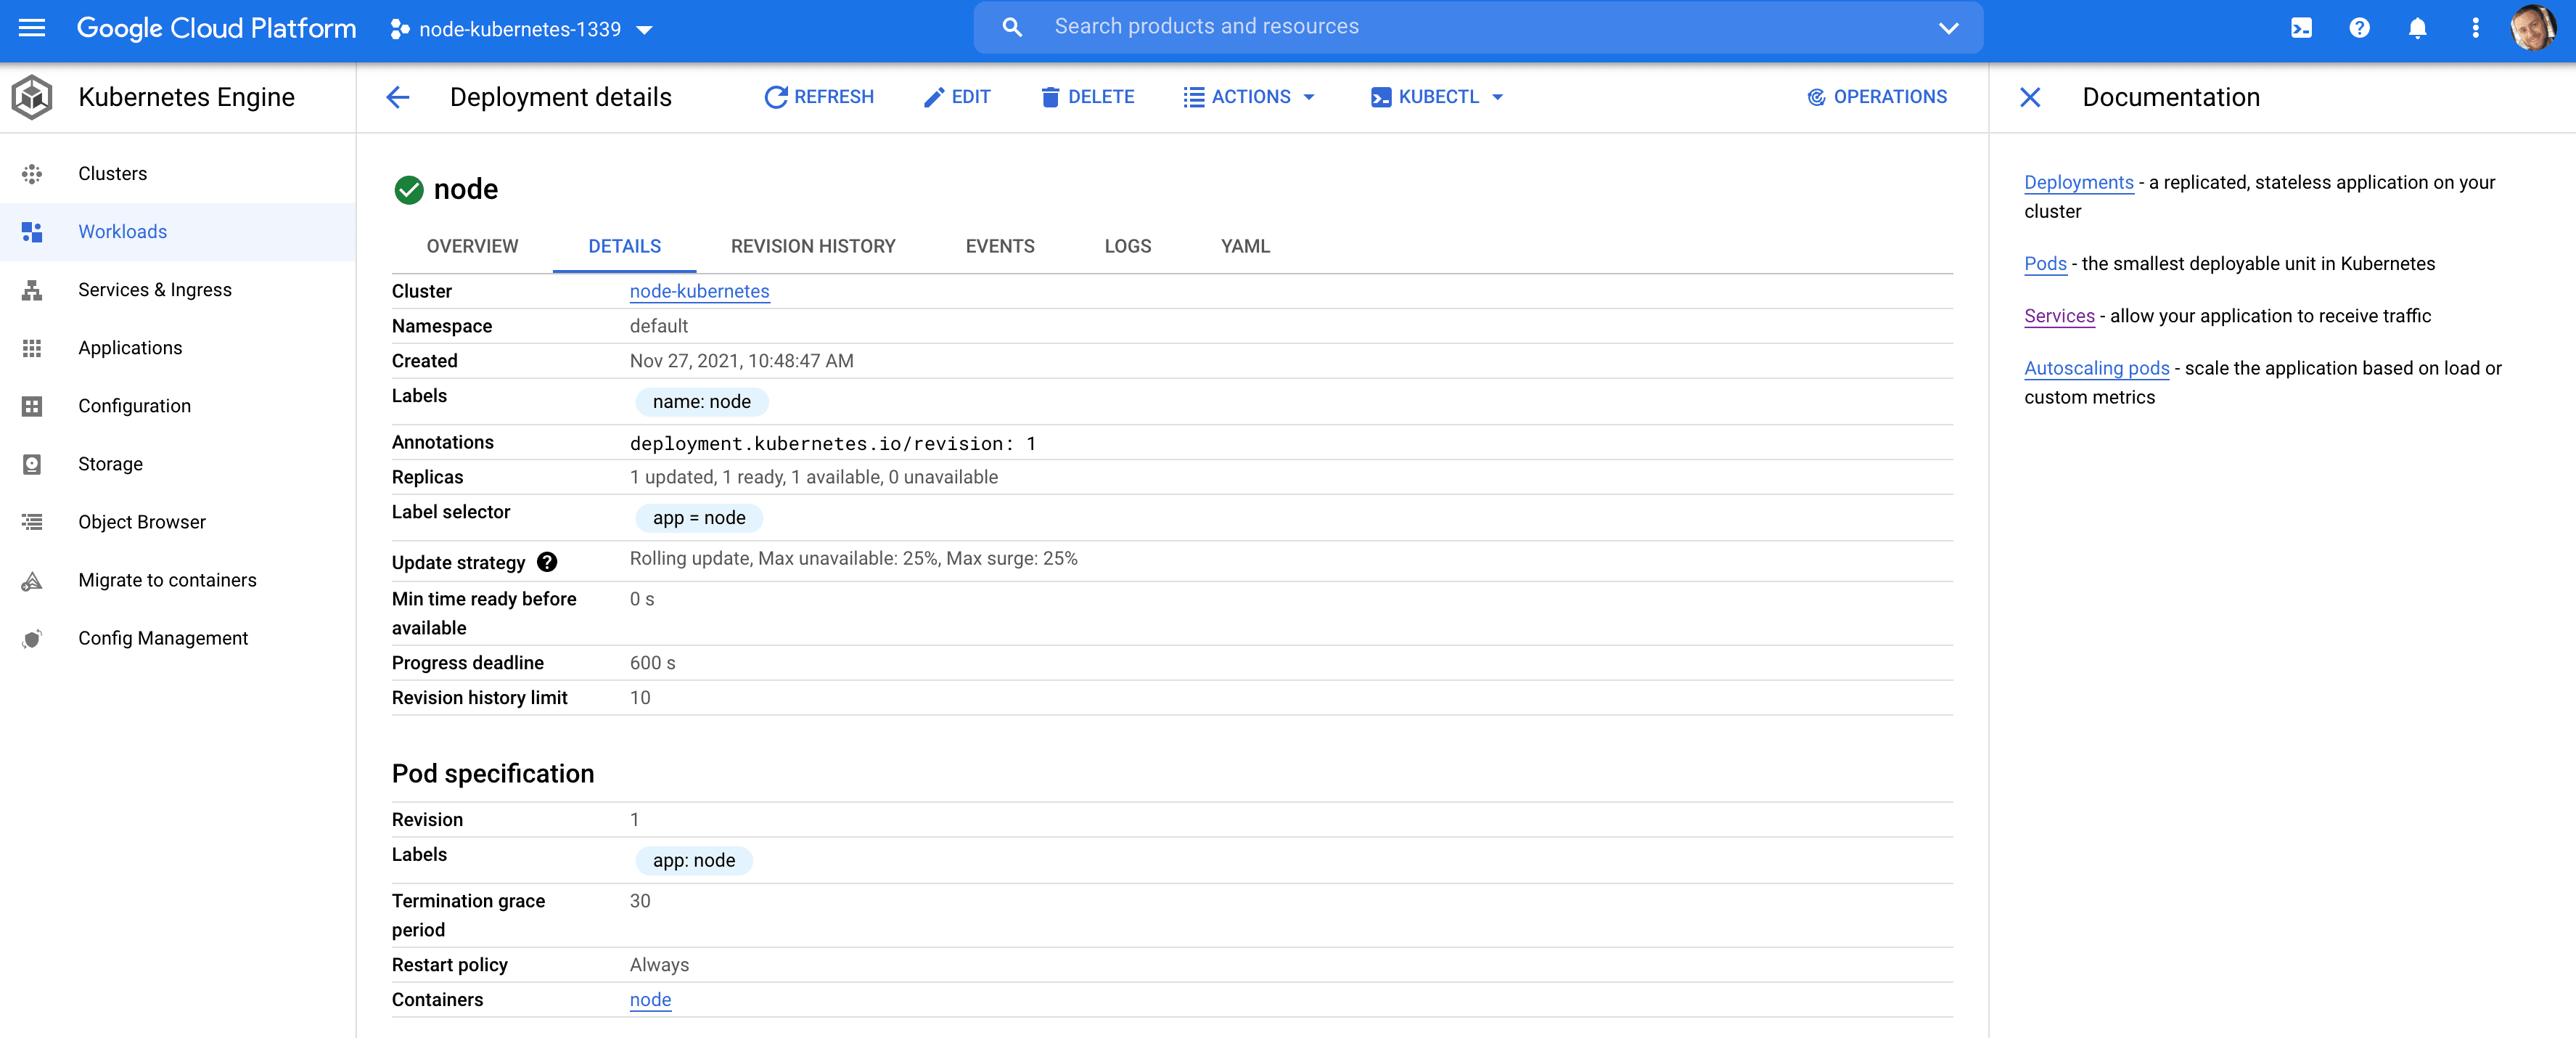
So, this will spin up a single pod named node via the gcr.io/<PROJECT_ID>/node-kubernetes:v0.0.1 image that we just pushed up.
Create:
$ kubectl create -f ./kubernetes/node-deployment.yaml Verify:
$ kubectl get deployments NAME READY UP-TO-DATE AVAILABLE AGE node 1/1 1 1 32s $ kubectl get pods NAME READY STATUS RESTARTS AGE node-59646c8856-72blj 1/1 Running 0 18s You can view the container logs via kubectl logs <POD_NAME>:
$ kubectl logs node-6fbfd984d-7pg92 > start > nodemon src/server.js [nodemon] 2.0.15 [nodemon] to restart at any time, enter `rs` [nodemon] watching path(s): *.* [nodemon] watching extensions: js,mjs,json [nodemon] starting `node src/server.js` Listening on port: 3000 You can also view these resources from the Google Cloud console:
To access your API externally, let's create a load balancer via a service.
kubernetes/node-service.yaml:
apiVersion: v1 kind: Service metadata: name: node labels: service: node spec: selector: app: node type: LoadBalancer ports: - port: 3000 This will create a serviced called node, which will find any pods with the label node and expose the port to the outside world.
Create:
$ kubectl create -f ./kubernetes/node-service.yaml This will create a new load balancer on Google Cloud:
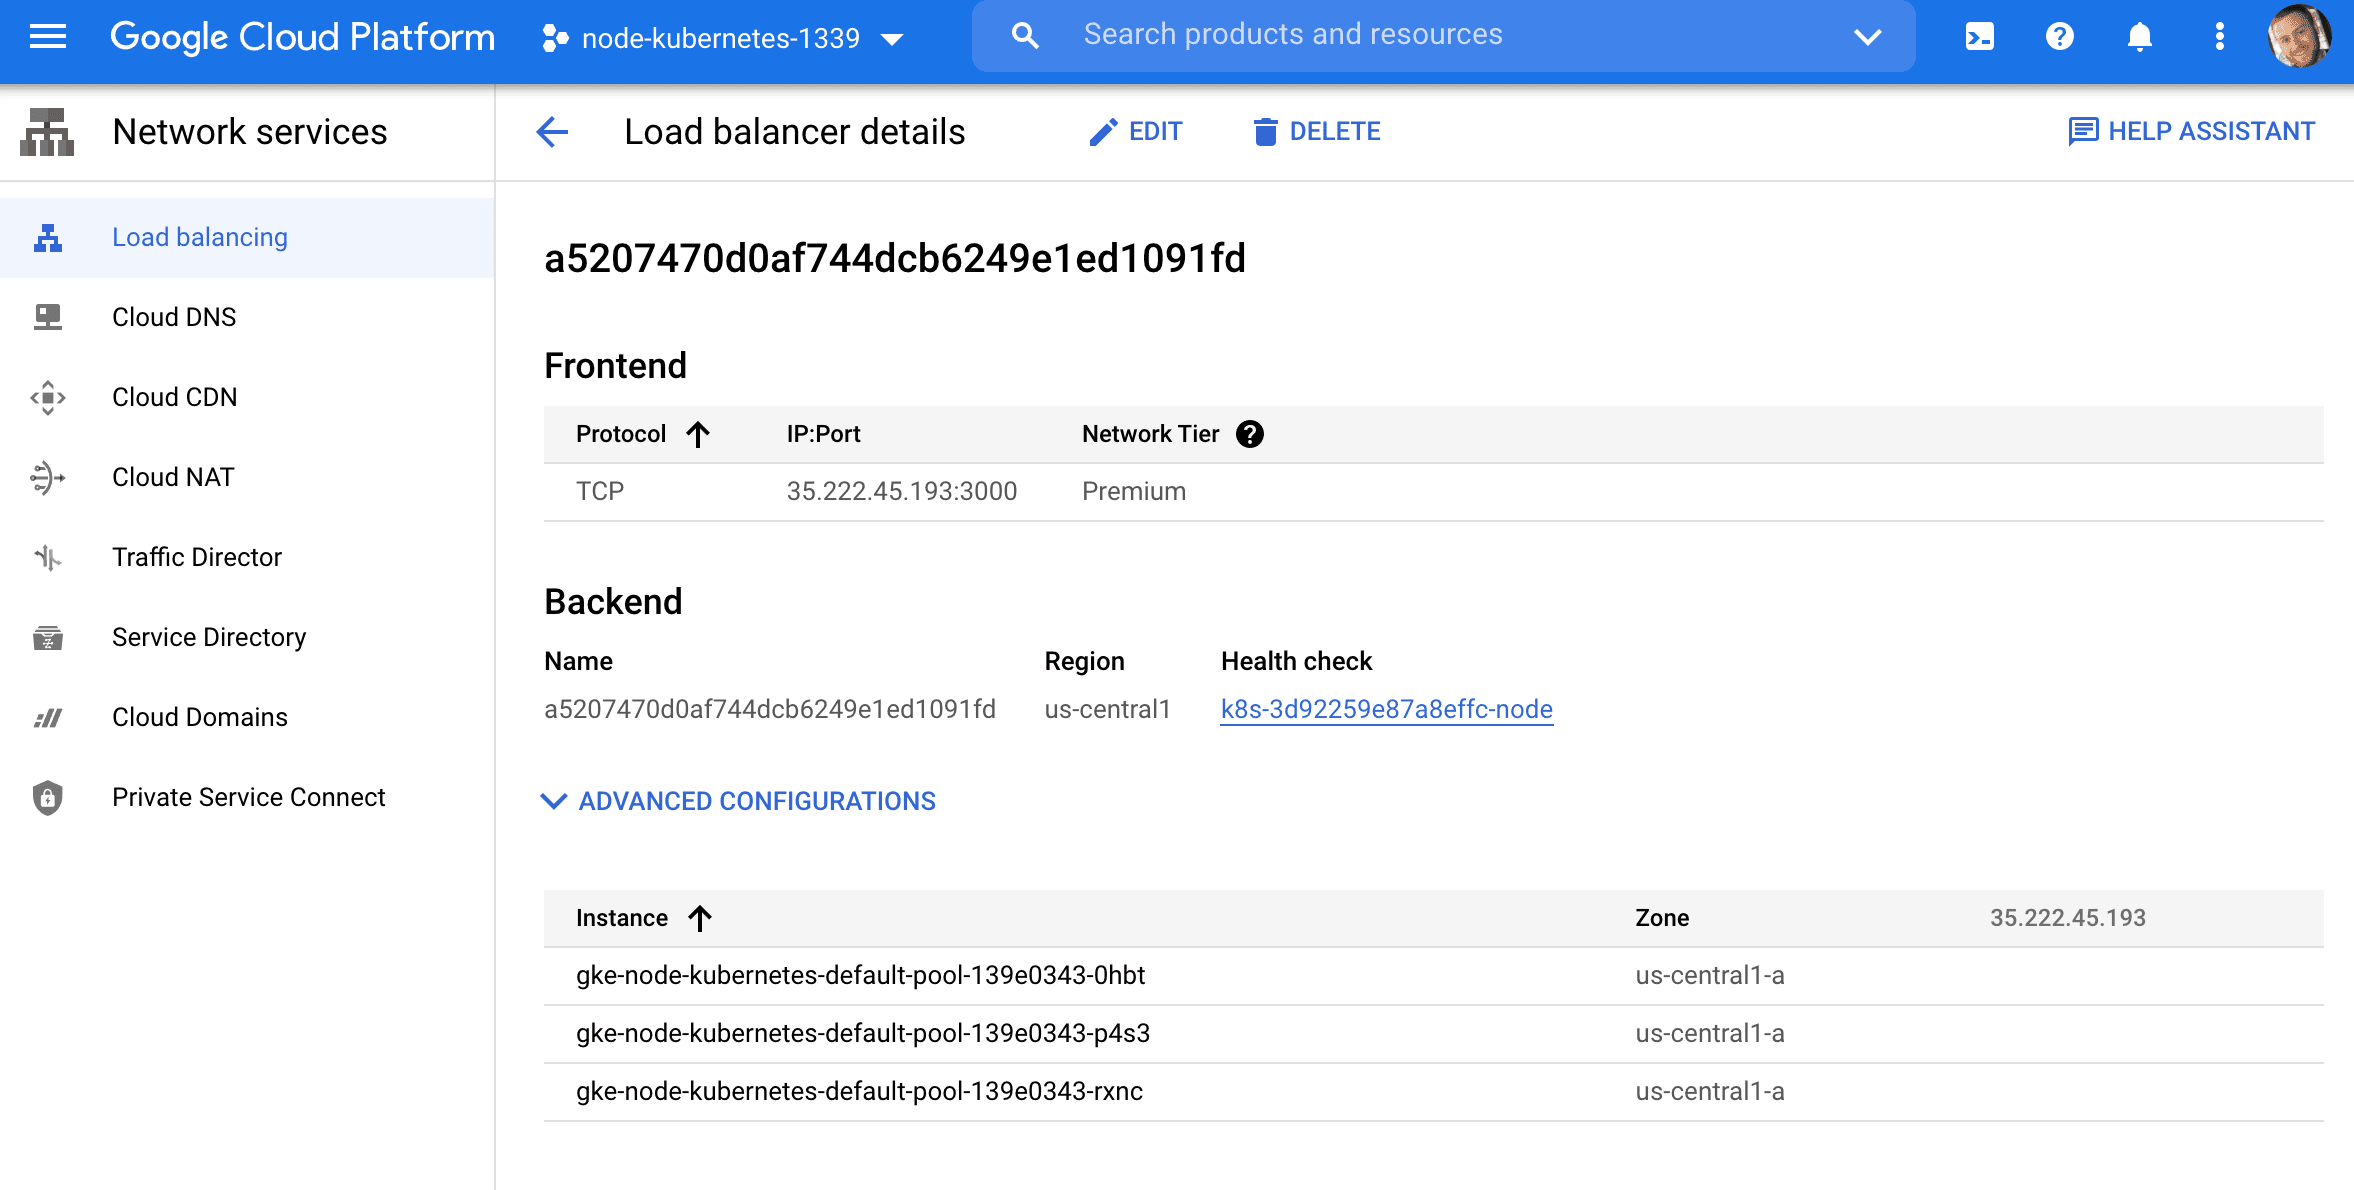
Grab the external IP:
$ kubectl get service node NAME TYPE CLUSTER-IP EXTERNAL-IP PORT(S) AGE node LoadBalancer 10.40.10.162 35.222.45.193 3000:31315/TCP 78s Test it out:
You should see "Something went wrong." when you hit the second endpoint since the database is not setup yet.
Secrets
Secrets are used to manage sensitive info such as passwords, API tokens, and SSH keys. We’ll utilize a secret to store our Postgres database credentials.
kubernetes/secret.yaml:
apiVersion: v1 kind: Secret metadata: name: postgres-credentials type: Opaque data: user: c2FtcGxl password: cGxlYXNlY2hhbmdlbWU= The user and password fields are base64 encoded strings:
$ echo -n "pleasechangeme" | base64 cGxlYXNlY2hhbmdlbWU= $ echo -n "sample" | base64 c2FtcGxl Create the secret:
$ kubectl apply -f ./kubernetes/secret.yaml Verify:
$ kubectl describe secret postgres-credentials Name: postgres-credentials Namespace: default Labels: <none> Annotations: <none> Type: Opaque Data ==== password: 14 bytes user: 6 bytes 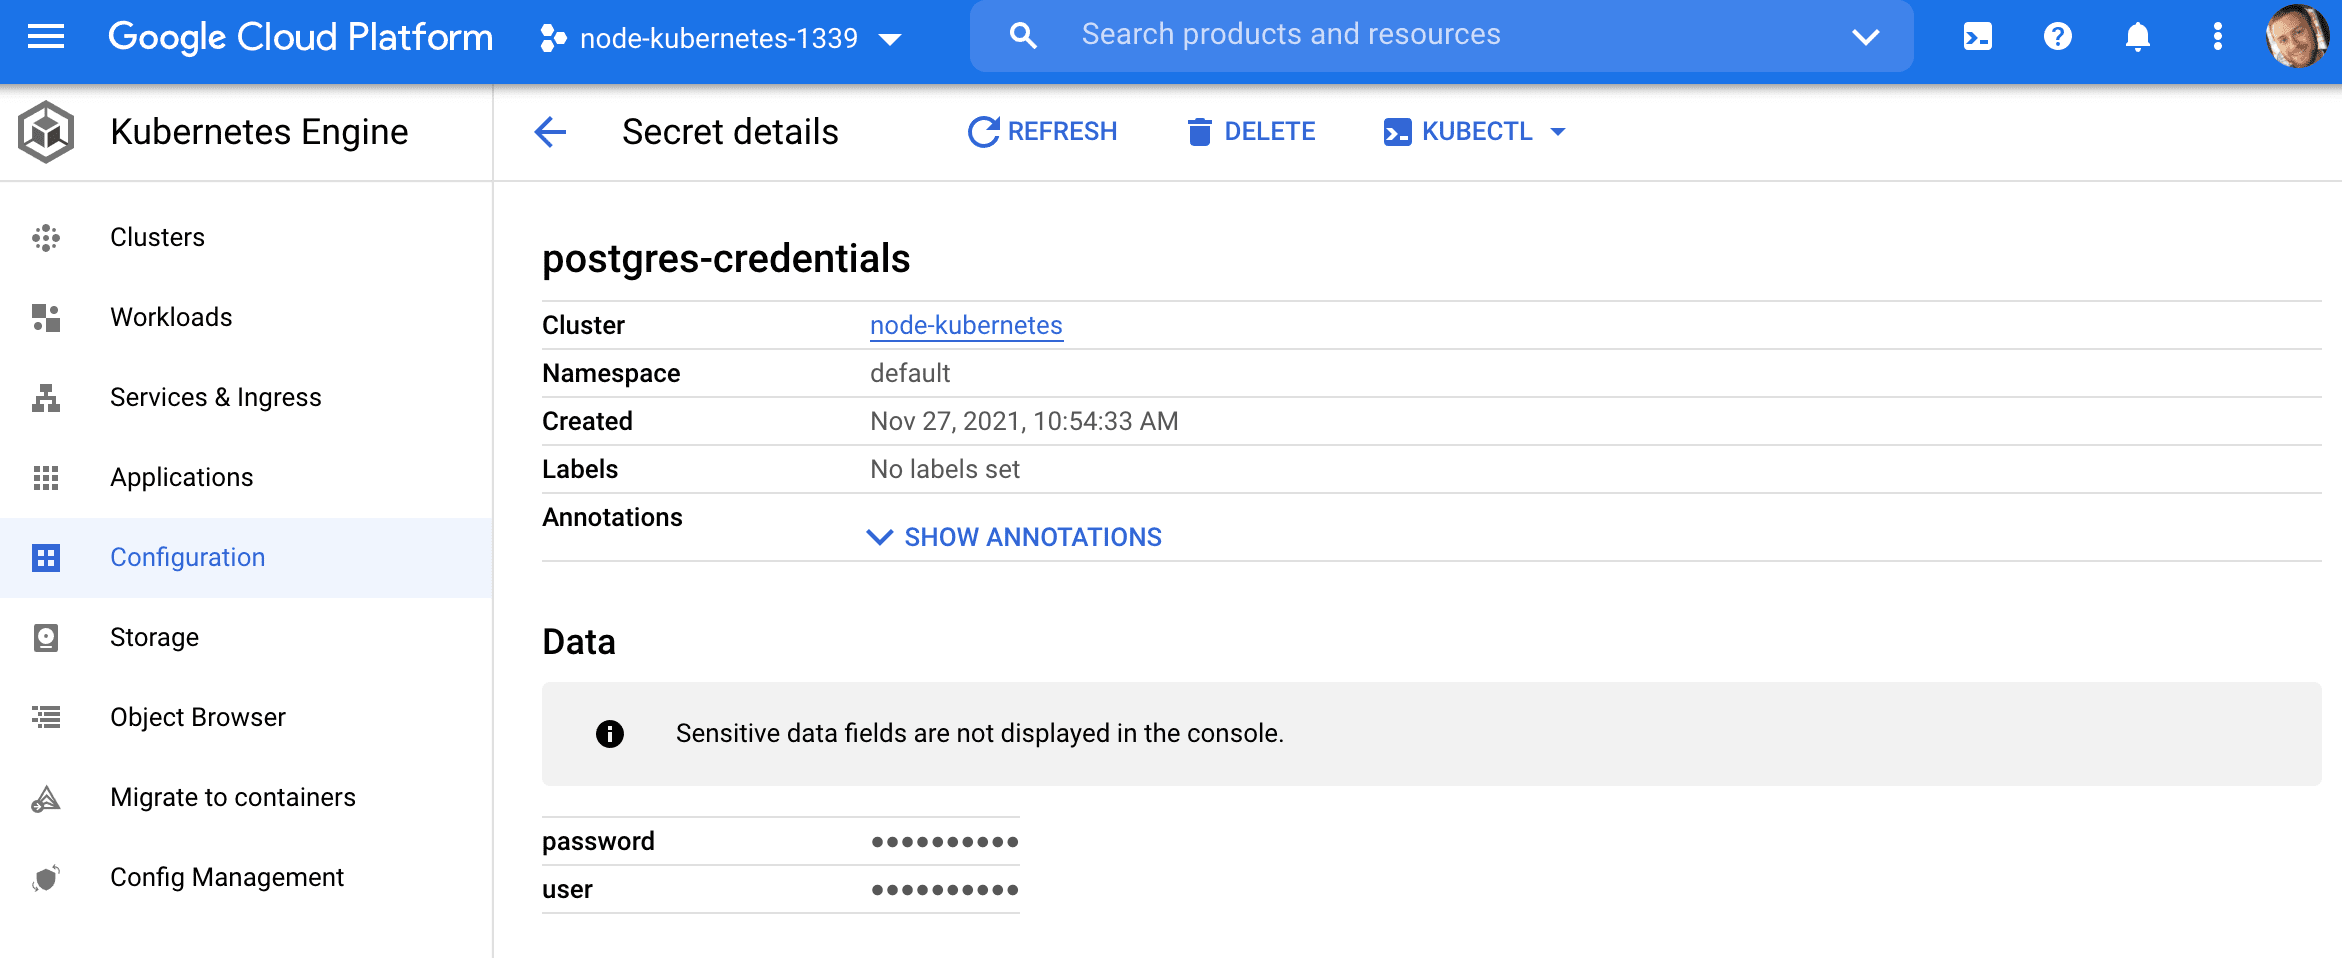
Volume
Since containers are ephemeral, we need to configure a volume, via a PersistentVolume and a PersistentVolumeClaim, to store the Postgres data outside of the pod. Without a volume, you will lose your data when the pod goes down.
Create a Persistent Disk:
$ gcloud compute disks create pg-data-disk --size 50GB --zone us-central1-a 
kubernetes/volume.yaml:
apiVersion: v1 kind: PersistentVolume metadata: name: postgres-pv labels: name: postgres-pv spec: capacity: storage: 50Gi storageClassName: standard accessModes: - ReadWriteOnce gcePersistentDisk: pdName: pg-data-disk fsType: ext4 This configuration will create a 50 gibibytes PersistentVolume with an access mode of ReadWriteOnce, which means that the volume can be mounted as read-write by a single node.
Create the volume:
$ kubectl apply -f ./kubernetes/volume.yaml Check the status:
$ kubectl get pv NAME CAPACITY ACCESS MODES RECLAIM POLICY STATUS CLAIM STORAGECLASS REASON AGE postgres-pv 50Gi RWO Retain Available standard 6s 
kubernetes/volume-claim.yaml:
apiVersion: v1 kind: PersistentVolumeClaim metadata: name: postgres-pvc labels: type: local spec: accessModes: - ReadWriteOnce resources: requests: storage: 50Gi volumeName: postgres-pv This will create a claim on the PersistentVolume (which we just created) that the Postgres pod will be able to use to attach a volume to.
Create:
$ kubectl apply -f ./kubernetes/volume-claim.yaml View:
$ kubectl get pvc NAME STATUS VOLUME CAPACITY ACCESS MODES STORAGECLASS AGE postgres-pvc Bound postgres-pv 50Gi RWO standard 6s 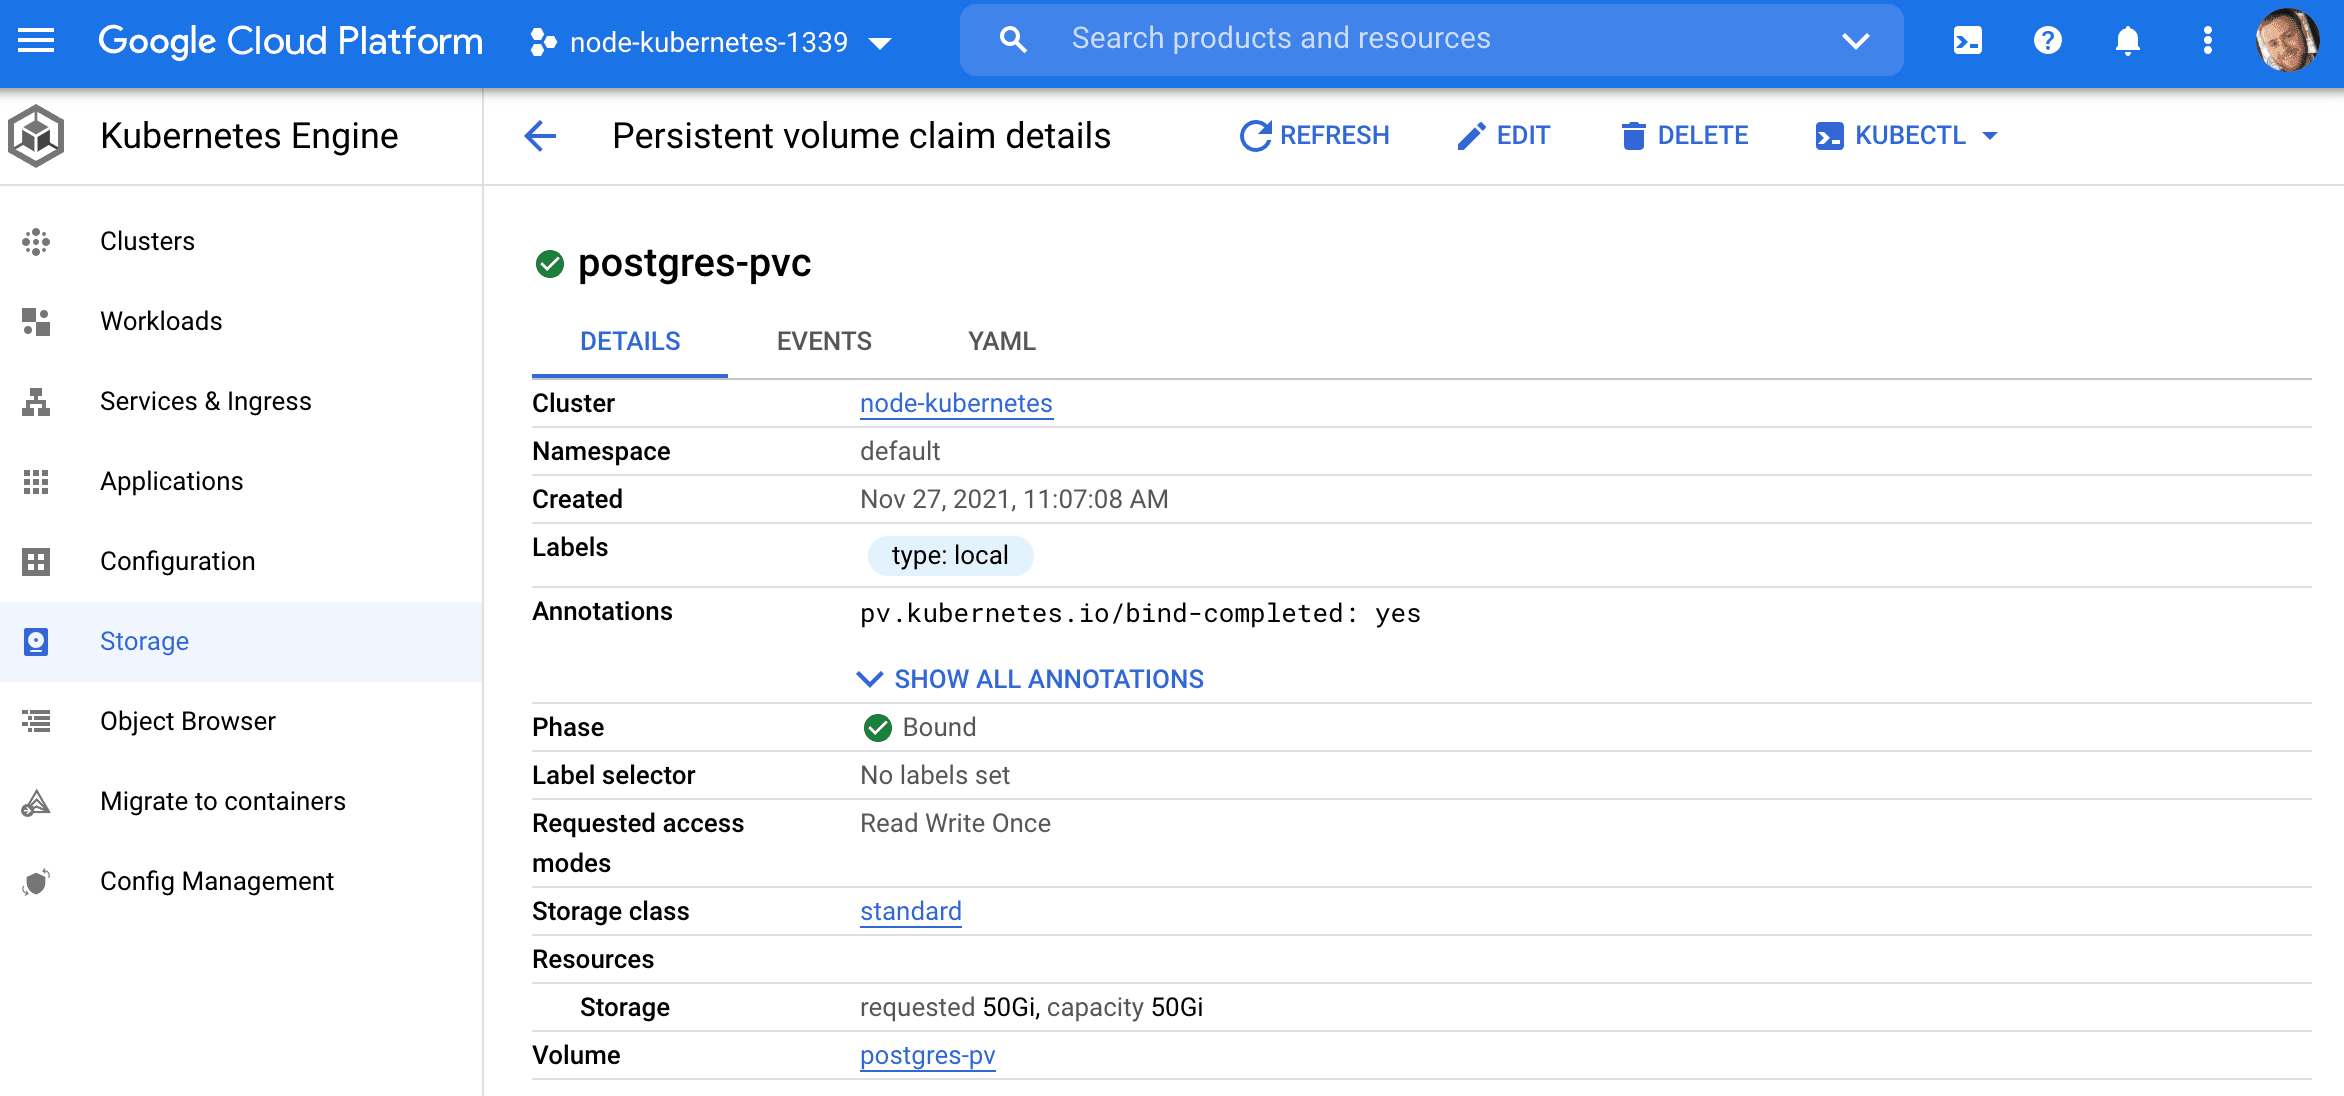
Postgres Setup
With the database credentials set up along with a volume, we can now configure the Postgres database itself.
kubernetes/postgres-deployment.yaml:
apiVersion: apps/v1 kind: Deployment metadata: name: postgres labels: name: database spec: replicas: 1 selector: matchLabels: service: postgres template: metadata: labels: service: postgres spec: containers: - name: postgres image: postgres:14-alpine volumeMounts: - name: postgres-volume-mount mountPath: /var/lib/postgresql/data subPath: postgres env: - name: POSTGRES_USER valueFrom: secretKeyRef: name: postgres-credentials key: user - name: POSTGRES_PASSWORD valueFrom: secretKeyRef: name: postgres-credentials key: password restartPolicy: Always volumes: - name: postgres-volume-mount persistentVolumeClaim: claimName: postgres-pvc Here, along with spinning up a new pod via the postgres:14-alpine image, this config mounts the PersistentVolumeClaim from the volumes section to the "/var/lib/postgresql/data" directory defined in the volumeMounts section.
Review this Stack Overflow question for more info on why we included a subPath with the volume mount.
Create:
$ kubectl create -f ./kubernetes/postgres-deployment.yaml Verify:
$ kubectl get pods NAME READY STATUS RESTARTS AGE node-59646c8856-72blj 1/1 Running 0 20m postgres-64d485d86b-vtrlh 1/1 Running 0 25s 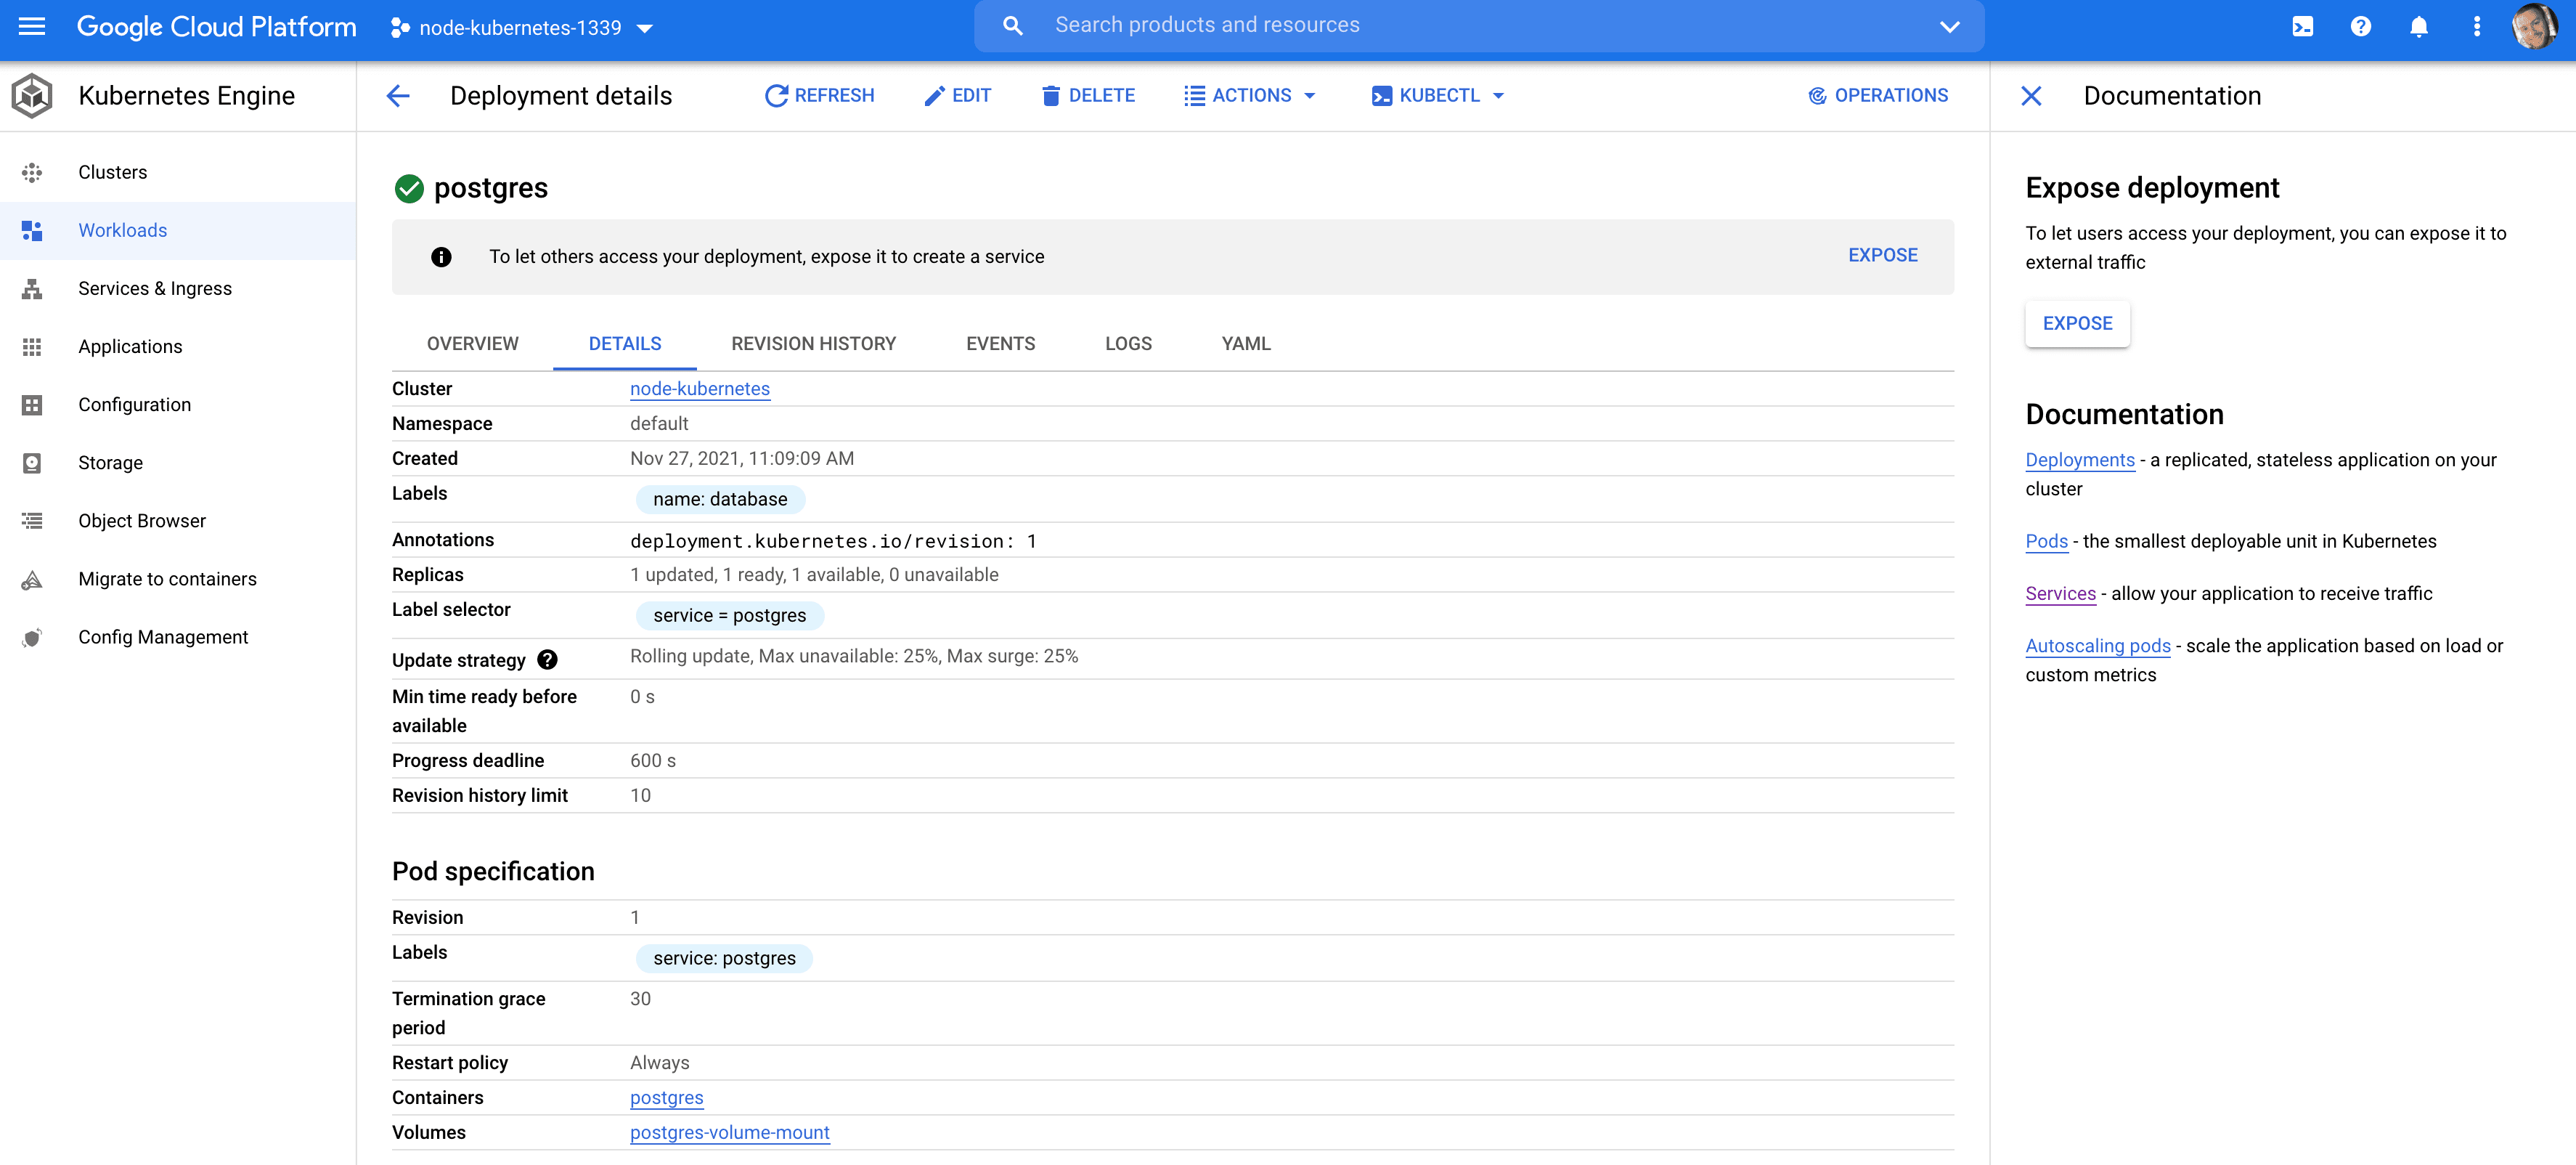
Create the todos database:
$ kubectl exec <POD_NAME> --stdin --tty -- createdb -U sample todos kubernetes/postgres-service.yaml:
apiVersion: v1 kind: Service metadata: name: postgres labels: service: postgres spec: selector: service: postgres type: ClusterIP ports: - port: 5432 This will create a ClusterIP service so that other pods can connect to it. It won't be available externally, outside the cluster.
Create the service:
$ kubectl create -f ./kubernetes/postgres-service.yaml 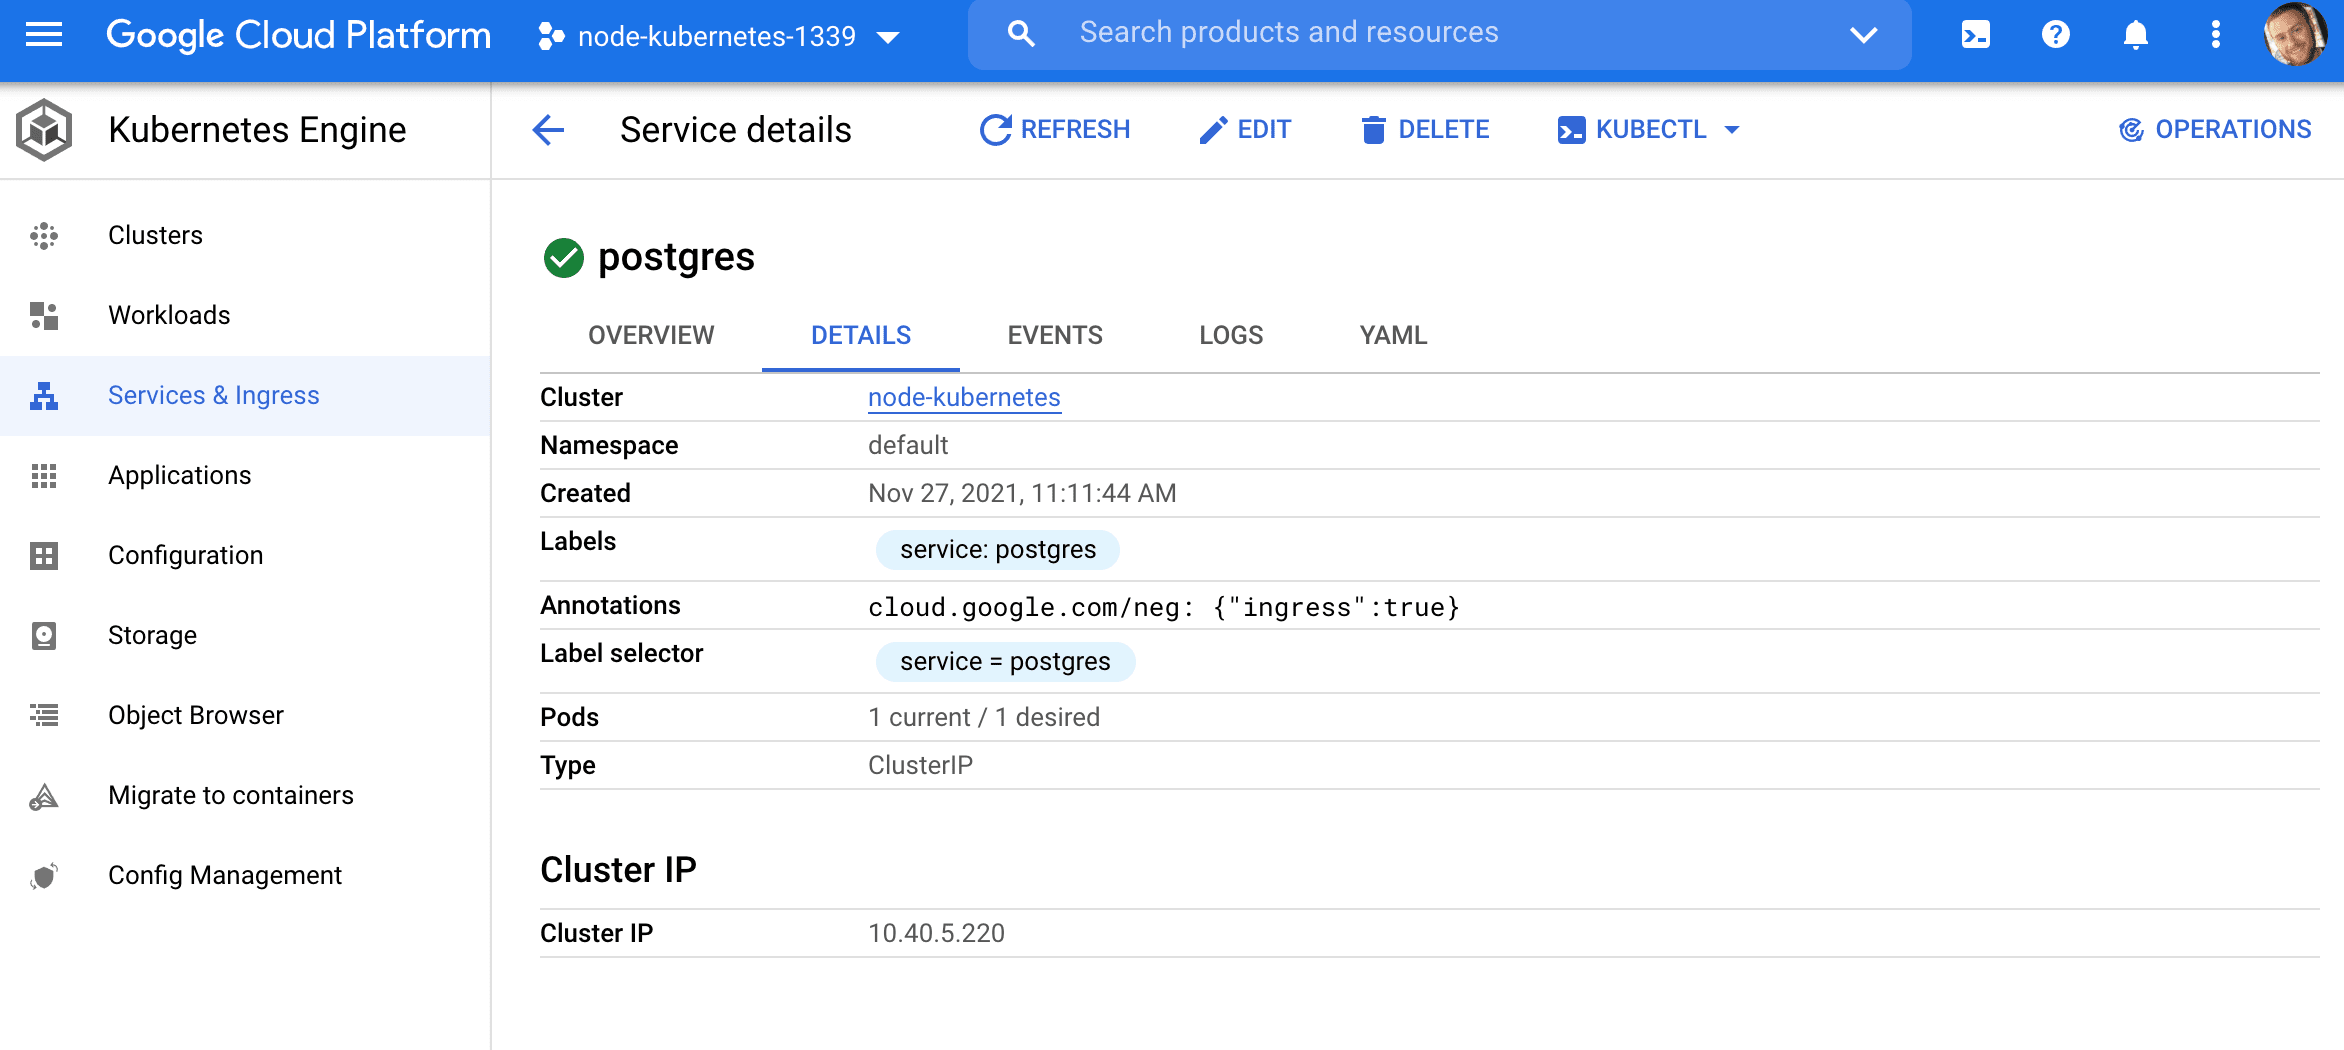
Update Node Deployment
Next, add the database credentials to the Node deployment:
kubernetes/node-deployment-updated.yaml:
apiVersion: apps/v1 kind: Deployment metadata: name: node labels: name: node spec: replicas: 1 selector: matchLabels: app: node template: metadata: labels: app: node spec: containers: - name: node image: gcr.io/<PROJECT_ID>/node-kubernetes:v0.0.1 # update env: - name: NODE_ENV value: "development" - name: PORT value: "3000" - name: POSTGRES_USER valueFrom: secretKeyRef: name: postgres-credentials key: user - name: POSTGRES_PASSWORD valueFrom: secretKeyRef: name: postgres-credentials key: password restartPolicy: Always Create:
$ kubectl delete -f ./kubernetes/node-deployment.yaml $ kubectl create -f ./kubernetes/node-deployment-updated.yaml Verify:
$ kubectl get pods NAME READY STATUS RESTARTS AGE node-64c45d449b-9m7pf 1/1 Running 0 9s postgres-64d485d86b-vtrlh 1/1 Running 0 4m7s Using the node pod, update the database:
$ kubectl exec <POD_NAME> knex migrate:latest $ kubectl exec <POD_NAME> knex seed:run Test it out again:
You should now see the todos:
[ { "id": 1, "title": "Do something", "completed": false }, { "id": 2, "title": "Do something else", "completed": false } ] Conclusion
In this post we looked at how to run a Node-based microservice on Kubernetes with GKE. You should now have a basic understanding of how Kubernetes works and be able to deploy a cluster with an app running on it to Google Cloud.
Be sure to bring down the resources (cluster, persistent disc, image on the container registry) when done to avoid incurring unnecessary charges:
$ kubectl delete -f ./kubernetes/node-service.yaml $ kubectl delete -f ./kubernetes/node-deployment-updated.yaml $ kubectl delete -f ./kubernetes/secret.yaml $ kubectl delete -f ./kubernetes/volume-claim.yaml $ kubectl delete -f ./kubernetes/volume.yaml $ kubectl delete -f ./kubernetes/postgres-deployment.yaml $ kubectl delete -f ./kubernetes/postgres-service.yaml $ gcloud container clusters delete node-kubernetes --zone us-central1-a $ gcloud compute disks delete pg-data-disk --zone us-central1-a $ gcloud container images delete gcr.io/<PROJECT_ID>/node-kubernetes:v0.0.1 Additional Resources:
You can find the code in the node-kubernetes repo on GitHub.