Dockerizing Celery and FastAPI
Part 1, Chapter 5
Objectives
By the end of this chapter, you will be able to:
- Explain what Docker Compose is used for and why you may want to use it
- Use Docker Compose to create and manage FastAPI, Postgres, Redis, and Celery
- Speed up the development of an application using Docker and Docker Compose
Docker Compose
Docker Compose is a tool used for defining and running multi-container Docker applications. It uses YAML files to configure the application's services and performs the creation and start-up processes for all of the containers with a single command.
We've already looked at how to serve up an instance of Redis with Docker using a single command:
$ docker run -p 6379:6379 --name some-redis -d redis Well, in this chapter, we'll take this a step further and containerize our entire infrastructure to simplify development. Before we do that though, let's look at the why: Why should we serve up our development environment in Docker containers with Docker Compose?
- Instead of having to run each process (e.g., Uvicorn/FastAPI, Celery worker, Celery beat, Flower, Redis, Postgres, etc.) manually, each from a different terminal window, after we containerize each service, Docker Compose enables us to manage and run the containers using a single command.
- Docker Compose will also simplify configuration. The Celery config is currently tied to our FastAPI app's config. This is not ideal. With Docker Compose, we can easily create different configurations for both FastAPI and Celery all from a single YAML file.
- Docker, in general, allows us to create isolated, reproducible, and portable development environments. So, you won't have to mess around with a virtual environment or install tools like Postgres and Redis on your local OS.
Install Docker Compose
Start by downloading and installing Docker if you haven't already done so.
If you're on a Mac or Windows machine, Docker Desktop will install both Docker and Docker Compose. Linux users will have to download and install them separately.
$ docker --version Docker version 20.10.16, build aa7e414 $ docker compose version Docker Compose version v2.6.0 If
docker compose versionis not working for you, trydocker-compose versionand review Migrate to Compose V2.
Config File Structure
Let's start with our config file structure, which should help you better understand the entire workflow:
├── alembic ├── # files omitted for brevity ├── alembic.ini ├── compose │ └── local │ └── fastapi │ ├── Dockerfile │ ├── celery │ │ ├── beat │ │ │ └── start │ │ ├── flower │ │ │ └── start │ │ └── worker │ │ └── start │ ├── entrypoint │ └── start ├── docker-compose.yml ├── main.py ├── project ├── # files omitted for brevity ├── requirements.txt Don't create the new files and folders just yet; we'll create them throughout the remainder of the chapter.
With Docker Compose, you describe the desired end state of your environment using a declarative syntax in a docker-compose.yml file.
The "compose" folder holds configuration files, shell scripts, and the associated Dockerfiles for each environment.
Application Services
Start by adding a docker-compose.yml file to the project root:
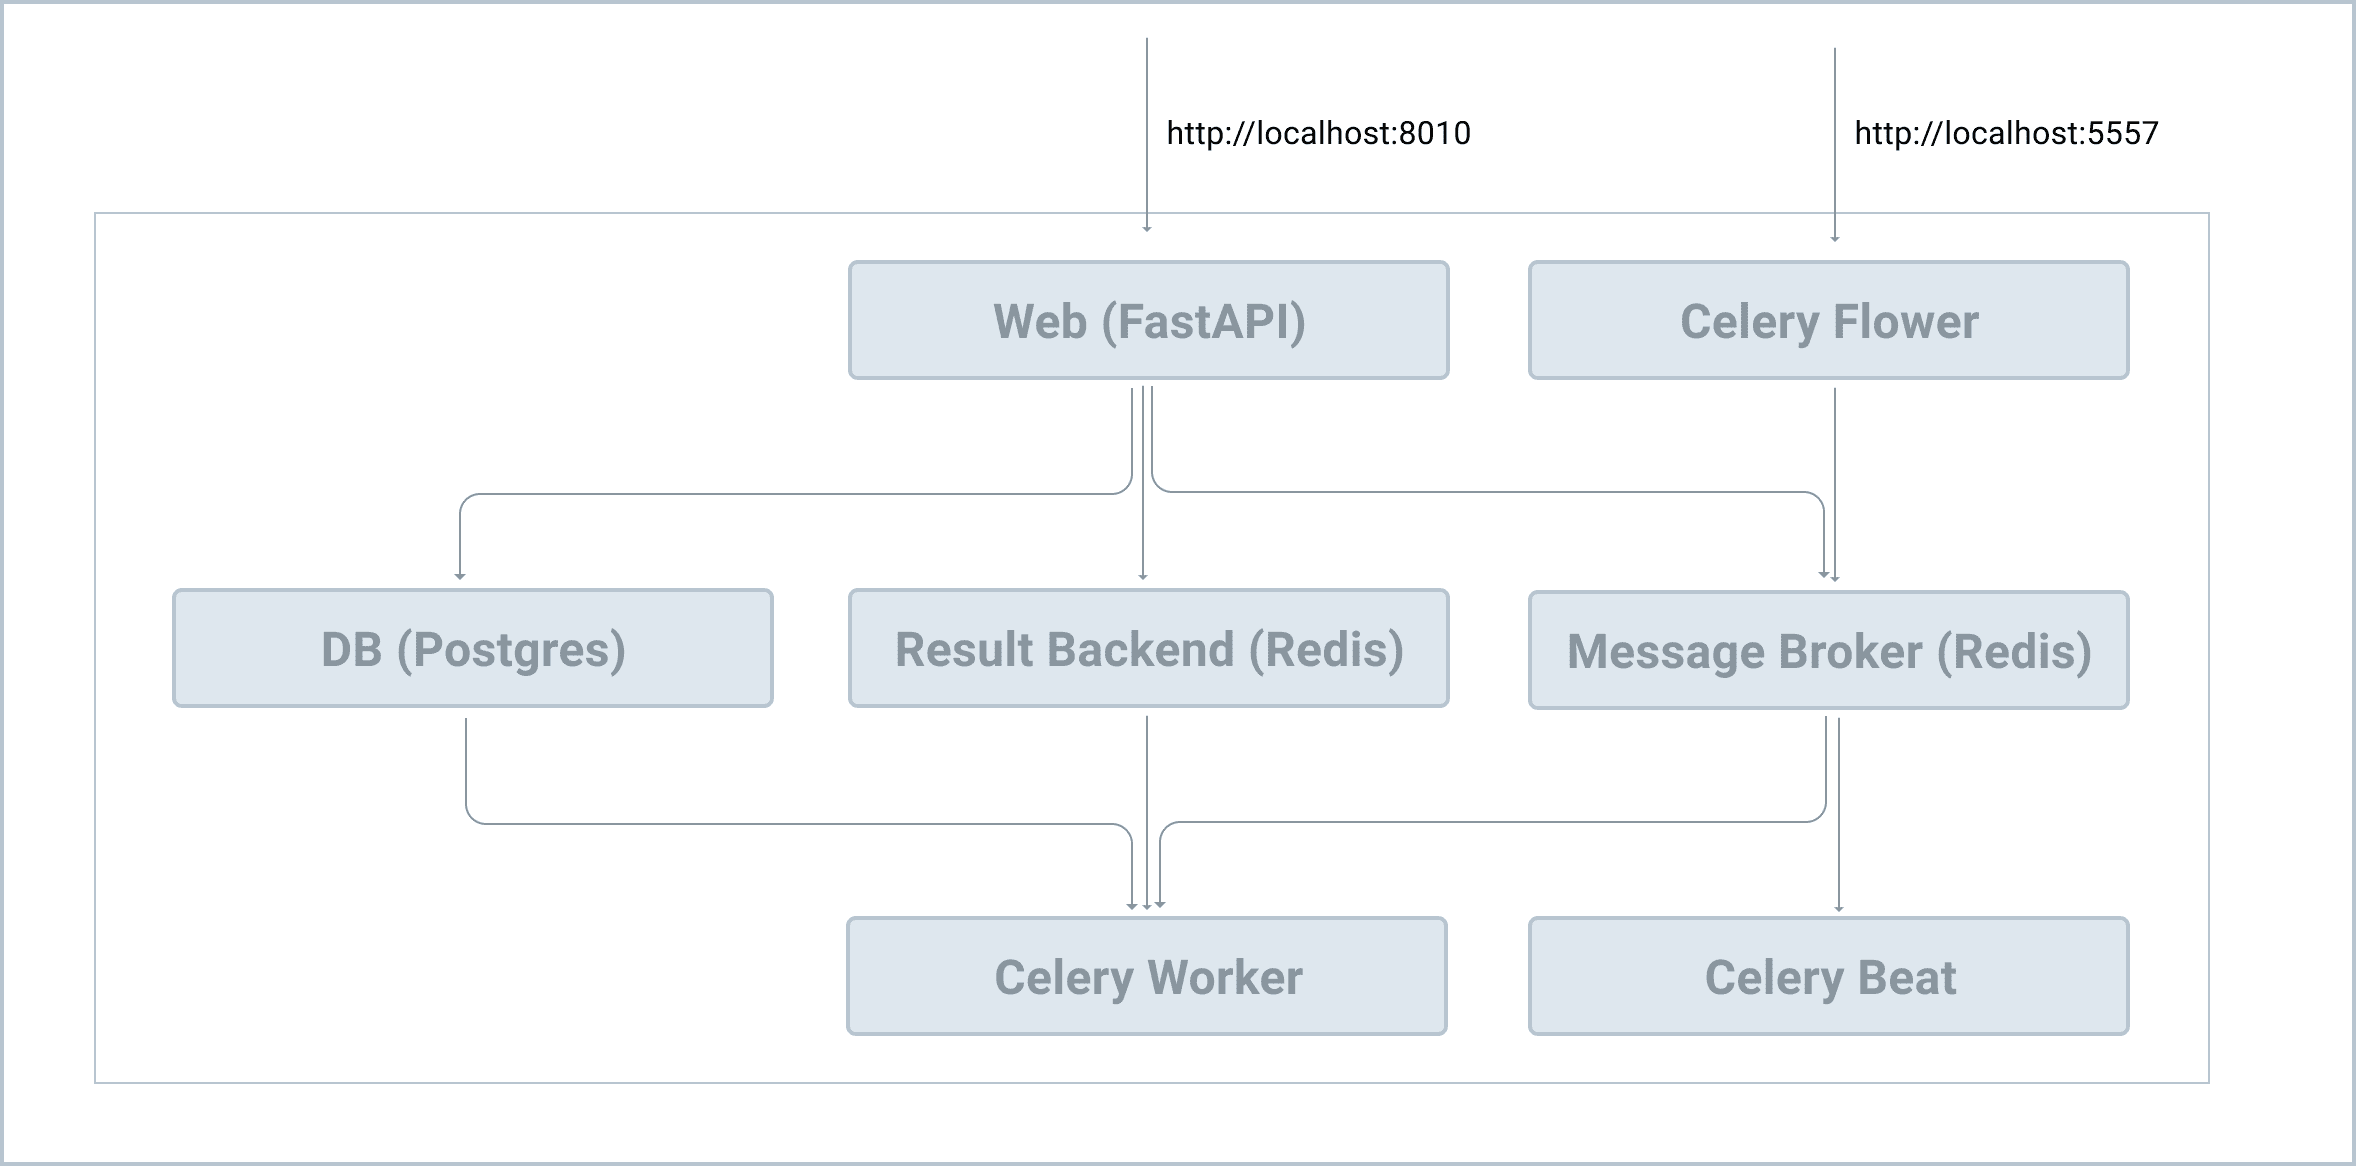
version: '3.8' services: web: build: context: . dockerfile: ./compose/local/fastapi/Dockerfile image: fastapi_celery_example_web # '/start' is the shell script used to run the service command: /start # this volume is used to map the files and folders on the host to the container # so if we change code on the host, code in the docker container will also be changed volumes: - .:/app ports: - 8010:8000 env_file: - .env/.dev-sample depends_on: - redis - db db: image: postgres:16-alpine volumes: - postgres_data:/var/lib/postgresql/data/ environment: - POSTGRES_DB=fastapi_celery - POSTGRES_USER=fastapi_celery - POSTGRES_PASSWORD=fastapi_celery redis: image: redis:7-alpine celery_worker: build: context: . dockerfile: ./compose/local/fastapi/Dockerfile image: fastapi_celery_example_celery_worker command: /start-celeryworker volumes: - .:/app env_file: - .env/.dev-sample depends_on: - redis - db celery_beat: build: context: . dockerfile: ./compose/local/fastapi/Dockerfile image: fastapi_celery_example_celery_beat command: /start-celerybeat volumes: - .:/app env_file: - .env/.dev-sample depends_on: - redis - db flower: build: context: . dockerfile: ./compose/local/fastapi/Dockerfile image: fastapi_celery_example_celery_flower command: /start-flower volumes: - .:/app env_file: - .env/.dev-sample ports: - 5557:5555 depends_on: - redis - db volumes: postgres_data: Here, we defined six services:
webis the FastAPI serverdbis the Postgres serverredisis the Redis service, which will be used as the Celery message broker and result backendcelery_workeris the Celery worker processcelery_beatis the Celery beat process for scheduled tasksfloweris the Celery dashboard
Review the web, db, and redis services on your own, taking note of the comments. To simplify things, the web, celery_worker, celery_beat, and flower services will all use the same Dockerfile.
Environment Variables
Create a new folder to store environment variables in the project root called .env. Then, add a new file to that folder called .dev-sample:
FASTAPI_CONFIG=development DATABASE_URL=postgresql://fastapi_celery:fastapi_celery@db/fastapi_celery CELERY_BROKER_URL=redis://redis:6379/0 CELERY_RESULT_BACKEND=redis://redis:6379/0 Dockerfile
Next, create the following files and folders in the project root:
└── compose └── local └── fastapi └── Dockerfile Next, update the compose/local/fastapi/Dockerfile:
FROM python:3.11-slim-buster ENV PYTHONUNBUFFERED 1 ENV PYTHONDONTWRITEBYTECODE 1 RUN apt-get update \ # dependencies for building Python packages && apt-get install -y build-essential \ # psycopg2 dependencies && apt-get install -y libpq-dev \ # Additional dependencies && apt-get install -y telnet netcat \ # cleaning up unused files && apt-get purge -y --auto-remove -o APT::AutoRemove::RecommendsImportant=false \ && rm -rf /var/lib/apt/lists/* # Requirements are installed here to ensure they will be cached. COPY ./requirements.txt /requirements.txt RUN pip install -r /requirements.txt COPY ./compose/local/fastapi/entrypoint /entrypoint RUN sed -i 's/\r$//g' /entrypoint RUN chmod +x /entrypoint COPY ./compose/local/fastapi/start /start RUN sed -i 's/\r$//g' /start RUN chmod +x /start COPY ./compose/local/fastapi/celery/worker/start /start-celeryworker RUN sed -i 's/\r$//g' /start-celeryworker RUN chmod +x /start-celeryworker COPY ./compose/local/fastapi/celery/beat/start /start-celerybeat RUN sed -i 's/\r$//g' /start-celerybeat RUN chmod +x /start-celerybeat COPY ./compose/local/fastapi/celery/flower/start /start-flower RUN sed -i 's/\r$//g' /start-flower RUN chmod +x /start-flower WORKDIR /app ENTRYPOINT ["/entrypoint"] A Dockerfile is a text file that contains the commands required to build an image.
Notes:
RUN sed -i 's/\r$//g' /entrypointis used to process the line endings of the shell scripts, which converts Windows line endings to UNIX line endings.- We copied the different service start shell scripts to the root directory of the final image.
- Since the source code will be housed under the "/app" directory of the container (from the
.:/appvolume in the Docker Compose file), we set the working directory to/app.
Entrypoint
We used a depends_on key for the web service to ensure that it does not start until both the redis and the db services are up. However, just because the db container is up does not mean the database is up and ready to handle connections. So, we can use a shell script called entrypoint to ensure that we can actually connect to the database before we spin up the web service.
compose/local/fastapi/entrypoint:
#!/bin/bash # if any of the commands in your code fails for any reason, the entire script fails set -o errexit # fail exit if one of your pipe command fails set -o pipefail # exits if any of your variables is not set set -o nounset postgres_ready() { python << END import sys import psycopg2 import urllib.parse as urlparse import os url = urlparse.urlparse(os.environ['DATABASE_URL']) dbname = url.path[1:] user = url.username password = url.password host = url.hostname port = url.port try: psycopg2.connect( dbname=dbname, user=user, password=password, host=host, port=port ) except psycopg2.OperationalError: sys.exit(-1) sys.exit(0) END } until postgres_ready; do >&2 echo 'Waiting for PostgreSQL to become available...' sleep 1 done >&2 echo 'PostgreSQL is available' exec "$@" Notes:
- We defined a
postgres_readyfunction that gets called in loop. The code will then continue to loop until the Postgres server is available. exec "$@"is used to make the entrypoint a pass through to ensure that Docker runs the command the user passes in (command: /start, in our case). For more, review this Stack Overflow answer.
Again, this entrypoint script and the above Dockerfile will be used with the web, celery_worker, celery_beat, and flower services to ensure they don't run their respective start scripts until Postgres is up and running.
Why didn't we wait for Redis to be up in the entrypoint script? Postgres usually starts much slower than Redis, so we can assume that Redis will be up once Postgres is up.
Start Scripts
Let's add the start scripts.
Start by adding the files and folders to the "compose/local/fastapi" folder so it looks like this:
└── fastapi ├── Dockerfile ├── celery │ ├── beat │ │ └── start │ ├── flower │ │ └── start │ └── worker │ └── start ├── entrypoint └── start Now, update each of the four start scripts.
compose/local/fastapi/start:
#!/bin/bash set -o errexit set -o pipefail set -o nounset alembic upgrade head uvicorn main:app --reload --reload-dir project --host 0.0.0.0 compose/local/fastapi/celery/beat/start:
#!/bin/bash set -o errexit set -o nounset rm -f './celerybeat.pid' celery -A main.celery beat -l info compose/local/fastapi/celery/worker/start:
#!/bin/bash set -o errexit set -o nounset celery -A main.celery worker --loglevel=info compose/local/fastapi/celery/flower/start:
#!/bin/bash set -o errexit set -o nounset worker_ready() { celery -A main.celery inspect ping } until worker_ready; do >&2 echo 'Celery workers not available' sleep 1 done >&2 echo 'Celery workers is available' celery flower \ --app=main.celery \ --broker="${CELERY_BROKER_URL}" In this final script, we used the same logic from our entrypoint to ensure that Flower doesn't start until the workers are ready.
Basic Workflow

With the config done, let's look at how everything works together in order to better understand the whole workflow.
Add psycopg2-binary to requirements.txt since we need it to connect to the Postgres database:
psycopg2-binary==2.9.9 Go ahead and deactivate the virtual environment and remove it. Then, build the images:
$ docker compose build Once the images are built, spin up the containers in detached mode:
$ docker compose up -d This will spin up each of the containers based on the order defined in the depends_on option:
redisanddbcontainers first- Then the
web,celery_worker,celery_beat, andflowercontainers
Once the containers are up, the entrypoint scripts will execute and then, once Postgres is up, the respective start scripts will execute. The db migrations will be applied and the development server will run. The FastAPI app should then be available.
Make sure you can view the hello world at http://localhost:8010/. You should be able to view the Flower dashboard at http://localhost:5557/ as well.
Troubleshooting
If you run into problems, you can view the logs at:
$ docker compose logs -f Try to fix the issue, and then re-build the images and spin up the containers again.
For Mac Silicon users, if you get some weird errors, you might need to run export DOCKER_DEFAULT_PLATFORM=linux/amd64 before running the Docker Compose commands. For more details, please check out this GitHub issue.
Useful Commands
To enter the shell of a specific container that's up and running, run the following command:
$ docker compose exec <service-name> bash # for example: # docker compose exec web bash If you want to run a command against a new container that's not currently running, run:
$ docker compose run --rm web bash The
--rmoption tells docker to delete the container after you exit the bash shell.
Simple Test
Let's test things out by entering the Python shell of the running web service:
$ docker compose exec web python Thn, run the following code:
>>> from main import app >>> from project.users.tasks import divide >>> >>> divide.delay(1, 2) <AsyncResult: decba749-8f7e-49b3-9d40-62da39298fef> Take note of the task ID (decba749-8f7e-49b3-9d40-62da39298fef in the above case).
Open a new terminal window, navigate to the project directory, and view the logs of the Celery worker:
$ docker compose logs celery_worker You should see something similar to:
fastapi-celery-project-celery_worker-1 | [2024-01-04 09:07:54,431: INFO/MainProcess] Task project.users.tasks.divide[decba749-8f7e-49b3-9d40-62da39298fef] received fastapi-celery-project-celery_worker-1 | [2024-01-04 09:07:59,443: INFO/ForkPoolWorker-16] Task project.users.tasks.divide[decba749-8f7e-49b3-9d40-62da39298fef] succeeded in 5.009163563023321s: 0.5 In the first window, exit from the shell.
Now, let's enter shell of the redis service:
$ docker compose exec redis sh We used
shsincebashis not available in this container.
Next, using the task ID from above, let's see the task result directly from Redis:
$ redis-cli 127.0.0.1:6379> MGET celery-task-meta-decba749-8f7e-49b3-9d40-62da39298fef 1) "{\"status\": \"SUCCESS\", \"result\": 0.5, \"traceback\": null, \"children\": [], \"date_done\": \"2024-01-04T09:07:59.437565\", \"task_id\": \"decba749-8f7e-49b3-9d40-62da39298fef\"}" Make sure you can see the result in the Flower Dashboard as well.
Conclusion
In this chapter, we looked at how to use Docker and Docker Compose to run FastAPI, Postgres, Redis, and Celery. You should be able to spin up each service from a single terminal window with Docker Compose.
Your final project structure after this chapter should now look like this:
├── alembic │ ├── README │ ├── env.py │ ├── script.py.mako │ └── versions │ ├── 399011ac3c75_.py │ └── b48ac95a682c_.py ├── alembic.ini ├── celerybeat-schedule ├── compose │ └── local │ └── fastapi │ ├── Dockerfile │ ├── celery │ ├── entrypoint │ └── start ├── db.sqlite3 ├── docker-compose.yml ├── main.py ├── project │ ├── __init__.py │ ├── celery_utils.py │ ├── config.py │ ├── database.py │ └── users │ ├── __init__.py │ ├── models.py │ └── tasks.py └── requirements.txt Be sure to remove the old SQLite database file, db.sqlite3, and the "venv" folder if you haven't already.
✓ Mark as Completed