
As you all know, Zoom has become the veritable king of online-meeting platforms and is widely used by corporates and universities.
Online meetings, however, come with their own set of problems. For example, every time you want to change anything in video, you have to go to zoom settings first. But isn’t that impractical, especially when you are presenting something and immediately want to zoom-in or blur the background. What if you need to turn the camera off right away because your roommate has unknowingly entered the camera frame. Today we will solve all these problems using Python and computer vision – Mediapipe Gesture Recognition.
1. Overview
1.1 Here’s a list of the project requirements:
- Virtual camera
- Detection of hand gestures
- Detect if the hand is present
- Detect gestures made by the user
- Detection of more than one person
- Stop the camera if more than one person is detected
- Stop the camera if no one is detected
- Selfie segmentation
- Separate the person from the background
- Blur the background
1.2 Finding the Solutions
Start by finding a way to connect the camera’s output with Zoom. For this, you’ll need a virtual camera. If you have ever used any video-calling software, you must have seen an option for selecting camera input.
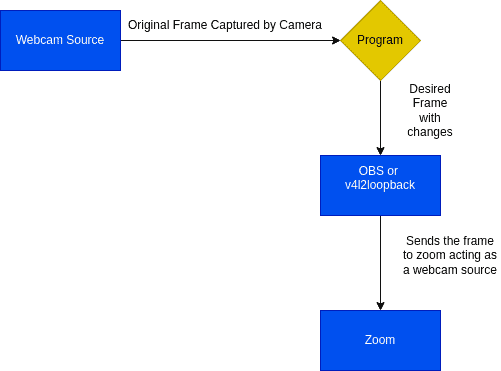
The Integrated Webcam output takes input directly from the webcam, its frames therefore cannot be edited or changed without a mediator. You’ll thus need a system that not only takes input from the webcam, but also lets you manipulate and then publish the edited frames.
This flowchart shows exactly what a virtual camera lets you do:
After zeroing onto a virtual camera, the next step is to automate the process of manipulation and publishing with the help of Python. We will use pyvirtualcam to send the edited frames to the virtual camera.
Now that you have a frame that can be edited, start planning a pipeline that can make appropriate changes to the frame, before it is sent to the webcam.
It’s a good idea to begin with processes that you’ll be running forever, like:
- Hand Gestures
- Face Detection
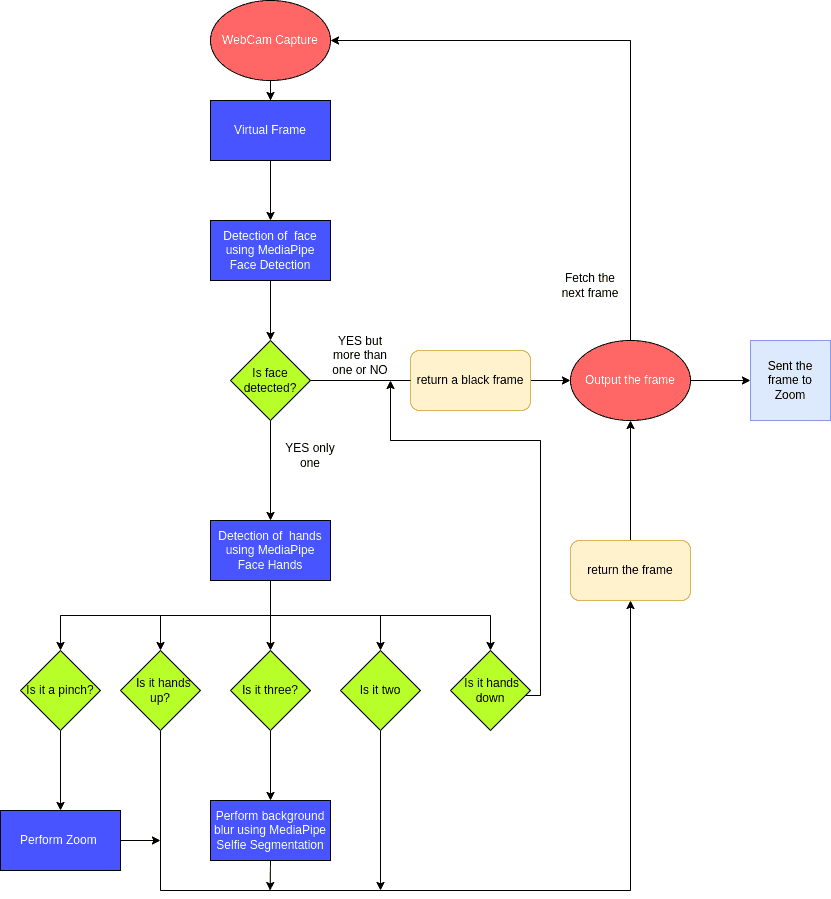
When we look for something that can detect our hand gestures and identify them correctly, MediaPipe Hands wins hands down. That’s because MediaPipe Hands can detect the points on hands and effectively track them. It also tells us which gesture we made. So, our pipeline has MediaPipe Hands running all through, right from the beginning, trying to detect hands and recognize any gestures they make.
Similarly, you can use MediaPipe Face Detection to find the number of faces in a frame.
Next, try blurring the background, using MediaPipe Selfie Segmentation.
Check out this final pipeline for it performs all our requirements!
2. MediaPipe
A good part of this project relies on MediaPipe and its modules, so it is important you understand exactly how we use them. To learn what else MediaPipe can do, visit our Introduction to MediaPipe.
2.1 MediaPipe Hands
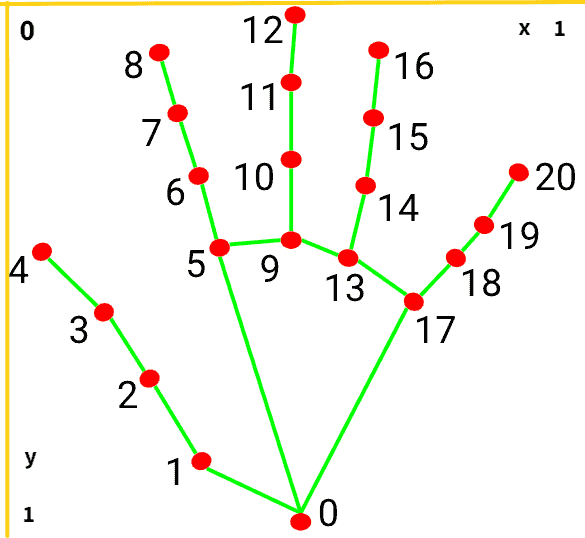
First, learn how the Coordinate system works, only then use MediaPipe Hands.
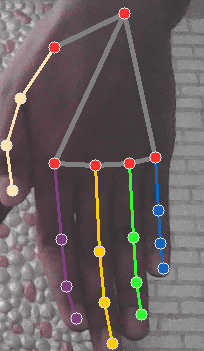
Before you start coding, it’s important you know that the y axis is inverted.
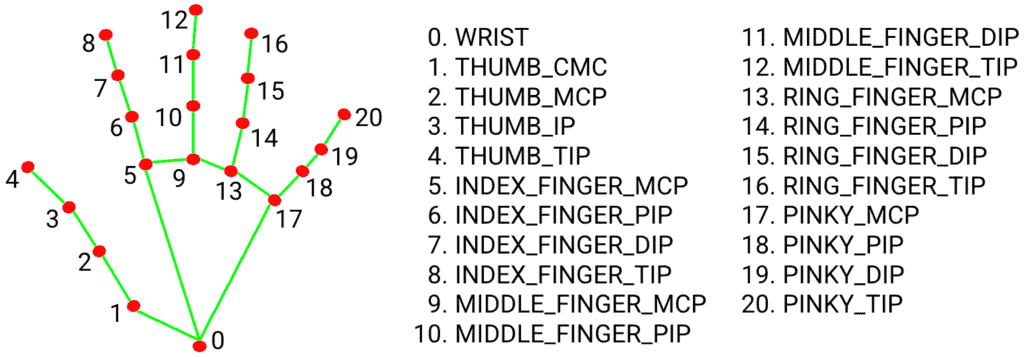
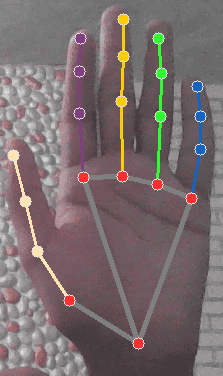
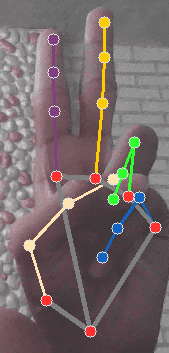
The MediaPipe Hands module will return coordinates of 20 points on fingers.
Note: It’s easy to detect gestures using a SVC or a DL model. As MediaPipe Hands already does the heavy work of getting the coordinates, simply use these coordinates for gesture detection.
- Our first gesture is a pinch to zoom and check if the fist is closed.
- Basically, we want to know the distance between these two points: the INDEX_FINGER_TIP and the THUMB_TIP.
- Also, ensure that the following points: MIDDLE_FINGER_TIP, RING_FINGER_TIP and PINKY_TIP are below the MIDDLE_FINGER_MCP, RING_FINGER_MCP and the PINKY_MCP respectively.
- The next gesture is Hand up.
A simple check that tells whether the WRIST is below the MIDDLE_FINGER_TIP or not is enough for this.
- For Hand down, this check is reversed.
You check if the WRIST is truly above the MIDDLE_FINGER_TIP.
- For this three-finger gesture, do the following checks:
- Are the INDEX_FINGER_TIP, MIDDLE_FINGER_TIP and the RING_FINGER_TIP above the INDEX_FINGER_MCP, MIDDLE_FINGER_MCP and the RING_FINGER_MCP respectively?
- Is the PINKY_TIP below the PINKY_MCP?
- Finally, for the two-finger gesture, check if:
- the INDEX_FINGER_TIP and the MIDDLE_FINGER_TIP are actually above the
INDEX_FINGER_MCP and the MIDDLE_FINGER_MCP respectively
- the PINKY_TIP and RING_FINGER_TIP are below the PINKY_MCP and RING_FINGER_MCP respectively.
2.2 MediaPipe Face Detection
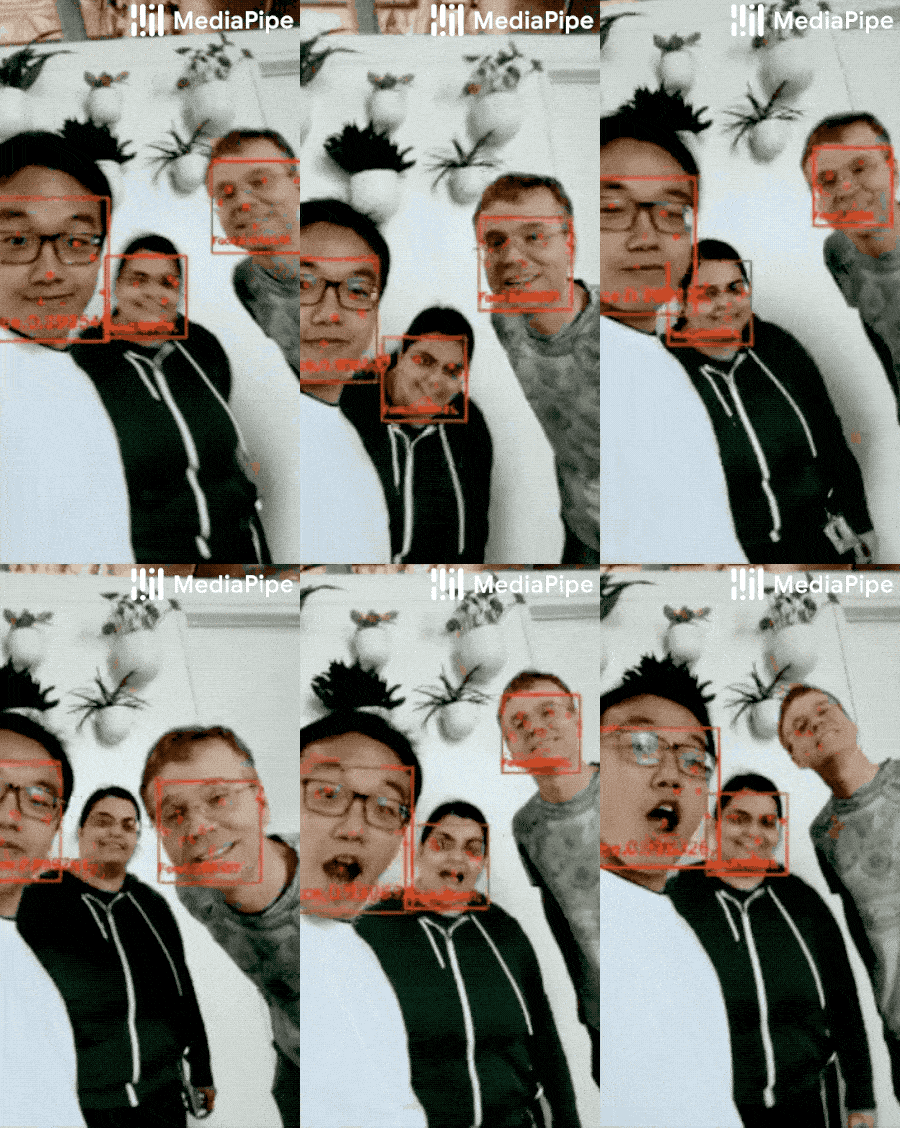
Here, MediaPipe detects the faces and you simply fetch its findings.
2.3 MediaPipe Selfie Segmentation
MediaPipe Selfie Segmentation allows us to separate a person from his or her background.

MediaPipe Selfie Segmentation creates a mask around the person and gives us a matrix sized the same as the image. However, you still need to convert the 2-D matrix into 3-D to match the images.
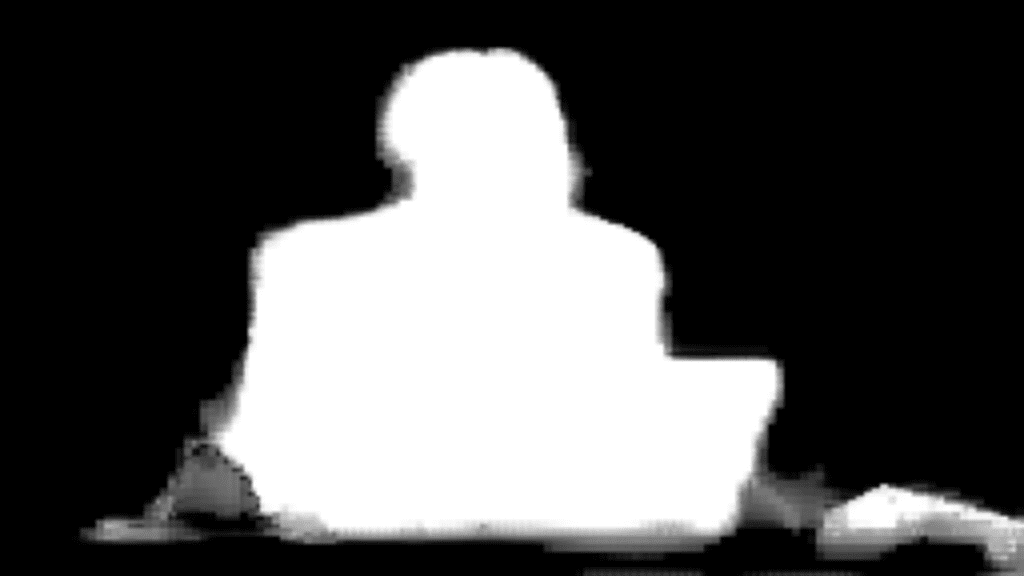
Consider the above image: The white part is the foreground, whereas the black area forms its background. Simply use this information to change the background.

3. Setting Up the Development Environment
Create a new folder and in it a file called requirements.txt.
Add the following contents to this file:
absl-py==1.0.0 attrs==21.4.0 cycler==0.11.0 fonttools==4.33.3 kiwisolver==1.4.2 matplotlib==3.5.1 mediapipe==0.8.9.1 numpy==1.22.3 opencv-contrib-python==4.5.5.64 packaging==21.3 Pillow==9.1.0 protobuf==3.20.1 pyparsing==3.0.8 python-dateutil==2.8.2 pyvirtualcam==0.9.1 six==1.16.0 Now, run these commands:
python3 -m venv zoom-gestures source zoom-gestures/bin/activate pip3 install -r requirements.txt Virtual Camera Setup
For linux:- Install v4l2loopback
Note: Follow the documentation of pyvirtualcam, whether you are on windows or mac.
sudo modprobe v4l2loopback Folder Structure
Create empty Python files, in line with the structure given below.
. ├── main.py ├── requirements.txt ├── utils │ ├── face_detection.py │ ├── faceutils.py │ ├── fingerutils.py │ ├── handsutils.py │ ├── __init__.py │ └── zoomutils.py You are now ready for coding!
4. Code
Note:- For in-depth information on the code functions, do refer to the comments given supporting them.
We begin here with fingerutils.py.
To make things easy, go define all the finger points we discussed in the MediaPipe Hands section.
WRIST = 0 INDEX_FINGER_PIP = 6 INDEX_FINGER_TIP = 8 MIDDLE_FINGER_MCP = 9 MIDDLE_FINGER_PIP = 10 MIDDLE_FINGER_TIP = 12 RING_FINGER_MCP = 13 RING_FINGER_PIP = 14 RING_FINGER_TIP = 16 PINKY_MCP = 17 PINKY_PIP = 18 PINKY_TIP = 20 Once the fingers are defined, create a function for each gesture. Each of these functions intakes a landmark array, which it fetches from MediaPipe Hands.
def is_fist_closed(points): """ Args: points: landmarks from mediapipe Returns: boolean check if fist is closed """ return points[MIDDLE_FINGER_MCP].y < points[MIDDLE_FINGER_TIP].y and points[PINKY_MCP].y < points[PINKY_TIP].y and \ points[RING_FINGER_MCP].y < points[RING_FINGER_TIP].y def hand_down(points): """ Args: points: landmarks from mediapipe Returns: boolean check if hand is down i.e. inverted """ return points[MIDDLE_FINGER_TIP].y > points[WRIST].y def hand_up(points): """ Args: points: landmarks from mediapipe Returns: boolean check if hand is up """ return points[MIDDLE_FINGER_TIP].y < points[WRIST].y def two_signal(points): """ Args: points: landmarks from mediapipe Returns: boolean check if fingers show two """ return points[INDEX_FINGER_TIP].y < points[INDEX_FINGER_PIP].y and points[MIDDLE_FINGER_TIP].y < points[ MIDDLE_FINGER_PIP].y and points[RING_FINGER_PIP].y < points[ RING_FINGER_TIP].y and \ points[PINKY_PIP].y < \ points[PINKY_TIP].y def three_signal(points): """ Args: points: landmarks from mediapipe Returns: boolean check if fingers show three """ return points[INDEX_FINGER_TIP].y < points[INDEX_FINGER_PIP].y and points[MIDDLE_FINGER_TIP].y < points[ MIDDLE_FINGER_PIP].y and points[RING_FINGER_PIP].y > points[ RING_FINGER_TIP].y and \ points[PINKY_PIP].y < \ points[PINKY_TIP].y Now, it’s time for face detection.
You just have to get the total number of detections.
So, go to file face_detection.py.
import cv2 import mediapipe as mp def face_detect(image): """ Args: image: frame captured by camera Returns: The number of faces """ # Use Mediapipe face detection mp_face_detection = mp.solutions.face_detection # choose face detection criteria with mp_face_detection.FaceDetection( model_selection=0, min_detection_confidence=0.5) as face_detection: # Make the image non-writable since the detection needs no write access # Doing so also improves performance image.flags.writeable = False # Convert image from RGB to BGR image = cv2.cvtColor(image, cv2.COLOR_BGR2RGB) # process the image results = face_detection.process(image) # If any face is detected return the number of faces if results.detections: return len(results.detections) Next, go to faceutils.py.
import cv2import mediapipe as mpimport numpy as np def background_blur(image): """ Args: image: frame captured by camera Returns: The image with a blurred background """ mp_selfie_segmentation = mp.solutions.selfie_segmentation with mp_selfie_segmentation.SelfieSegmentation( model_selection=1) as selfie_segmentation: # Convert Image to RGB from BGR image = cv2.cvtColor(cv2.flip(image, 1), cv2.COLOR_BGR2RGB) # Make image readable before processing to increase the performance image.flags.writeable = False results = selfie_segmentation.process(image) image.flags.writeable = True # Convert Image to BGR from RGB image = cv2.cvtColor(image, cv2.COLOR_RGB2BGR) # Add a bilateral filter mask = cv2.ximgproc.jointBilateralFilter(np.uint8(results.segmentation_mask), image, 15, 5, 5) # Create a condition for blurring the background condition = np.stack( (results.segmentation_mask,) * 3, axis=-1) > 0.1 # Remove map the image on blurred background output_image = np.where(condition, image, mask) # Flip the output output_image = cv2.flip(output_image, 1) return output_image Here, you create a condition to check if:
- the coordinates given in the segmentation mask are greater than 1.0, which indicates the foreground
- or these coordinates are less than 1.0, indicating they belong to the background
We can blur the background and apply this filter to the image and then return it.
To bring this all together, let us go to handutils.py.
Import all the necessary modules and initialize the global variables. Also, initialize the MediaPipe Hands module and use it to detect the presence of hands.
# Imports import math import cv2 import numpy as np import mediapipe as mp from . import faceutils from . import face_detection from . import fingerutils from . import zoomutils # Set all status to false video_status = False blur_status = False detect_face_status = False # Set default Zoom Factor zoom_factor = 1 # Initialization of mediapipe Hands mp_hands = mp.solutions.hands hands = mp_hands.Hands() """MediaPipe Hands() """ Create a function called mediapipe_gestures, which takes two inputs:
- Firstly, the image
- Secondly, a cropped frame, which helps reduce the processing load. (More on this when we discuss the main function.)
def mediapipe_gestures(img, cropped_img): """ Args: img: current frame cropped_img: cropped image for hands detection Returns: frame with applied effects """ # Crop the image for area specific detection cropped_img_rgb = cv2.cvtColor(cropped_img, cv2.COLOR_BGR2RGB) # Fetch the results on cropped image results = hands.process(cropped_img_rgb) # Set global variable values global video_status global zoom_factor global blur_status global detect_face_status # Detect faces detect_face = face_detection.face_detect(img) if detect_face is None or detect_face != 1: detect_face_status = True if detect_face == 1: detect_face_status = False # Create frame with a black img stopped_img = np.zeros([100, 100, 3], dtype=np.uint8) Detect the finger gestures and perform actions based on it.
if results.multi_hand_landmarks: for handLms in results.multi_hand_landmarks: zoom_arr = [] # coordinates of points on index finger and thumb top h, w, c = img.shape landmarks = handLms.landmark for lm_id, lm in enumerate(landmarks): # Convert landmark coordinates to actual image coordinates cx, cy = int(lm.x * w), int(lm.y * h) # Append the coordinates if lm_id == 4 or lm_id == 8: zoom_arr.append((cx, cy)) # Check if hand is inverted or down if fingerutils.hand_down(landmarks): video_status = True # Check if three signal is given if fingerutils.three_signal(landmarks): blur_status = True # Check if two signal is given if fingerutils.two_signal(landmarks): blur_status = False # Check if hand is up and continue the capture if fingerutils.hand_up(landmarks): video_status = False # Check if fingers are detected fists are closed and hand is up so video is on if len(zoom_arr) > 1 and fingerutils.is_fist_closed(landmarks) and fingerutils.hand_up(landmarks): p1 = zoom_arr[0] p2 = zoom_arr[1] # Calculate the distance between two fingertips dist = math.sqrt(pow(p1[0] - p2[0], 2) + pow(p1[1] - p2[1], 2)) # Zoom in or out if 150 <= dist <= 300: zoom_factor = zoomutils.fetch_zoom_factor(dist) # If the hand was down or there is more than one person in frame if video_status is True or detect_face_status is True: img = stopped_img # If blur is on blur the image if blur_status: img = faceutils.background_blur(img) # Zoom the image according to the needs img = zoomutils.zoom_center(img, zoom_factor) return img Finally, get main.py.
# Imports import cv2 import pyvirtualcam from pyvirtualcam import PixelFormat from utils import handsutils import platform def main(): # Start video capture and set defaults device_val = None cap = cv2.VideoCapture(0) pref_width = 1280 pref_height = 720 pref_fps = 30 cap.set(cv2.CAP_PROP_FRAME_WIDTH, pref_width) cap.set(cv2.CAP_PROP_FRAME_HEIGHT, pref_height) cap.set(cv2.CAP_PROP_FPS, pref_fps) width = int(cap.get(cv2.CAP_PROP_FRAME_WIDTH)) height = int(cap.get(cv2.CAP_PROP_FRAME_HEIGHT)) fps = cap.get(cv2.CAP_PROP_FPS) os = platform.system() if os == "Linux": device_val = "/dev/video2" with pyvirtualcam.Camera(width, height, fps, device=device_val, fmt=PixelFormat.BGR) as cam: print('Virtual camera device: ' + cam.device) while True: success, img = cap.read() cropped_img = img[0:720, 0:400] img = handsutils.mediapipe_gestures(img, cropped_img) img = cv2.resize(img, (1280, 720)) cam.send(img) cam.sleep_until_next_frame() if __name__ == '__main__': """ Main Function """ main() Once you capture the frame, get the processed image using medipipe_gestures. It is important to pass a cropped image for hand detection because you don’t want the program to detect gestures outside your particular region.
5. Output
6. Conclusion
You now have a clear understanding of the basic concepts of MediaPipe. Also, you know how multiple modules of MediaPipe can be used together.
One additional fact: Besides Zoom, this program works on any other software that can detect and use virtual cameras.
Also, Check Out: Center Stage for Zoom Calls using MediaPipe
More on Mediapipe
| Hang on, the journey doesn’t end here. We have some more exciting blog posts for you to explore!!! 1. Building a Poor Body Posture Detection and Alert System using MediaPipe 2. Creating Snapchat/Instagram filters using Mediapipe 3. Center Stage for Zoom Calls using MediaPipe 4. Drowsy Driver Detection using Mediapipe 5. Comparing Yolov7 and Mediapipe Pose Estimation models Never Stop Learning!!! |





100K+ Learners
Join Free OpenCV Bootcamp3 Hours of Learning