在 QuickNode 上使用 LYS Labs 构建低延迟 Solana 事件追踪器
-
 QuickNode
 - 发布于 2025-09-26 14:32
概述
在 Solana 上构建实时应用程序,例如交易机器人、分析仪表板或通知服务,需要快速且可靠地访问链上事件。解码原始交易数据通常既缓慢又复杂,从而造成了显著的开发障碍。
这就是 LYS Labs 的 结构化实时 Solana 数据 插件的用武之地。它提供了一个解码后的、人类可读的 Solana 交易事件的简单 WebSocket 流,使你可以专注于应用程序的核心逻辑,而不是数据解析。本指南将向你展示如何构建一个脚本来跟踪 Solana 上的所有新代币铸造,以及来自 Pump.fun 的代币迁移,为更复杂的应用程序提供基础。
你将做什么
- 激活 结构化实时 Solana 数据 插件,并通过你的 QuickNode 帐户获取你的 API 密钥
- 设置一个 Node.js 项目以连接到 WebSocket API
- 订阅并筛选特定的链上事件,例如新代币的铸造
- 处理来自 LYS Labs API 的实时交易数据
你将需要什么
- 一个 QuickNode 帐户
- 启用了 LYS Labs 的 结构化实时 Solana 数据 插件的 Solana QuickNode 节点
- 对 Solana 的基本了解
- 已安装 Node.js
- 一个代码编辑器,如 Visual Studio Code
- 一个类 Unix 的终端环境,例如 macOS、Linux 或带有 WSL 的 Windows
结构化实时 Solana 数据插件
此插件可通过 QuickNode Marketplace 获得,为 Solana 区块链提供实时数据解决方案。它捕获事件的发生并立即通过 WebSocket 连接传递它们。
主要功能包括:
- 实时事件流: 在链上事件中获得亚秒级的延迟。
- 可操作的交易数据: 立即访问来自 DEX(如 Raydium、Meteora 和 Pump.fun)的解码事件。数据包括代币交换摘要、精确的交易量洞察以及实时的流动性变化。
- 简单的 WebSocket API: 只需几行代码即可轻松订阅事件流。
在本指南中,你将学习如何通过构建一个 Node.js 脚本来筛选和记录新 SPL 代币的铸造来使用这些功能。
让我们深入了解开发过程。
低延迟 Solana 事件追踪器
前提条件
首先,你需要一个 API 密钥才能与 LYS Labs 通信。你可以直接从 QuickNode Marketplace 获得此密钥。
- 如果你还没有 QuickNode 帐户,请创建一个。你可以在 这里 注册。
- 在 QuickNode 上设置一个 Solana Mainnet 节点。
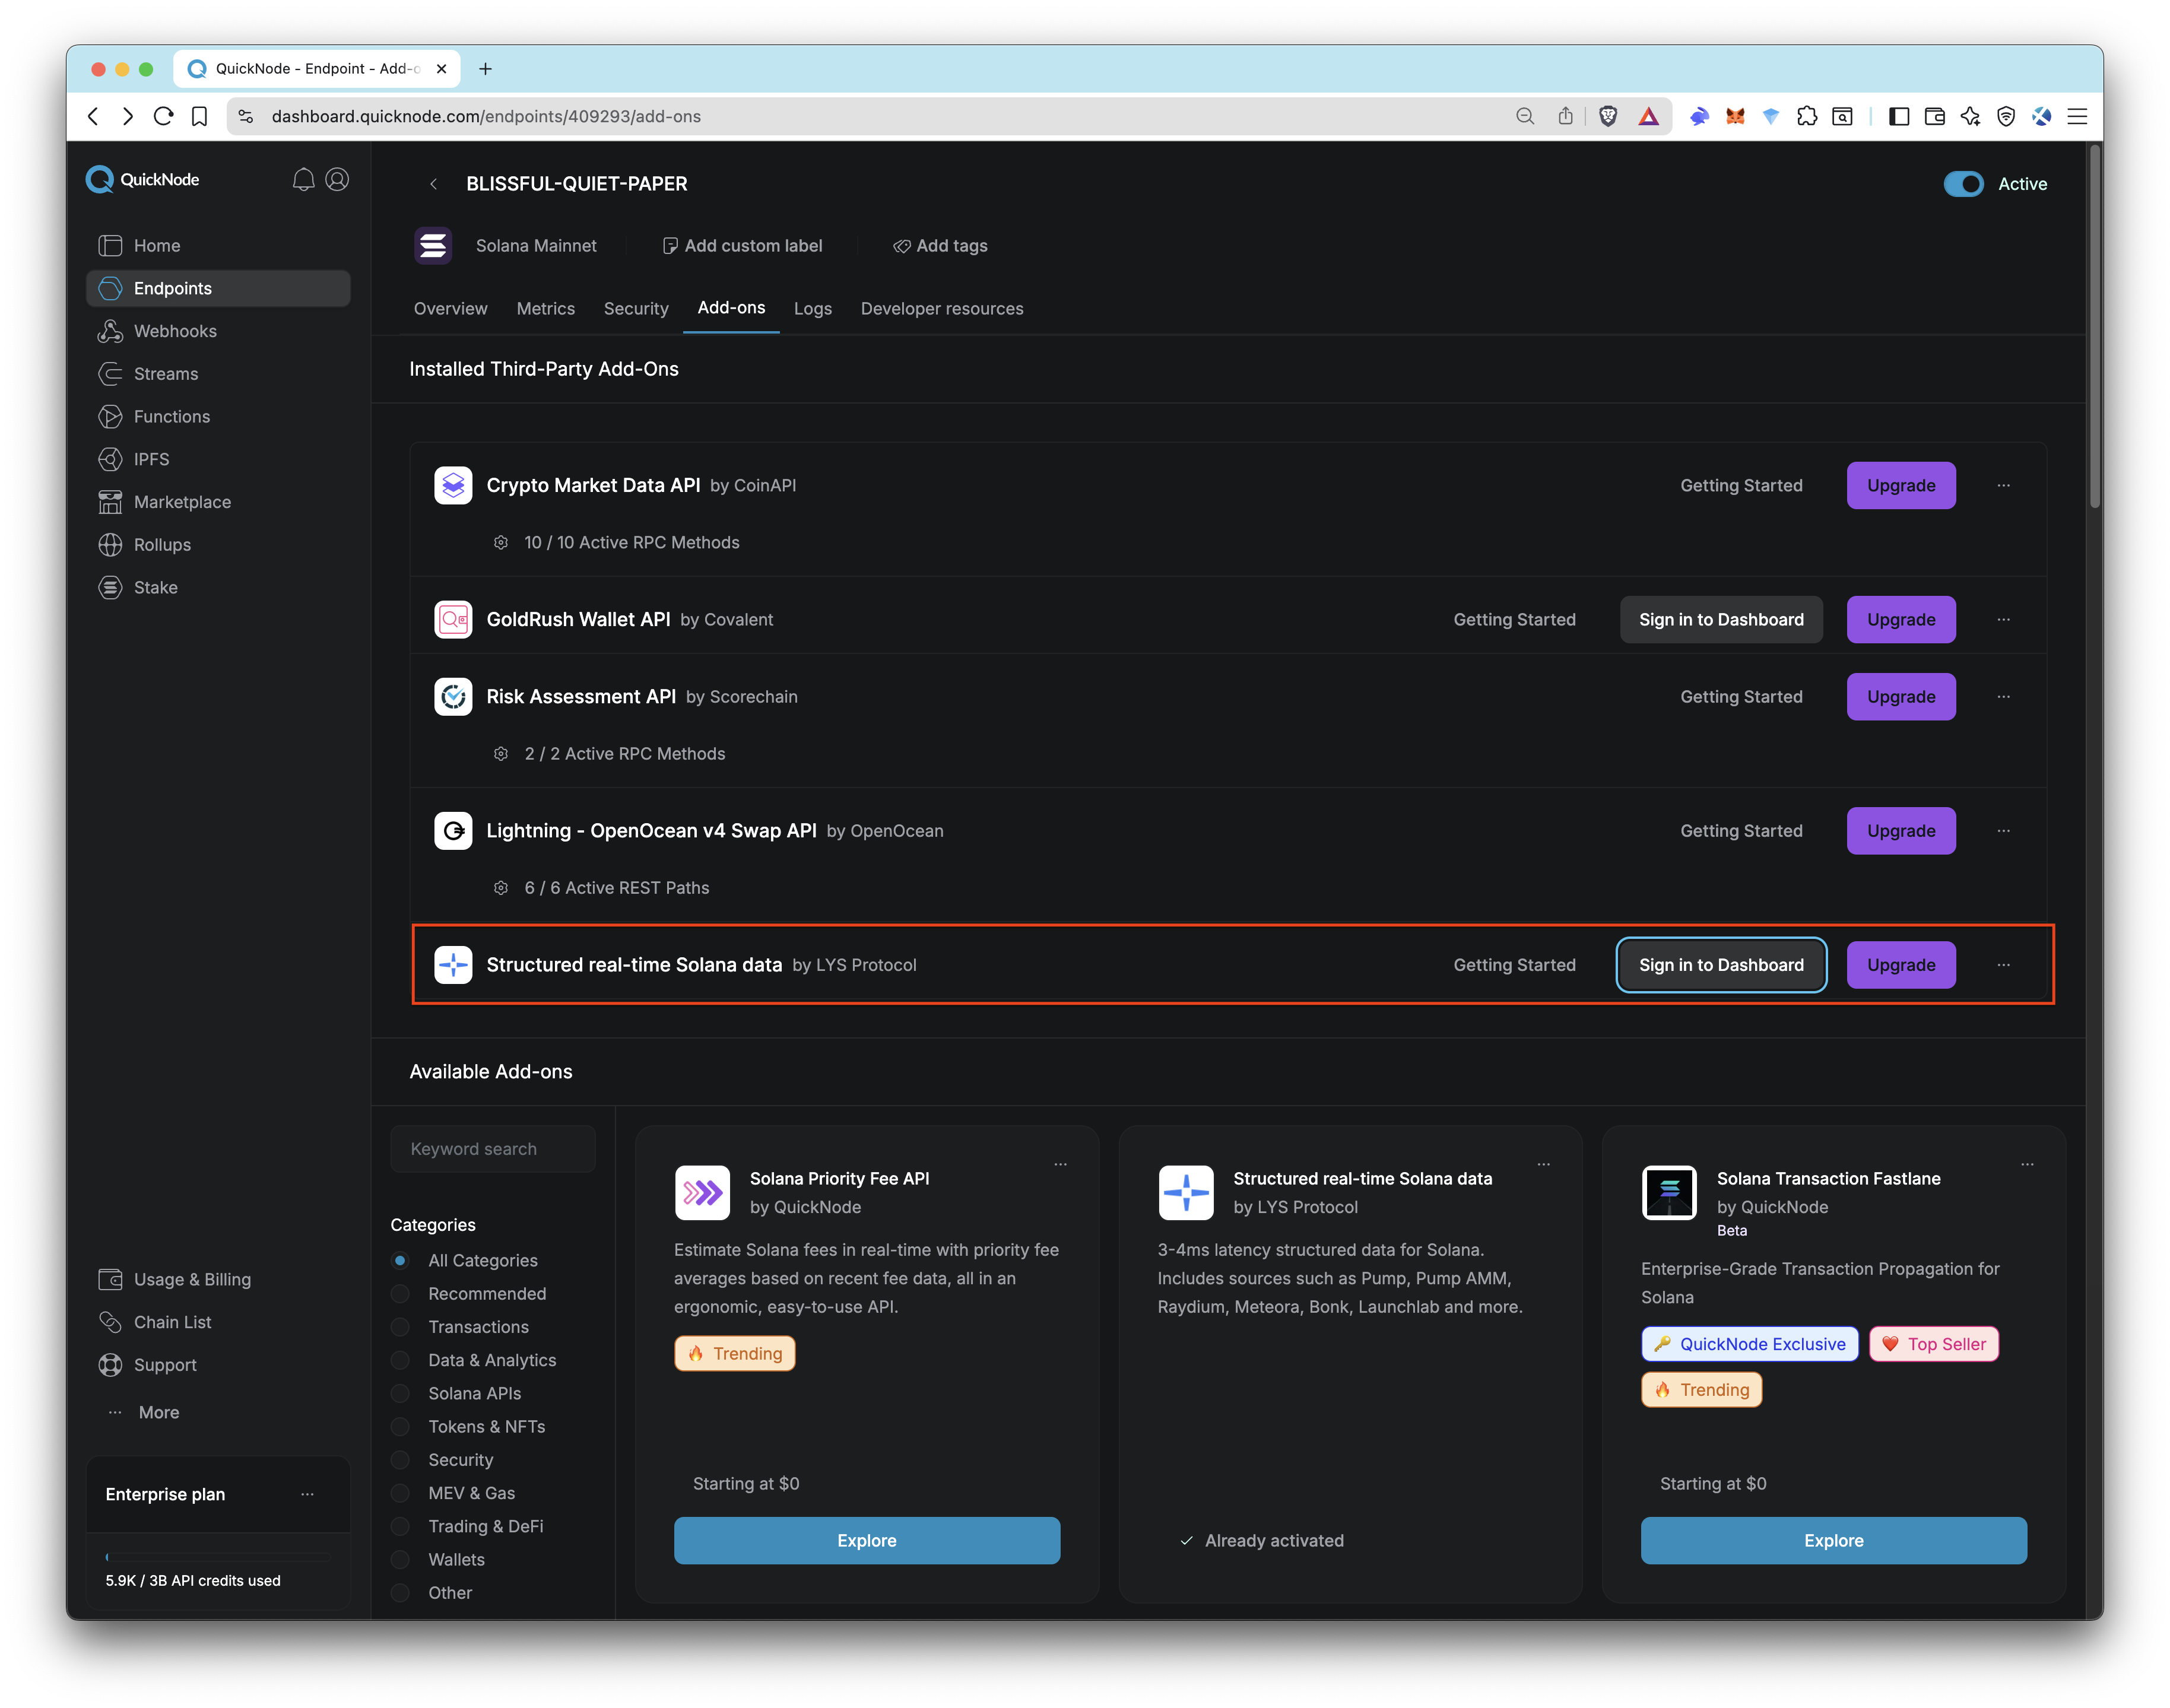
- 将 结构化实时 Solana 数据 插件添加到你的节点。
- 添加后,单击插件卡上的“登录到仪表板”按钮,以访问你的 LYS Labs 仪表板并获取你的 API 密钥。
请妥善保管你的 API 密钥,因为你需要它来连接到 WebSocket API。
设置项目
有了 API 密钥,你现在可以开始构建你的监控脚本。
打开你的终端并运行以下命令以创建一个项目文件夹并初始化一个 Node.js 项目:
mkdir lys-solana-tracker && cd lys-solana-tracker npm init -y 接下来,打开新创建的 package.json 文件并添加 "type": "module" 以启用 ES Module 语法。这使得处理导入和导出更加简洁。我们还将添加一个 dev 脚本以轻松运行我们的 TypeScript 文件。
{ // ...existing package.json content "type": "module", "scripts": { "dev": "tsx index.ts" } } 现在,安装必要的依赖项。我们将使用 ws 进行 WebSocket 连接,使用 dotenv 安全地管理我们的 API 密钥,并使用 tsx 直接运行 TypeScript 代码。
npm install ws dotenv npm install --save-dev typescript tsx @types/node @types/ws 最后,在你的项目目录中创建两个新文件:.env 用于存储你的 API 密钥,index.ts 用于你的应用程序代码。
touch .env index.ts 在 .env 文件中,像这样添加你的 API 密钥:
LYS_API_KEY=your_api_key_here 安全提示
始终将你的 .env 文件添加到 .gitignore 文件,以防止意外将你的秘密 API 密钥提交到公共存储库。
连接到 WebSocket API
设置好项目后,你现在可以编写代码以连接到 LYS WebSocket 节点。
打开你的 index.ts 文件并添加以下代码。此代码段导入所需的库,从 .env 文件加载你的 API 密钥,并建立与 LYS WebSocket 服务器的连接。
import WebSocket from 'ws' import 'dotenv/config' // 1. Load the API key from the .env file // 1. 从 .env 文件加载 API 密钥 const API_KEY = process.env.LYS_API_KEY || null if (!API_KEY) { throw new Error('LYS_API_KEY is not defined in the .env file') //抛出一个错误:LYS_API_KEY 未在 .env 文件中定义 } // 2. Define the WebSocket URL and create a new WebSocket instance // 2. 定义 WebSocket URL 并创建一个新的 WebSocket 实例 const url = `wss://solana-mainnet-api-vip.lyslabs.ai/v1/?apiKey=${API_KEY}` const ws = new WebSocket(url) // 3. Once the connection is open, log a success message and subscribe to events // 3. 连接打开后,记录一条成功消息并订阅事件 ws.on('open', () => { console.log('✅ Successfully connected to LYS Labs!') // The 'subscribe' action tells the API to start sending all transaction events // “subscribe” 操作告诉 API 开始发送所有交易事件 ws.send(JSON.stringify({ action: 'subscribe' })) }) // We'll add the message handler in the next step // 我们将在下一步中添加消息处理程序 ws.on('message', data => { // Code to process incoming messages will go here // 处理传入消息的代码将放在这里 }) ws.on('error', error => { console.error('WebSocket Error:', error) //websocket 错误:错误 }) ws.on('close', () => { console.log('WebSocket connection closed.') //websocket 连接已关闭 }) 监听新的代币铸造
现在你已经建立了 WebSocket 连接,你可以开始监听不同的事件。在此示例中,我们将为新的代币铸造添加一个过滤器,并将它们记录到控制台。
LYS API 将数据作为单个 transaction 对象或一批 transactions 发送。为了简化处理,我们将数据规范化为一个数组,然后循环遍历它。
使用以下代码更新 ws.on("message", ...) 处理程序在你的 index.ts 文件中。此代码检查类型为 MINT 的 SPL_TOKEN 程序事件,并记录相关详细信息,例如铸造地址、金额和目标帐户。
ws.on('message', data => { const msg = JSON.parse(data.toString()) // Check if the message contains transaction data // 检查消息是否包含交易数据 if (msg.type === 'transaction' || msg.type === 'transactions') { // Normalize the data into an array, whether it's a single object or an array // 将数据规范化为一个数组,无论它是单个对象还是一个数组 const transactions = Array.isArray(msg.data) ? msg.data : [msg.data] for (const tx of transactions) { // Filter for SPL_TOKEN program events of type MINT // 筛选类型为 MINT 的 SPL_TOKEN 程序事件 if (tx.decoderType === 'SPL_TOKEN' && tx.eventType === 'MINT') { // Extract the amount, handling potential variations in the data structure // 提取金额,处理数据结构中潜在的变化 const amount = tx.uiAmount?.value ?? tx.amount ?? 'N/A' console.log('🎉 New Token Mint Detected!') //检测到新的代币铸造 console.log(` Signature: ${tx.txSignature}`) // 签名 console.log(` Mint Address: ${tx.mint}`) // 铸币地址 console.log(` Amount: ${amount}`) // 数量 console.log(` Destination: ${tx.destinationAccount}`) // 目的地 console.log('------------------------------------') } } } }) 事件数据结构
事件数据的结构可能因 eventType 而异。 LYS Labs 在 他们的官方文档 中提供了不同事件的详细示例,这是跟踪其他事件类型时的一个很好的参考资源。
运行脚本
代码就绪后,你现在可以运行脚本并开始实时跟踪新的代币铸造。
在你的终端中运行以下命令以启动脚本:
npm run dev 你应该看到“成功连接”消息,然后是网络上发生的新的代币铸造流,如下所示:
✅ Successfully connected to LYS Labs! //成功连接到 LYS Labs! 🎉 New Token Mint Detected! // 检测到新的代币铸造! Signature: 4h4cVhXPANAtYrw33sACEFmE35dSHGXV8baisG2qvgqdFF3QMoYa2sP8PuANy7fkCjZYVZsXLr6T8JBxzEpG6X5K Mint Address: FZN7QZ8ZUUAxMPfxYEYkH3cXUASzH8EqA6B4tyCL8f1j Amount: 857353 Destination: 3tt29ZvzMrzEW841n8H2V3AaKpevGf947Ryr4kzpXVH6 ------------------------------------ 🎉 New Token Mint Detected! // 检测到新的代币铸造! Signature: 4h4cVhXPANAtYrw33sACEFmE35dSHGXV8baisG2qvgqdFF3QMoYa2sP8PuANy7fkCjZYVZsXLr6T8JBxzEpG6X5K Mint Address: 6cGACr5TqEoFm6UiromxCeHfA5UstEMnn1eLkMskAjuh Amount: 964960861 Destination: HsVCHzkVzZfYbqM4gFWkAA153oVLLmgmLaJ4mkuRCqi2 ------------------------------------ 🎉 New Token Mint Detected! // 检测到新的代币铸造! Signature: 3DAVXZJJMwY9b7QdxwdAEzTSaHAk46G9rZ33XiHQJ91q6qkrqhj4MYLt9iSEehbQvGJuTpxHeGb5hfBSbiADQMJj Mint Address: 3RpEekjLE5cdcG15YcXJUpxSepemvq2FpmMcgo342BwC Amount: 7411092 Destination: CHtAbgouK9Sqf7hVBnhr7F5tkhJkHhCtkqbUHszymJL9 ------------------------------------ (可选)跟踪 Pump.fun 代币迁移
现在你已经基本了解如何使用该插件,让我们更进一步并跟踪 Pump.fun 协议上的代币迁移。“代币迁移”是指代币获得足够的吸引力,通过将其流动性从 Pump.fun 的初始定价模型转移到主要的 DEX(如 Raydium)来“毕业”。对于交易者来说,这是一个关键事件,因为它使代币可以进入更广泛的市场。
为此,你只需要更改消息处理逻辑。设置和 WebSocket 连接保持不变。
将 ws.on("message", ...) 处理程序替换为以下代码:
// Define a type for the decoded transaction data relevant to this example // 定义与此示例相关的解码交易数据的类型 type PumpFunTransaction = { decoderType: string eventType: string txSignature: string mint?: string // This property is part of the MIGRATE event // 此属性是 MIGRATE 事件的一部分 pool?: string // This property is part of the CREATE_POOL event // 此属性是 CREATE_POOL 事件的一部分 lpMint?: string // This property is part of the CREATE_POOL event // 此属性是 CREATE_POOL 事件的一部分 } // A map to temporarily store migration events until the corresponding pool is created // 一个用于临时存储迁移事件的映射,直到创建相应的池 const pendingMigrations: Map<string, PumpFunTransaction> = new Map() ws.on('message', data => { const msg = JSON.parse(data.toString()) if (msg.type === 'transaction' || msg.type === 'transactions') { const transactions = ( Array.isArray(msg.data) ? msg.data : [msg.data] ) as PumpFunTransaction[] for (const tx of transactions) { // Watch for the MIGRATE event from Pump.fun // 关注来自 Pump.fun 的 MIGRATE 事件 if (tx.decoderType === 'PUMP_FUN' && tx.eventType === 'MIGRATE') { pendingMigrations.set(tx.txSignature, tx) } // Watch for the CREATE_POOL event from the Pump.fun AMM // 关注来自 Pump.fun AMM 的 CREATE_POOL 事件 if (tx.decoderType === 'PUMP_FUN_AMM' && tx.eventType === 'CREATE_POOL') { // Check if we saw the matching migration event for this transaction // 检查我们是否看到了此交易的匹配迁移事件 const migrateTx = pendingMigrations.get(tx.txSignature) if (migrateTx) { console.log('🚀 Token Graduated from Pump.fun!') // 代币从 Pump.fun 毕业! console.log(` Tx Signature: ${tx.txSignature}`) //交易签名: console.log(` Token Mint: ${migrateTx.mint}`) //Token铸造: console.log(` AMM Pool Address: ${tx.pool}`) //AMM 池地址: console.log(` LP Mint: ${tx.lpMint}`) //LP 铸币: console.log('------------------------------------') // Clean up the map to prevent memory leaks // 清理映射以防止内存泄漏 pendingMigrations.delete(tx.txSignature) } } } } }) 此逻辑使用交易签名将初始 MIGRATE 事件与随后的 CREATE_POOL 事件连接起来,从而让你全面了解代币的毕业情况。
完整代码
这是用于跟踪新的代币铸造和 Pump.fun 代币迁移的完整代码。
查看用于跟踪新代币铸造的代码
import WebSocket from 'ws' import 'dotenv/config' // 1. Load the API key from the .env file // 1. 从 .env 文件加载 API 密钥 const API_KEY = process.env.LYS_API_KEY || null if (!API_KEY) { throw new Error('LYS_API_KEY is not defined in the .env file') // 抛出一个错误:LYS_API_KEY 未在 .env 文件中定义 } // 2. Define the WebSocket URL and create a new WebSocket instance // 2. 定义 WebSocket URL 并创建一个新的 WebSocket 实例 const url = `wss://solana-mainnet-api-vip.lyslabs.ai/v1/?apiKey=${API_KEY}` const ws = new WebSocket(url) // 3. Once the connection is open, log a success message and subscribe to events // 3. 连接打开后,记录一条成功消息并订阅事件 ws.on('open', () => { console.log('✅ Successfully connected to LYS Labs!') // Successfully connected to LYS Labs! // The 'subscribe' action tells the API to start sending all transaction events // “subscribe” 操作告诉 API 开始发送所有交易事件 ws.send(JSON.stringify({ action: 'subscribe' })) }) ws.on('message', data => { const msg = JSON.parse(data.toString()) // Check if the message contains transaction data // 检查消息是否包含交易数据 if (msg.type === 'transaction' || msg.type === 'transactions') { // Normalize the data into an array, whether it's a single object or an array // 将数据规范化为一个数组,无论它是单个对象还是一个数组 const transactions = Array.isArray(msg.data) ? msg.data : [msg.data] for (const tx of transactions) { // Filter for SPL_TOKEN program events of type MINT // 筛选类型为 MINT 的 SPL_TOKEN 程序事件 if (tx.decoderType === 'SPL_TOKEN' && tx.eventType === 'MINT') { // Extract the amount, handling potential variations in the data structure // 提取金额,处理数据结构中潜在的变化 const amount = tx.uiAmount?.value ?? tx.amount ?? 'N/A' console.log('🎉 New Token Mint Detected!') // 检测到新的代币铸造! console.log(` Signature: ${tx.txSignature}`) // 签名: console.log(` Mint Address: ${tx.mint}`) // 铸币地址: console.log(` Amount: ${amount}`) // 金额: console.log(` Destination: ${tx.destinationAccount}`) // 目的地: console.log('------------------------------------') } } } }) ws.on('error', error => { console.error('WebSocket Error:', error) // WebSocket 错误:错误 }) ws.on('close', () => { console.log('WebSocket connection closed.') // WebSocket 连接已关闭。 }) 查看用于跟踪 Pump.fun 代币迁移的代码
import WebSocket from 'ws' import 'dotenv/config' // 1. Load the API key from the .env file // 1. 从 .env 文件加载 API 密钥 const API_KEY = process.env.LYS_API_KEY || null if (!API_KEY) { throw new Error('LYS_API_KEY is not defined in the .env file') //抛出一个错误:LYS_API_KEY 未在 .env 文件中定义 } // 2. Define the WebSocket URL and create a new WebSocket instance // 2. 定义 WebSocket URL 并创建一个新的 WebSocket 实例 const url = `wss://solana-mainnet-api-vip.lyslabs.ai/v1/?apiKey=${API_KEY}` const ws = new WebSocket(url) // 3. Once the connection is open, log a success message and subscribe to events // 3. 连接打开后,记录一条成功消息并订阅事件 ws.on('open', () => { console.log('✅ Successfully connected to LYS Labs!') // 成功连接到 LYS Labs! // The 'subscribe' action tells the API to start sending all transaction events //“subscribe” 操作告诉 API 开始发送所有交易事件 ws.send(JSON.stringify({ action: 'subscribe' })) }) // Define a type for the decoded transaction data relevant to this example // 定义与此示例相关的解码交易数据的类型 type PumpFunTransaction = { decoderType: string eventType: string txSignature: string mint?: string // This property is part of the MIGRATE event //此属性是 MIGRATE 事件的一部分 pool?: string // This property is part of the CREATE_POOL event //此属性是 CREATE_POOL 事件的一部分 lpMint?: string // This property is part of the CREATE_POOL event //此属性是 CREATE_POOL 事件的一部分 } // A map to temporarily store migration events until the corresponding pool is created // 一个用于临时存储迁移事件的映射,直到创建相应的池 const pendingMigrations: Map<string, PumpFunTransaction> = new Map() ws.on('message', data => { const msg = JSON.parse(data.toString()) if (msg.type === 'transaction' || msg.type === 'transactions') { const transactions = ( Array.isArray(msg.data) ? msg.data : [msg.data] ) as PumpFunTransaction[] for (const tx of transactions) { // Watch for the MIGRATE event from Pump.fun // 关注来自 Pump.fun 的 MIGRATE 事件 if (tx.decoderType === 'PUMP_FUN' && tx.eventType === 'MIGRATE') { pendingMigrations.set(tx.txSignature, tx) } // Watch for the CREATE_POOL event from the Pump.fun AMM // 关注来自 Pump.fun AMM 的 CREATE_POOL 事件 if (tx.decoderType === 'PUMP_FUN_AMM' && tx.eventType === 'CREATE_POOL') { // Check if we saw the matching migration event for this transaction // 检查我们是否看到了此交易的匹配迁移事件 const migrateTx = pendingMigrations.get(tx.txSignature) if (migrateTx) { console.log('🚀 Token Graduated from Pump.fun!') //🚀 代币从 Pump.fun 毕业! console.log(` Tx Signature: ${tx.txSignature}`) //交易签名: console.log(` Token Mint: ${migrateTx.mint}`) //代币铸币: console.log(` AMM Pool Address: ${tx.pool}`) //AMM 池地址: console.log(` LP Mint: ${tx.lpMint}`) //LP 铸造: console.log('------------------------------------') // Clean up the map to prevent memory leaks // 清理映射以防止内存泄漏 pendingMigrations.delete(tx.txSignature) } } } } }) ws.on('error', error => { console.error('WebSocket Error:', error) //WebSocket 错误:错误 }) ws.on('close', () => { console.log('WebSocket connection closed.') //WebSocket 连接已关闭。 }) 结论
恭喜!你已经成功构建了一个实时 Solana 事件跟踪器,该跟踪器使用由 LYS Labs 的 结构化实时数据插件 提供支持的 QuickNode Solana 节点。你现在拥有监听任何链上事件的基础知识,从而为构建响应迅速且数据驱动的 Web3 应用程序开辟了无限可能。
鸣谢
特别感谢 LYS Labs 团队在创建本指南中的密切合作。
下一步
- 探索 LYS Labs 文档 中的其他事件类型
- 将此逻辑集成到交易机器人或实时分析仪表板中
- 在 QuickNode 上查看 其他 Solana 指南 以进一步提高你的技能
如果你遇到问题或有疑问,请将它们放在我们的 Discord 中。通过在 X(以前的 Twitter) (@QuickNode) 或我们的 Telegram 公告频道 上关注我们来了解最新信息。
我们 ❤️ 反馈!
如果你对新主题有任何反馈或要求,请 告诉我们。我们很乐意听取你的意见。
- 原文链接: quicknode.com/guides/mar...
- 登链社区 AI 助手,为大家转译优秀英文文章,如有翻译不通的地方,还请包涵~

