


New to KubeDB? Please start here.
Run MySQL with Custom PodTemplate
KubeDB supports providing custom configuration for MySQL via PodTemplate. This tutorial will show you how to use KubeDB to run a MySQL database with custom configuration using PodTemplate.
Before You Begin
At first, you need to have a Kubernetes cluster, and the kubectl command-line tool must be configured to communicate with your cluster. If you do not already have a cluster, you can create one by using kind.
Now, install KubeDB cli on your workstation and KubeDB operator in your cluster following the steps here.
To keep things isolated, this tutorial uses a separate namespace called
demothroughout this tutorial.$ kubectl create ns demo namespace/demo created
Note: YAML files used in this tutorial are stored in docs/guides/mysql/configuration/podtemplating/yamls folder in GitHub repository kubedb/docs.
Overview
KubeDB allows providing a template for database pod through spec.podTemplate. KubeDB operator will pass the information provided in spec.podTemplate to the PetSet created for MySQL database.
KubeDB accept following fields to set in spec.podTemplate:
- metadata:
- annotations (pod’s annotation)
- controller:
- annotations (petset’s annotation)
- spec:
- env
- resources
- initContainers
- imagePullSecrets
- nodeSelector
- schedulerName
- tolerations
- priorityClassName
- priority
- securityContext
Read about the fields in details in PodTemplate concept,
CRD Configuration
Below is the YAML for the MySQL created in this example. Here, spec.podTemplate.spec.env specifies environment variables and spec.podTemplate.spec.args provides extra arguments for MySQL Docker Image.
In this tutorial, an initial database myDB will be created by providing env MYSQL_DATABASE while the server character set will be set to utf8mb4 by adding extra args. Note that, character-set-server in MySQL 5.7.44 is latin1.
apiVersion: kubedb.com/v1 kind: MySQL metadata: name: mysql-misc-config namespace: demo spec: version: "5.7.44" storageType: "Durable" storage: storageClassName: "standard" accessModes: - ReadWriteOnce resources: requests: storage: 1Gi podTemplate: metadata: labels: pass-to: pod annotations: annotate-to: pod controller: labels: pass-to: petset annotations: annotate-to: statfulset spec: containers: - name: mysql env: - name: MYSQL_DATABASE value: myDB args: - --character-set-server=utf8mb4 resources: requests: memory: "1Gi" cpu: "250m" deletionPolicy: Halt $ kubectl create -f https://github.com/kubedb/docs/raw/v2025.6.30/docs/guides/mysql/configuration/podtemplating/yamls/mysql-misc-config.yaml mysql.kubedb.com/mysql-misc-config created Now, wait a few minutes. KubeDB operator will create necessary PVC, petset, services, secret etc. If everything goes well, we will see that a pod with the name mysql-misc-config-0 has been created.
Check that the petset’s pod is running
$ kubectl get pod -n demo -l app.kubernetes.io/name=mysqls.kubedb.com,app.kubernetes.io/instance=mysql-misc-config NAME READY STATUS RESTARTS AGE mysql-misc-config-0 1/1 Running 0 9m28s Check the pod’s log to see if the database is ready
$ kubectl logs -f -n demo mysql-misc-config-0 Initializing database ..... Database initialized Initializing certificates ... Certificates initialized MySQL init process in progress... .... MySQL init process done. Ready for start up. .... 2022-06-28T13:22:26.076407Z 0 [Note] mysqld: ready for connections. Version: '5.7.44' socket: '/var/run/mysqld/mysqld.sock' port: 3306 MySQL Community Server (GPL) .... Once we see [Note] /usr/sbin/mysqld: ready for connections. in the log, the database is ready.
Now, we will check if the database has started with the custom configuration we have provided.
First, deploy phpMyAdmin to connect with the MySQL database we have just created.
$ kubectl create -f https://github.com/kubedb/docs/raw/v2025.6.30/docs/guides/mysql/configuration/podtemplating/yamls/phpmyadmin.yaml deployment.extensions/myadmin created service/myadmin created Then, open your browser and go to the following URL: http://{node-ip}:{myadmin-svc-nodeport}. For kind cluster, you can get this URL by running the following command:
$ kubectl get svc -n demo myadmin -o json | jq '.spec.ports[].nodePort' 30942 $ kubectl get node -o json | jq '.items[].status.addresses[].address' "172.18.0.3" "kind-control-plane" "172.18.0.4" "kind-worker" "172.18.0.2" "kind-worker2" # expected url will be: url: http://172.18.0.4:30942 Now, let’s connect to the database from the phpMyAdmin dashboard using the database pod IP and MySQL user password.
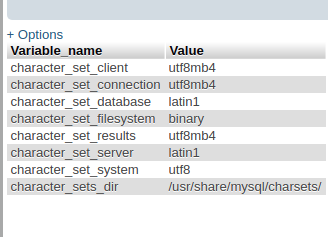
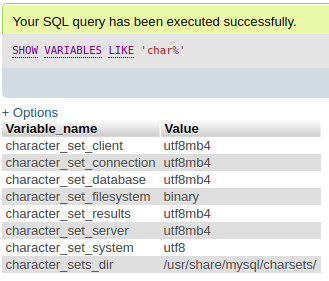
$ kubectl get pods mysql-misc-config-0 -n demo -o yaml | grep IP ... hostIP: 10.0.2.15 podIP: 172.17.0.6 $ kubectl get secrets -n demo mysql-misc-config-auth -o jsonpath='{.data.\user}' | base64 -d root $ kubectl get secrets -n demo mysql-misc-config-auth -o jsonpath='{.data.\password}' | base64 -d MLO5_fPVKcqPiEu9 Once, you have connected to the database with phpMyAdmin go to SQL tab and run sql to see all databases SHOW DATABASES; and to see charcter-set configuration SHOW VARIABLES LIKE 'char%';. You will see a database called myDB is created and also all the character-set is set to utf8mb4.
Cleaning up
To cleanup the Kubernetes resources created by this tutorial, run:
kubectl patch -n demo my/mysql-misc-config -p '{"spec":{"deletionPolicy":"WipeOut"}}' --type="merge" kubectl delete -n demo my/mysql-misc-config kubectl delete deployment -n demo myadmin kubectl delete service -n demo myadmin kubectl delete ns demo If you would like to uninstall KubeDB operator, please follow the steps here.
Next Steps
- Quickstart MySQL with KubeDB Operator.
- Initialize MySQL with Script.
- Monitor your MySQL database with KubeDB using out-of-the-box Prometheus operator.
- Monitor your MySQL database with KubeDB using out-of-the-box builtin-Prometheus.
- Use private Docker registry to deploy MySQL with KubeDB.
- Use kubedb cli to manage databases like kubectl for Kubernetes.
- Detail concepts of MySQL object.
- Want to hack on KubeDB? Check our contribution guidelines.