Close
0%
0%

TinyTTS — The Neural Module That Makes Photos Talk

Your pictures don’t just sit there anymore — they speak. Add short captions to your family album, and turn them into natural voice

Similar projects worth following
When we flip through old photos, our minds fill in the sounds — laughter in the kitchen, the hum of a train station, someone saying “remember?” We built this project so those voices could return, not just live in memory. Now a picture can speak for itself — short, warm phrases, like someone you love is right there again. It began with a Family Storyteller: a few childhood photos, a couple of sentences about funny moments — press Play, and the frame speaks, completely offline. Then came the idea of Talking Places: open a travel snapshot and hear the whisper of a story — as if the city itself tells you where to go next

All of it runs fully on-device — no cloud, no delay. The speech is generated right on the TinyTTS module inside the frame.
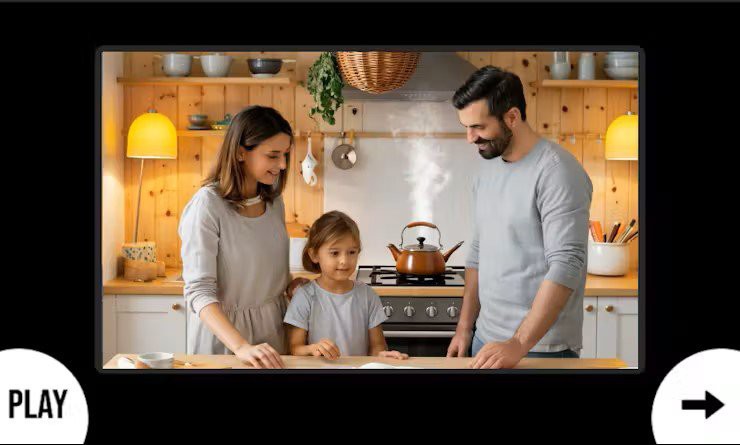
You are the director: control pacing, pauses, and sequence — or just let the story unfold.
The formula is simple: photo + text → voice. That’s it. The rest is emotion.

We don’t just share a tutorial — we hand you a template for your own stories: family, museum, travel, educational.
Add a few lines, press play, and watch faces light up when the frame starts to talk. The first time it speaks — it really does feel like magic.


How It Works

Most “talking” projects stream audio from the cloud.
This one shows true on-device TTS — real speech, fully generated on a microcontroller.

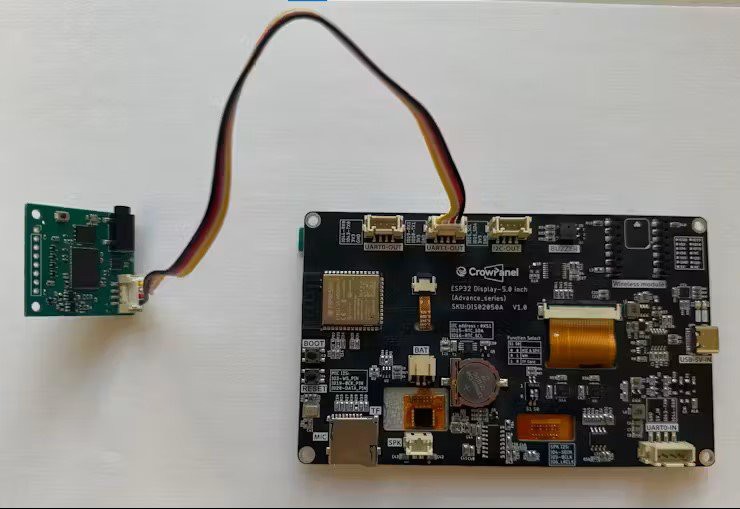
CrowPanel handles UI, SD read, mode switching, and UART transmission.

TinyTTS receives lines via UART, generates voice, and signals completion.

Data flow: CrowPanel (UART) → TinyTTS → Speaker

  • CrowPanel reads image and text files.
  • Text is sent over UART to TinyTTS.
  • TinyTTS generates speech.
  • Audio output from TinyTTS goes to the speaker.
  • Everything runs fully offline.

What’s Next

The same setup can evolve into museum guides, educational kits, talking toys, or home displays — all running fully offline.

No internet, no latency, no cloud dependencies — just local voice and logic you can adapt for any storytelling scenario.

Create the first chapter of your talking album today.
Flash the ready demo, load five photos and five short lines, press Play.

The rest of the story — you’ll discover along the way.

Resources

  • 1 × TinyTTS kit: The First Neural Speech Module https://www.tindie.com/products/40292/
  • 1 × CrowPanel Advance 5“

  • 1
    Quick Start — Ready Demo

    💡 Ready binaries for instant start.

    You’ll Need

    TinyTTS Module

    • TinyTTS kit (Elecrow, or Tindie) — MCU module with embedded neural TTS
    • CrowPanel Advanced (Elecrow) (ESP32-S3 display controller)
    • Speaker — connect to TinyTTS audio out

    1. Connect the CrowPanel (ESP32-S3) to your computer via USB/Serial.
    Set the panel’s function-select switch to “WM(0,1)” (UART1-OUT mode).

    Do not connect the tinyTTS module yet.

    2. Flash the firmware.

    Option A — Use prebuilt images:
    In firmware/, pick

    • binaries_album/ for the album scenario, or
    • binaries_travel/ for the traveling scenario.

    Flash using the provided flasher (see firmware/flash_tool.md).

    Option B — Build from source:
    Install ESP-IDF v5.4, clone the repo, choose the scenario in
    components/ui/scenario_build.h, then run:

     idf.py fullcleanidf.py buildidf.py -p PORT flash

    3. After flashing:
    Connect the tinyTTS module to the CrowPanel (UART0 ↔ UART1-OUT) with the 4-pin cable.
    Attach the audio output (3.5 mm jack) from tinyTTS to a speaker or headphones.


    4. Run the demo:

    The screen shows a photo card.

    • Press Play - the card text is spoken by tinyTTS.
    • Press "→" - next card appears (looped list).

    More details in the Readme

  • 2
    Make Your Own Album - Example: third

    (Based on the Add Scenario Guide)

    1. Create Scenario Folders

    In the repository root, add:

    components/ui/third/new folder for visuals spiffs_root/assets_third/new folder for binary images

    Each must follow the naming convention: lowercase scenario name = third.

    2. Enable Scenario in Code

    Edit
    components/ui/include/scenario_build.h

    #define UI_SCENARIO_ALBUM 0 #define UI_SCENARIO_TRAVEL 0 #define UI_SCENARIO_THIRD 1 // activate the new one

    Only one scenario can be set to 1.

    3. Add Assets

    Place .bin images (RAW format) inside
    spiffs_root/assets_third/.

    You can generate them using SquareLine Studio or the LVGL Image Converter
    (Color format: True color (RGB565), Output: Binary).

    4. Add Texts and Visuals

    Texts:
    Create components/ui/builtin_texts_third.c —
    defines kThirdTexts[] array with your text strings.

    Visuals:
    Create components/ui/third/visuals_third.c —
    maps each text to an image (import from img_third_*.c).

    Example:

    const case_visual_t kVisuals[CASE_TXT_COUNT] = { [CASE_TXT_01] = { &ui_img_third_01, ui_img_third_01_load }, [CASE_TXT_02] = { &ui_img_third_02, ui_img_third_02_load }, [CASE_TXT_03] = { &ui_img_third_03, ui_img_third_03_load }, };

    5. Update CMakeLists.txt

    Add the new block inside components/ui/CMakeLists.txt:

    elseif(_SCEN_SELECTED_NAME_LOWER STREQUAL "third") list(APPEND UI_SCENARIO_SRCS  ${CMAKE_CURRENT_LIST_DIR}/builtin_texts_third.c ${CMAKE_CURRENT_LIST_DIR}/third/visuals_third.c )

    6. Build and Flash

    Clean, build, and flash:

    idf.py fullcleanidf.py buildidf.py -p PORT flash monitor

    Expected log output:

     -- UI scenario selected: THIRD (lower='third')

View all instructions

Enjoy this project?

Share

Discussions

Similar Projects

Does this project spark your interest?

Become a member to follow this project and never miss any updates