There's an ATMega88 in that handsome case.

Give ATMega88 The Boot With This Retro Front Panel

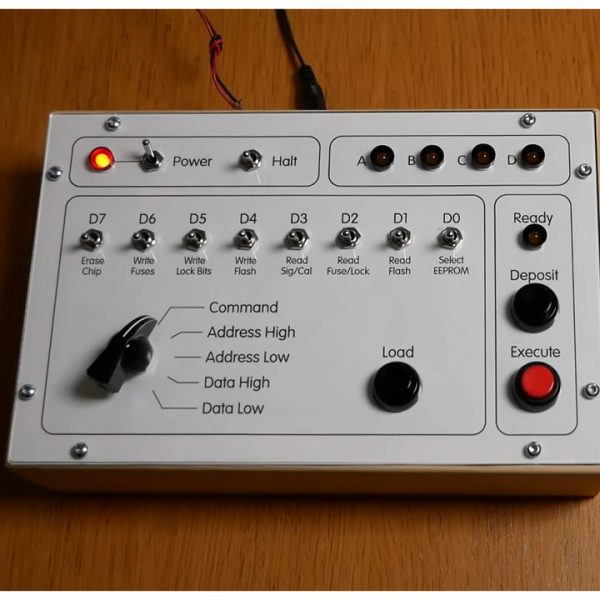
It’s a truism that a computer must boot before it begins to operate. Nowadays that bootstrapping process is automatic, but in the case of the very first home computers, it was very much a hands-on affair. That’s what all those switches and blinkenlights are for on the front panel of the Altair 8800 — laboriously flicking each bit into memory as required to get your program going.

[Linus Åkesson] missed those very early days, and wanted to see what it was like, and clicking virtual switches on an emulator wasn’t going to cut it. He realized that he could set up an ATmega88 for front-panel booting, and proceeded to do just that.

The article linked above goes into good detail; for those of you who prefer video, we’ve embedded his presentation below.  They say the book is always better, but to get the full story, you’ll really want both in this case. The video contains a lot more context and build details, but neglects to mention some issues he had with programming that are detailed in the text. In short, the Write Page bit needs to be written to the Command register to use the page buffer. Which does make sense, but tripped [Linus] up at first.

Then again, this use case isn’t exactly detailed in the datasheet. ATmega88 is an old chip, but not Intel 8008 old, so that’s no surprise. Which is exactly what makes this a good hack! The only thing lacking is blinkenlights to allow one to see the contents of the registers. [Linus] discusses the idea of putting them in, but is apparently happy with this more minimalist approach.

We’ve seen the doughty Atmel chip hacked into everything from web-servers to washing machines, and even things that don’t start with “W”. As for the redoubtable [Linus], he’s most famous around these parts for his musical inventions and adventures with the Commodore 64Continue reading “Give ATMega88 The Boot With This Retro Front Panel”

These are test stampings-- the final product looks a lot better.

2025 Component Abuse Challenge: Nail Your Next Decal

One of the hardest parts of a project — assuming it makes it that far — is finishing it up in an aesthetically pleasing manner. As they say, the devil is in the details, wearing Prada. Apparently the devil also has an excellent manicure, because [Tamas Feher] has come up with a way to introduce incredibly detailed decals (down to 0.1 mm) in cheap, repeatable fashion, using a technique borrowed from the local nail salon. 

The end result can look quite a bit better than the test piece above.

For those who aren’t in to nail art (which, statistically speaking, is likely to be most of you) there is a common “stamping” technique for putting details onto human fingernails. Nail polish is first applied to voids on a stencil-like plate, then picked up by a smooth silicone stamper, which is then pressed against the nail, reproducing the image that was on the stencil. If that’s clear as mud, there’s a quick demo video embedded bellow.

There’s a common industrial technique that works the same way, which is actually where [Tamas] got the idea. For nail salons and at-home use, there are a huge variety of these stencils commercially available for nail art, but that doesn’t mean you’re likely to find what you want for your project’s front panel.

[Tamas] points out that by using a resin printer to produce the stencil plate, any arbitrary text or symbol can be used. Your logo, labels, whatever. By printing flat to the build plate, you can take advantage of the full resolution of the resin printer — even an older 2 K model would more than suffice here, while higher res like the new 16 K models become the definition of overkill. The prints go quick, as they don’t need any structural thickness: just enough to hold together coming off of the plate, plus enough extra to hold your designs at a 0.15 mm inset. That doesn’t seem very thick, but remember that this only has to hold enough nail polish to be picked up by the stamper.

[Tamas] cautions you have to work fast, as the thin layer of nail polish picked up by the stamper can dry in seconds. You’ll want plenty of nail polish remover (or plain acetone) on hand to clean the stamper once you’ve finished, as well as your stencil. [Tamas] cautions you’ll want to clean it immediately if you ever want to use it again. Good to know.

While this is going outside of the nail art kit’s comfort zone, it might not quite be abuse. It is however a very useful technique to add to our ever-growing quiver of how to make front panels. Besides, we don’t specify you have to literally make components suffer; we just want to see what wild and wonderful substitutions and improvisations you all come up with.

Continue reading “2025 Component Abuse Challenge: Nail Your Next Decal”

The Most Satisfying Way To Commit

Have you ever finished up a bit of code and thought that typing “git push” in a terminal is just not a satisfying finish? So did [penumbriel], so he built a big red button he could smash instead.

This is a very simple hack: an Arduino sits inside a 3D-printed case that holds a big, red button. The case itself is very sturdily made to withstand a good satisfying smack: it has thick walls, brass insets, and rubber feet to protect the de The code for the Arduino is very, very simple: it spoofs a USB HID using the standard keyboard library, and automatically types out “git push” whenever the button is pressed. Or smashed, because you know you’re going to want to slam that thing. So far, so good– very innovative for 2006, right?

The detail that made this project stand out in 2025 was the technique [penumbriel] used for lettering– we’re always looking

With a simple soap-and-water mask, the cured silicone peels right off, leaving a clean label.

for new ways to make a good front panel. In this case, the letters were printed as a valley and filled with silicone adhesive. To protect the top surface of the print, soapy water was used as a mask. The silicone would not adhere to the wet plastic, so all [penumbriel] had to do was peel it off after it had cured, leaving solid white inside. It’s a neat trick, and a great way to use up an old tube of silicone before it goes hard. You could also use it for injection molding, but this is a great use for the dregs.

This might go well next to the programmer’s macro pad we featured a while back, but it really needs to stay as a big red button for maximum satisfaction.


Easy Panels With InkJet, Adhesives, And Elbow Grease

Nothing caps off a great project like a good, professional-looking front panel. Looking good isn’t easy, but luckily [Accidental Science] has a tutorial for a quick-and-easy front panel technique in the video below.

It starts with regular paper, and an inkjet or laser printer to print your design. The paper then gets coated on both sides: matte varnish on the front, and white spray paint on the back. Then it’s just a matter of cutting the decal from the paper, and it gluing to your panel. ([Accidental Science] suggests two-part epoxy, but cautions you make sure it does not react to the paint.)

He uses aluminum in this example, but there’s no reason you could not choose a different substrate. Once the paper is adhered to the panel, another coat of varnish is applied to protect it. Alternatively, clear epoxy can be used as glue and varnish. The finish produced is very professional, and holds up to drilling and filing the holes in the panel.

We’d probably want to protect the edges by mounting this panel in a frame, but otherwise would be proud to put such a panel on a project that required it. We covered a similar technique before, but it required a laminator.If you’re looking for alternatives, Hackaday community had a lot of ideas on how to make a panel, but if you have a method you’ve documented, feel free to put in the tip line. Continue reading “Easy Panels With InkJet, Adhesives, And Elbow Grease”

Deep Dive On Panel Making

It is easier than ever to produce projects with nice enclosures thanks to 3D printing and laser cutting. However, for a polished look, you also need a labeled front panel. We’ve looked at several methods for doing that in the past, but we enjoyed [Accidental Science’s] video showing his method for making laminated panels.

His first step is to draw the panel in Inkscape, and he has some interesting tips for getting the most out of the program. He makes a few prints and laminates one of them. The other is a drill guide. You use the drill guide to make openings in the panel, which could be aluminum, steel, plastic, or whatever material you want to work in.

Continue reading “Deep Dive On Panel Making”

Blinkenlights-First Retrocomputer Design

[Boz] wants to build a retrocomputer, but where to start? You could start with the computery bits, like say the CPU or the bus architecture, but where’s the fun in that? Instead, [Boz] built a righteous blinkenlights array.

What’s cool about this display is that it’s ready to go out of the box. All of the LEDs are reverse-mount and assembled by the board maker. The 19″ 2U PCBs serve as the front plates, so [Boz] was careful not to use any through-hole parts, which also simplified the PCB assembly, of course. Each slice has its own microcontroller and a few shift registers to get the bits lit up, and that’s all there is to it. They take incoming data at 9600 baud and output blinkiness.

Right now it pulls out its bytes from his NAS. We’re not sure which bytes, and we think we see some counters in there. Anyway, it doesn’t matter because it’s so pretty. And maybe someday the prettiness will lure [Boz] into building a retrocomputer to go under it. But honestly, we’d just relax and watch the blinking lights.

Continue reading “Blinkenlights-First Retrocomputer Design”

Ask Hackaday: How Do You Make Front Panels?

We’ll admit it. The closer a project is to completion, the less enthusiasm we have for it. Once the main design is clearly going to work on a breadboard, we’re ready to move on to the next one. We don’t mind the PCB layout, especially with modern tools. However, once the board is done, you have to do the case. Paradoxically, this was easier in the old days because you just picked some stock box, drilled some holes, and while it looked terrible, it was relatively easy.

Today, the bar is much higher. You’ll probably 3D print or laser cut an enclosure. If it looks no better than what you did in the 1970s, you won’t win many admirers. We routinely cover projects that could easily pass for commercial products. So how do you do it?

The Parts

The enclosure may even be the easy part. There are plenty of scripts and generators that will make you a nice box that meets your specifications. You can probably even get the holes made as you build. Back in the day, it was a challenge to cut odd-shaped holes for things like serial port connectors. Now, no problem. The printer or laser will just make a hole with any shape you like. You may even want to try a new angle on 3D printing.

Mounting the PCB isn’t that hard, either. With 3D printing, you can create standoffs, but even if you laser cut, you can easily use conventional standoffs. In a pinch, we’ve used long bolts with nuts.

The real problem, it seems to us, is the front panel. Only Star Trek can get away with front panels containing a bunch of knobs and dials with no markings. And although we call them “front” panels, sometimes you need markings on the back or even the sides, too. Continue reading “Ask Hackaday: How Do You Make Front Panels?”