- 🐞Bugs? 💡Issues?
- Please open an issue!
- 💬 Prefer to chat live?
- Find us in #tools-data-diff in the Locally Optimistic Slack or
- Please reach out to the product team share any product feedback or feature requests!
- 💸💸 Looking for paid contributors! 💸💸
- We're looking for developers with a deep understanding of databases and solid Python knowledge. Apply here!
data-diff enables data professionals to detect differences in values between any two tables. It's fast, easy to use, and reliable. Even at massive scale.
Diffing compares two files and tells you how they're different. It's there for you when your test suite doesn't cover every edge case.
You already know about git diff, which helps code reviewers see what's changed. A data-diff does the same thing, but between two data tables.
This is a data-diff! Real code and output examples below.
You sure do! And that will catch any errors that you've written a test for. data-diff is different because it will alert you to any changes in the data.
For example, if you write a test to check if a primary key is unique and not_null, that won't catch if your code change or data migration has caused certain primary keys to disappear💨, or to be slightly altered😱. That's where data-diff comes in.
- Validation of data integrity in replication, migration, and pipelines
- Comparing tables within one database to validate successful transformations
- Searching for changes between two data sets in any context
- ⇄ Verifies across many different databases (e.g. PostgreSQL ⇄ Snowflake) or within a database
- 🔍 Outputs diff of rows in detail
- 🚨 Simple CLI/API to create monitoring and alerts
- 🔁 Bridges column types of different formats and levels of precision (e.g. Double ⇆ Float ⇆ Decimal)
- 🔥 Verify 25M+ rows in <10s, and 1B+ rows in ~5min
- ♾️ Works for tables with 10s of billions of rows
First, install data-diff using pip.
pip install data-diff
Note: Once you've installed Python 3.7+, it's most likely that pip and pip3 can be used interchangeably.
Then, install one or more driver(s) specific to the database(s) you want to connect to.
-
pip install 'data-diff[mysql]' -
pip install 'data-diff[postgresql]' -
pip install 'data-diff[snowflake]' -
pip install 'data-diff[presto]' -
pip install 'data-diff[oracle]' -
pip install 'data-diff[trino]' -
pip install 'data-diff[clickhouse]' -
pip install 'data-diff[vertica]' -
For BigQuery, see: https://pypi.org/project/google-cloud-bigquery/
Once you've installed data-diff, you can run it from the command line:
data-diff DB1_URI TABLE1_NAME DB2_URI TABLE2_NAME [OPTIONS]
We've included examples here for PostgreSQL and Snowflake. Additional database configurations and examples are available in the (docs TODO.)[link]
Here's an example comparing two versions of a table with 829,615 rows in two different databases. The code here has <> carrots 🥕 around variables in place of content that you will replace with your own information.
The -k flag is used to specify a primary key. Otherwise, data-diff will assume the primary key is named id.
$ data-diff \ postgresql://<YOUR_USERNAME>:<your_postgres_password>@<your_hostname>:5432/<your_database_name> <table_2_name> \ "snowflake://<YOUR_USERNAME>:<your_snowflake_password>@<YOUR_ACCOUNT>/SNOWFLAKE_DB/<YOUR_DATABASE>?warehouse=<YOUR_WAREHOUSE>&role=<YOUR_ROLE>" <TABLE_1_NAME> \ -k <primary_key>
Here's what the command looks like when you replace the carrots with real values and see the results:

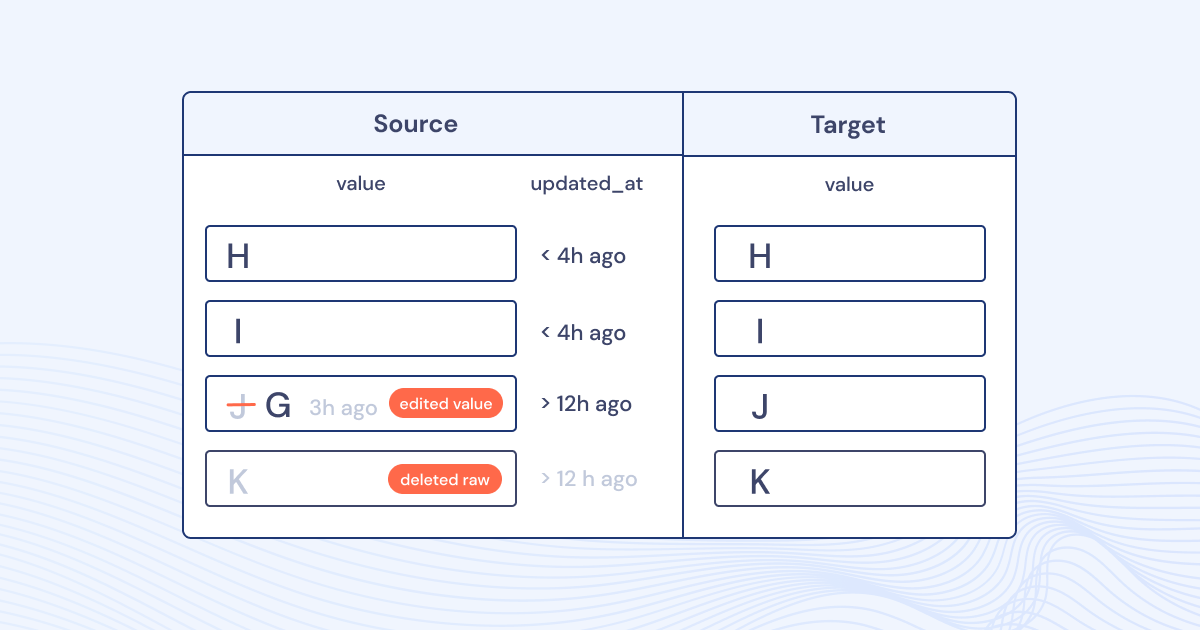
We see that is one primary key that exists in the origin Postgres database, but is missing from the destination Snowflake warehouse.
If you want to see a summary of the results, you can use the -s flag. Here's what that looks like:
$ data-diff \ postgresql://<YOUR_USERNAME>:<your_postgres_password>@<your_hostname>:5432/<your_database_name> <table_2_name> \ "snowflake://<YOUR_USERNAME>:<your_snowflake_password>@<YOUR_ACCOUNT>/SNOWFLAKE_DB/<YOUR_DATABASE>?warehouse=<YOUR_WAREHOUSE>&role=<YOUR_ROLE>" <TABLE_1_NAME> \ -k <primary_key> -s 
With the -c flag, you can specify additional columns to analyze for differences between the two tables.
$ data-diff \ postgresql://<YOUR_USERNAME>:<your_postgres_password>@<your_hostname>:5432/<your_database_name> <table_2_name> \ "snowflake://<YOUR_USERNAME>:<your_snowflake_password>@<YOUR_ACCOUNT>/SNOWFLAKE_DB/<YOUR_DATABASE>?warehouse=<YOUR_WAREHOUSE>&role=<YOUR_ROLE>" <TABLE_1_NAME> \ -k <primary_key> -c activity 
We see that one row has a conflicting value in the activity column. Further investigation of this row revealed that there is extra trailing whitespace in the origin Postgres database.
In this example, we'll run a similar command comparing two tables within Snowflake. This could help you out when reviewing a PR and comparing the development vs production version of a table.
$ data-diff \ "snowflake://<YOUR_USERNAME>:<your_snowflake_password>@<YOUR_ACCOUNT>/SNOWFLAKE_DB/<YOUR_DATABASE>?warehouse=<YOUR_WAREHOUSE>&role=<YOUR_ROLE>" <TABLE_1_NAME> \ "snowflake://<YOUR_USERNAME>:<your_snowflake_password>@<YOUR_ACCOUNT>/SNOWFLAKE_DB/<YOUR_DATABASE>?warehouse=<YOUR_WAREHOUSE>&role=<YOUR_ROLE>" <TABLE_2_NAME> \ -k <primary_key> \ -s 
We see that 7 primary keys exist only in the ANALYTICS_DEV schema, and 23 primary keys exist only in the ANALYTICS schema. Depending on the nature of the PR, this could be expected, or it could be a red flag indicating there's something wrong with the updated code.
[TODO want to learn more? Dive into the Datafold Documentation (link).]
data-diff collects anonymous usage data to help our team improve the tool and to apply development efforts to where our users need them most. [TODO Read more about this and how to opt out in the documentation (link).]
The development setup centers around using docker-compose to boot up various databases, and then inserting data into them.
For Mac for performance of Docker, we suggest enabling in the UI:
- Use new Virtualization Framework
- Enable VirtioFS accelerated directory sharing
1. Install Data Diff
When developing/debugging, it's recommended to install dependencies and run it directly with poetry rather than go through the package.
$ brew install mysql postgresql # MacOS dependencies for C bindings $ apt-get install libpq-dev libmysqlclient-dev # Debian dependencies $ pip3 install poetry # Python dependency isolation tool $ poetry install # Install dependencies 2. Start Databases
Install docker-compose if you haven't already.
$ docker-compose up -d mysql postgres # run mysql and postgres dbs in background 3. Run Unit Tests
There are more than 1000 tests for all the different type and database combinations, so we recommend using unittest-parallel that's installed as a development dependency.
$ poetry run unittest-parallel -j 16 # run all tests $ poetry run python -m unittest -k <test> # run individual test 4. Seed the Database(s) (optional)
First, download the CSVs of seeding data:
$ curl https://datafold-public.s3.us-west-2.amazonaws.com/1m.csv -o dev/ratings.csv # For a larger data-set (but takes 25x longer to import): # - curl https://datafold-public.s3.us-west-2.amazonaws.com/25m.csv -o dev/ratings.csv Now you can insert it into the testing database(s):
# It's optional to seed more than one to run data-diff(1) against. $ poetry run preql -f dev/prepare_db.pql mysql://mysql:Password1@127.0.0.1:3306/mysql $ poetry run preql -f dev/prepare_db.pql postgresql://postgres:Password1@127.0.0.1:5432/postgres # Cloud databases $ poetry run preql -f dev/prepare_db.pql snowflake://<uri> $ poetry run preql -f dev/prepare_db.pql mssql://<uri> $ poetry run preql -f dev/prepare_db.pql bigquery:///<project> 5. Run data-diff against seeded database (optional)
poetry run python3 -m data_diff postgresql://postgres:Password1@localhost/postgres rating postgresql://postgres:Password1@localhost/postgres rating_del1 --verbose6. Run benchmarks (optional)
$ dev/benchmark.sh # runs benchmarks and puts results in benchmark_<sha>.csv $ poetry run python3 dev/graph.py # create graphs from benchmark_*.csv files You can adjust how many rows we benchmark with by passing N_SAMPLES to dev/benchmark.sh:
$ N_SAMPLES=100000000 dev/benchmark.sh # 100m which is our canonical target