Arbeiten mit Farbverlauf in PS-Datei | Python
Fügen Sie einen Farbverlauf im PS-Dokument hinzu
In diesem Artikel wird die Implementierung von Farbverläufen in PS-Dokumenten mit Aspose.Page für Python untersucht.
Farbverläufe stellen einen sanften Übergang zwischen den Farben dar und erhöhen den Realismus gezeichneter Bilder.
In Aspose.Page für Python werden Farbverläufe als Unterklassen von aspose.pydrawing.Brush implementiert, nämlich:
- aspose.pydrawing.drawing2d.LinearGradientBrush
- aspose.pydrawing.drawing2d.PathGradientBrush
Um Farbe oder Strich in einem PsDocument anzuwenden, werden Objekte der Klasse aspose.pydrawing.Brush zum Malen und aspose.pydrawing.Pen zum Streichen an die entsprechenden Methoden übergeben. Aspose.Page für Python unterstützt alle wesentlichen Klassen innerhalb von aspose.pydrawing.Brush, die von der .NET-Plattform angeboten werden, einschließlich aspose.pydrawing.Color, aspose.pydrawing.TextureBrush, aspose.pydrawing.drawing2d .LinearGradientBrush und aspose.pydrawing.drawing2d.PathGradientBrush. Die Strichfarbe wird separat von den Stricheigenschaften mithilfe von aspose.pydrawing.Brush im aspose.pydrawing.Pen-Objekt zugewiesen.
Um Grafikobjekte mit einem Farbverlauf zu malen, erstellen Sie entweder aspose.pydrawing.drawing2d.LinearGradientBrush oder aspose.pydrawing.drawing2d.PathGradientBrush und übergeben Sie es an set_paint() oder eines der Methoden fill_text() oder fill_and_Stroke_text(), die aspose.pydrawing.Brush als Parameter akzeptieren.
Um Grafikobjekte mit einem Farbverlauf zu umreißen, übergeben Sie entweder aspose.pydrawing.drawing2d.LinearGradientBrush oder aspose.pydrawing.drawing2d.PathGradientBrush an set_paint() oder einen der * *outline_text()**- oder fill_and_Stroke_text()-Methoden, die Strichfarbe als Parameter akzeptieren.
Im folgenden Beispiel zeigen wir, wie man eine Form und einen Text füllt und den Text mit einem Farbverlauf umrandet.
Ein Algorithmus zum Malen von Grafikobjekten mit einem Farbverlauf in einem neuen PS-Dokument umfasst die folgenden Schritte:
- Erstellen Sie einen Ausgabestream für die resultierende PS-Datei.
- Initiieren Sie PsSaveOptions.
- Erstellen Sie ein PsDocument mit dem bereits erstellten Ausgabestream und den Speicheroptionen.
- Erstellen Sie den erforderlichen Grafikpfad oder eine Schriftart, abhängig davon, welches Objekt wir füllen oder umreißen möchten.
- Erstellen Sie ein Objekt von aspose.pydrawing.drawing2d.LinearGradientBrush oder aspose.pydrawing.drawing2d.PathGradientBrush in Abhängigkeit von der gewünschten Form eines Farbverlaufs.
- Stellen Sie an diesem Pinsel die erforderliche Transformation ein.
- Legen Sie den Verlaufspinsel als aktuelle Farbe im PsDocument fest
- Füllen Sie den Grafikpfad mit der aktuellen Farbe oder füllen Sie den Text. Wenn wir eine der Methoden zum Füllen des Textes verwenden, die aspose.pydrawing.Brush als Parameter akzeptiert, kann der vorherige Schritt ignoriert werden.
- Schließen Sie die Seite.
- Speichern Sie das Dokument.
Wenn wir Grafikobjekte mit einem Farbverlauf streichen (umreißen) müssen, sehen die letzten 4 Schritte wie folgt aus: 8. Legen Sie den Farbverlauf als aktuelle Farbe in PsDocument fest. 9. Erstellen Sie das Objekt aspose.pydrawing.Pen. 10. Legen Sie diesen Strich als aktuellen Strich in PsDocument fest. 11. Umreißen Sie den Grafikpfad mit dem aktuellen Strich oder umreißen Sie den Text. Wenn wir eine der Methoden zum Umreißen des Textes verwenden, die aspose.pydrawing.Pen als Parameter akzeptiert, kann der vorherige Punkt ignoriert werden. 12. Schließen Sie die Seite. 13. Speichern Sie das Dokument.
Hier sind 5 separate Codeausschnitte, die die Verwendung verschiedener Farbverläufe demonstrieren. In diesem Fall erstellen wir einen horizontalen linearen Farbverlauf aus zwei Farben, füllen ein Rechteck, füllen einen Text und umreißen einen Text mit diesem Farbverlauf.
1# The path to the documents directory. 2data_dir = Util.get_data_dir_working_with_gradient() 3 4# Create an output stream for the PostScript document 5with open(data_dir + "HorizontalGradient_outPS.ps", "wb") as out_ps_stream: 6 # Create the save options with the A4 size 7 options = PsSaveOptions() 8 9 # Create a new 1-paged PS Document 10 document = PsDocument(out_ps_stream, options, False) 11 12 offset_x = 200. 13 offset_y = 100. 14 width = 200. 15 height = 100. 16 17 # Create a graphics path from the first rectangle 18 path = aspose.pydrawing.drawing2d.GraphicsPath() 19 path.add_rectangle(aspose.pydrawing.RectangleF(offset_x, offset_y, width, height)) 20 21 # Create a linear gradient brush with a rectangle as a bounds, start and end colors 22 brush = GraphicsFactory.create_linear_gradient_brush_by_rect_and_angle(aspose.pydrawing.RectangleF(0, 0, width, height), 23 aspose.pydrawing.Color.from_argb(150, 0, 0, 0), aspose.pydrawing.Color.from_argb(50, 40, 128, 70), 0) 24 # Create a transform for brush. X and Y scale component must be equal to the width and height of the rectangle correspondingly. 25 # Translation components are offsets of the rectangle 26 brush_transform = aspose.pydrawing.drawing2d.Matrix(width, 0., 0., height, offset_x, offset_y) 27 # Set the transform 28 brush.transform = brush_transform 29 30 # Set the paint 31 document.set_paint(brush) 32 33 # Fill the rectangle 34 document.fill(path) 35 36 # Fill the text with the gradient 37 font = ExternalFontCache.fetch_dr_font("Arial", 96, aspose.pydrawing.FontStyle.BOLD) 38 document.fill_and_stroke_text("ABC", font, 200, 300, brush, 39 GraphicsFactory.create_pen_by_brush_and_width(aspose.pydrawing.SolidBrush(aspose.pydrawing.Color.black), 2)) 40 41 # Set a current stroke 42 document.set_stroke(GraphicsFactory.create_pen_by_brush_and_width(brush, 5)) 43 # Outline text with the gradient 44 document.outline_text("ABC", font, 200, 400) 45 46 # Close the current page 47 document.close_page() 48 49 # Save the document 50 document.save()Das Ergebnis der Ausführung dieses Codes ist

In diesem Codeausschnitt können Sie die Erstellung eines vertikalen linearen Farbverlaufs aus 5 Farben und das Füllen eines Rechtecks mit diesem Farbverlauf sehen.
1# The path to the documents directory. 2data_dir = Util.get_data_dir_working_with_gradient() 3 4# Create an output stream for the PostScript document 5with open(data_dir + "VerticalGradient_outPS.ps", "wb") as out_ps_stream: 6 # Create the save options with the A4 size 7 options = PsSaveOptions() 8 9 # Create a new 1-paged PS Document 10 document = PsDocument(out_ps_stream, options, False) 11 12 offset_x = 200. 13 offset_y = 100. 14 width = 200. 15 height = 100. 16 17 # Create a graphics path from the first rectangle 18 path = aspose.pydrawing.drawing2d.GraphicsPath() 19 path.add_rectangle(aspose.pydrawing.RectangleF(offset_x, offset_y, width, height)) 20 21 # Create an array of interpolation colors 22 colors = [ aspose.pydrawing.Color.red, aspose.pydrawing.Color.green, aspose.pydrawing.Color.blue, 23 aspose.pydrawing.Color.orange, aspose.pydrawing.Color.dark_olive_green ] 24 positions = [ 0.0, 0.1873, 0.492, 0.734, 1.0 ] 25 color_blend = aspose.pydrawing.drawing2d.ColorBlend() 26 color_blend.colors = colors 27 color_blend.positions = positions 28 29 # Create a linear gradient brush with a rectangle as a bounds, start and end colors 30 brush = GraphicsFactory.create_linear_gradient_brush_by_rect_and_angle(aspose.pydrawing.RectangleF(0, 0, width, height), 31 aspose.pydrawing.Color.beige, aspose.pydrawing.Color.dodger_blue, 0) 32 # Set interpolation colors 33 brush.interpolation_colors = color_blend 34 # Create a transform for brush. X and Y scale component must be equal to the width and height of the rectangle correspondingly. 35 # Translation components are offsets of the rectangle 36 brush_transform = aspose.pydrawing.drawing2d.Matrix(width, 0., 0., height, offset_x, offset_y) 37 # Rotate transform to get colors change in the vertical direction from up to down 38 brush_transform.rotate(90.) 39 # Set the transform 40 brush.transform = brush_transform 41 42 # Set the paint 43 document.set_paint(brush) 44 45 # Fill the rectangle 46 document.fill(path) 47 48 # Close the current page 49 document.close_page() 50 51 # Save the document 52 document.save()Hier kommt das Ergebnis

In diesem Codeausschnitt erstellen wir einen diagonalen linearen Farbverlauf aus 2 Farben und füllen ein Rechteck mit diesem Farbverlauf.
1# Create an output stream for PostScript document 2with open(data_dir + "DiagonaGradient_outPS.ps", "wb") as out_ps_stream: 3 # Create the save options with A4 size 4 options = PsSaveOptions() 5 6 # Create a new 1-paged PS Document 7 document = PsDocument(out_ps_stream, options, False) 8 9 offset_x = 200. 10 offset_y = 100. 11 width = 200. 12 height = 100. 13 14 # Create a graphics path from the first rectangle 15 path = aspose.pydrawing.drawing2d.GraphicsPath() 16 path.add_rectangle(aspose.pydrawing.RectangleF(offset_x, offset_y, width, height)) 17 18 # Create a linear gradient brush with a rectangle as a bounds, start and end colors 19 brush = GraphicsFactory.create_linear_gradient_brush_by_rect_and_angle(aspose.pydrawing.RectangleF(0, 0, width, height), 20 aspose.pydrawing.Color.from_argb(255, 255, 0, 0), aspose.pydrawing.Color.from_argb(255, 0, 0, 255), 0) 21 22 # Create a transform for brush. X and Y scale component must be equal to the width and height of the rectangle correspondingly. 23 # Translation components are offsets of the rectangle 24 brush_transform = aspose.pydrawing.drawing2d.Matrix(width, 0., 0., height, offset_x, offset_y) 25 # Rotate gradient, than scale and translate to get the visible color transition in the required rectangle 26 brush_transform.rotate(-45.) 27 hypotenuse = float(math.sqrt(200. * 200. + 100. * 100.)) 28 ratio = hypotenuse / 200. 29 brush_transform.scale(-ratio, 1.) 30 brush_transform.translate(100. / brush_transform.elements[0], 0.) 31 32 # Set the transform 33 brush.transform = brush_transform 34 35 # Set the paint 36 document.set_paint(brush) 37 38 # Fill the rectangle 39 document.fill(path) 40 41 # Close the current page 42 document.close_page() 43 44 # Save the document 45 document.save()Hier kommt das Ergebnis

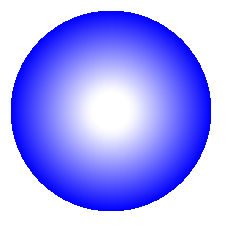
Hier erstellen wir einen radialen Farbverlauf aus 2 Farben und füllen einen Kreis mit diesem Farbverlauf.
1# The path to the documents directory. 2data_dir = Util.get_data_dir_working_with_gradient() 3 4# Create an output stream for the PostScript document 5with open(data_dir + "RadialGradient1_outPS.ps", "wb") as out_ps_stream: 6 # Create the save options with A4 size 7 options = PsSaveOptions() 8 9 # Create a new 1-paged PS Document 10 document = PsDocument(out_ps_stream, options, False) 11 12 offset_x = 200. 13 offset_y = 100. 14 width = 200. 15 height = 200. 16 17 # Create a graphics path from the rectangle bounds 18 bounds = aspose.pydrawing.RectangleF(offset_x, offset_y, width, height) 19 path = aspose.pydrawing.drawing2d.GraphicsPath() 20 path.add_ellipse(bounds) 21 22 # Create and fill a color blend object 23 colors = [ aspose.pydrawing.Color.white, aspose.pydrawing.Color.white, aspose.pydrawing.Color.blue ] 24 positions = [ 0.0, 0.2, 1.0 ] 25 color_blend = aspose.pydrawing.drawing2d.ColorBlend() 26 color_blend.colors = colors 27 color_blend.positions = positions 28 29 brush_rect = aspose.pydrawing.drawing2d.GraphicsPath() 30 brush_rect.add_rectangle(aspose.pydrawing.RectangleF(0, 0, width, height)) 31 32 # Create a path gradient brush with a rectangle as a bounds 33 brush = GraphicsFactory.create_path_gradient_brush_by_path(brush_rect) 34 # Set the interpolation colors 35 brush.interpolation_colors = color_blend 36 # Create a transform for brush. X and Y scale component must be equal to the width and height of the rectangle correspondingly. 37 # Translation components are offsets of the rectangle 38 brush_transform = aspose.pydrawing.drawing2d.Matrix(width, 0., 0., height, offset_x, offset_y) 39 # Set the transform 40 brush.transform = brush_transform 41 42 # Set the paint 43 document.set_paint(brush) 44 45 # Fill the rectangle 46 document.fill(path) 47 48 # Close the current page 49 document.close_page() 50 51 #Save the document 52 document.save()Das Ergebnis
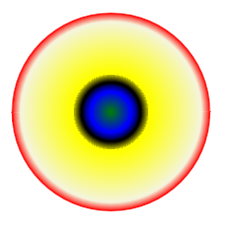
In diesem Codeausschnitt erstellen wir einen radialen Farbverlauf aus 6 Farben und füllen ein Rechteck mit diesem Farbverlauf.
1# The path to the documents directory. 2 data_dir = Util.get_data_dir_working_with_gradient() 3 4# Create an utput stream for the PostScript document 5with open(data_dir + "RadialGradient2_outPS.ps", "wb") as out_ps_stream: 6 # Create save options with the A4 size 7 options = PsSaveOptions() 8 9 # Create a new 1-paged PS Document 10 document = PsDocument(out_ps_stream, options, False) 11 12 offset_x = 200. 13 offset_y = 100. 14 width = 200. 15 height = 200. 16 17 # Create a graphics path from the rectangle bounds 18 bounds = aspose.pydrawing.RectangleF(offset_x, offset_y, width, height) 19 path = aspose.pydrawing.drawing2d.GraphicsPath() 20 path.add_rectangle(bounds) 21 22 # Create and fill a color blend object 23 colors = [ aspose.pydrawing.Color.green, aspose.pydrawing.Color.blue, aspose.pydrawing.Color.black, 24 aspose.pydrawing.Color.yellow, aspose.pydrawing.Color.beige, aspose.pydrawing.Color.red ] 25 positions = [ 0.0, 0.2, 0.3, 0.4, 0.9, 1.0 ] 26 color_blend = aspose.pydrawing.drawing2d.ColorBlend() 27 color_blend.colors = colors 28 color_blend.positions = positions 29 30 brush_rect = aspose.pydrawing.drawing2d.GraphicsPath() 31 brush_rect.add_rectangle(aspose.pydrawing.RectangleF(0, 0, width, height)) 32 33 # Create a path gradient brush with a rectangle as a bounds 34 brush = GraphicsFactory.create_path_gradient_brush_by_path(brush_rect) 35 # Set interpolation colors 36 brush.interpolation_colors = color_blend 37 # Create a transform for brush. X and Y scale component must be equal to the width and height of the rectangle correspondingly. 38 # Translation components are offsets of the rectangle 39 brush_transform = aspose.pydrawing.drawing2d.Matrix(width, 0., 0., height, offset_x, offset_y) 40 # Set the transform 41 brush.transform = brush_transform 42 43 # Set the paint 44 document.set_paint(brush) 45 46 # Fill the rectangle 47 document.fill(path) 48 49 # Close the current page 50 document.close_page() 51 52 # Save the document 53 document.save()Das Ergebnis sieht wie folgt aus
Sie können Beispiele und Datendateien herunterladen von GitHub.