Change the appearance of a 3D object scene layer with different renderers.
Use case
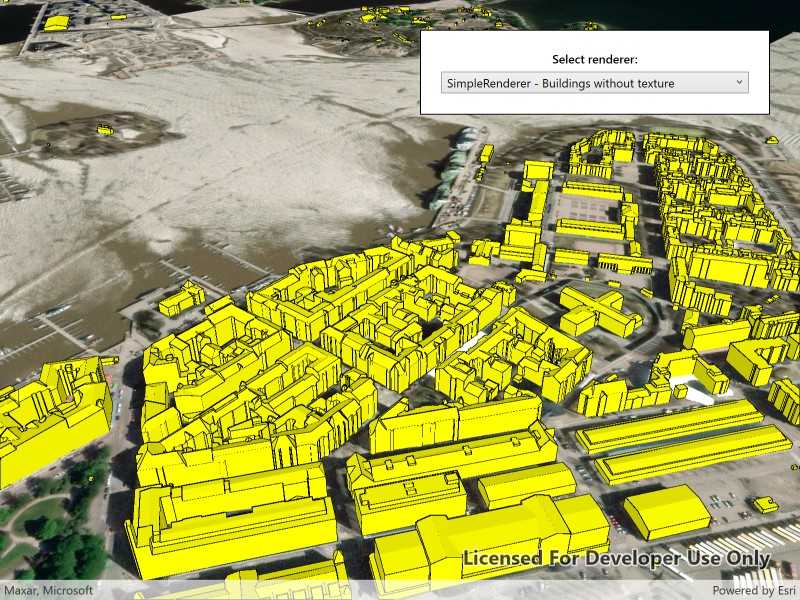
A scene layer of 3D buildings hosted on ArcGIS Online comes with a preset renderer that defines how the buildings are displayed in the application. However, the fill color may sometimes blend into the basemap, making the buildings difficult to distinguish. To enhance visualization, you can apply a custom renderer with a more contrasting fill color, helping the 3D buildings stand out more clearly. Additionally, you can use a unique value renderer to represent different building uses, or a class breaks renderer to visualize building ages - valuable insights for urban planning and analysis.
How to use the sample
Wait for the scene layer to load. The original scene layer displays 3D textured buildings. Tap on the "Select Renderer" dropdown menu and choose a different renderer to change how the buildings are visualized. Each renderer applies different symbology to the scene layer. Setting the renderer to null will remove any applied symbology, reverting the buildings to their original textured appearance.
How it works
- Create an
ArcGISSceneLayerusing a service URL. - Add the scene layer to an
ArcGISSceneand display it via aSceneView. - Configure multiple renderers:
- A
SimpleRendererwith aMultilayerMeshSymbolthat includes a fill color and styled edges. - A
UniqueValueRendererthat applies differentMultilayerMeshSymbolsettings based on the building usage attribute. - A
ClassBreaksRendererthat changes the symbol based on the building's year of completion.
- A
- Update the scene layer's
Rendererproperty with the selected renderer. - Setting the
Rendererproperty tonullrestores the original textured appearance.
Relevant API
- ArcGISScene
- ArcGISSceneLayer
- ClassBreaksRenderer
- MultilayerMeshSymbol
- SceneView
- SimpleRenderer
- SymbolLayerEdges3D
- UniqueValueRenderer
About the data
This sample uses the Helsinki 3D Buildings Scene from ArcGIS Online, showcasing 3D textured buildings in Helsinki, Finland.
Tags
3d tiles, layers, OGC, OGC API, scene, service
Sample Code
// Copyright 2025 Esri. // // Licensed under the Apache License, Version 2.0 (the "License"); you may not use this file except in compliance with the License. // You may obtain a copy of the License at: http://www.apache.org/licenses/LICENSE-2.0 // // Unless required by applicable law or agreed to in writing, software distributed under the License is distributed on an // "AS IS" BASIS, WITHOUT WARRANTIES OR CONDITIONS OF ANY KIND, either express or implied. See the License for the specific // language governing permissions and limitations under the License. using Esri.ArcGISRuntime.Mapping; using Esri.ArcGISRuntime.Symbology; using System; using System.Collections.Generic; using System.Threading.Tasks; using System.Windows.Controls; namespace ArcGIS.WPF.Samples.ApplyRenderersToSceneLayer { [ArcGIS.Samples.Shared.Attributes.Sample( name: "Apply renderers to scene layer", category: "Layers", description: "Change the appearance of a 3D object scene layer with different renderers.", instructions: "Wait for the scene layer to load. The original scene layer displays 3D textured buildings. Tap on the \"Select Renderer\" dropdown menu and choose a different renderer to change how the buildings are visualized. Each renderer applies different symbology to the scene layer. Setting the renderer to null will remove any applied symbology, reverting the buildings to their original textured appearance.", tags: new[] { "3d tiles", "OGC", "OGC API", "layers", "scene", "service" })] public partial class ApplyRenderersToSceneLayer { private readonly Uri _elevationSourceUrl = new Uri("https://elevation3d.arcgis.com/arcgis/rest/services/WorldElevation3D/Terrain3D/ImageServer"); private readonly Uri _sceneLayerUrl = new Uri("https://services.arcgis.com/V6ZHFr6zdgNZuVG0/arcgis/rest/services/Helsinki_buildings/SceneServer"); private ArcGISSceneLayer _sceneLayer; public ApplyRenderersToSceneLayer() { InitializeComponent(); _ = Initialize(); } private async Task Initialize() { // Create new Scene. Scene myScene = new Scene(BasemapStyle.ArcGISImageryStandard); // Create and add an elevation source for the Scene. ArcGISTiledElevationSource elevationSrc = new ArcGISTiledElevationSource(_elevationSourceUrl); myScene.BaseSurface.ElevationSources.Add(elevationSrc); // Create new scene layer from the URL. _sceneLayer = new ArcGISSceneLayer(_sceneLayerUrl); // Add created layer to the operational layers collection. myScene.OperationalLayers.Add(_sceneLayer); // Set the scene on the SceneView to visualize the 3D tiles layer. MySceneView.Scene = myScene; // Load the scene layer before setting up the view. await _sceneLayer.LoadAsync(); // Create a camera with an initial viewpoint. // Camera constructor parameters: latitude, longitude, altitude, heading, pitch, and roll. var sceneCamera = new Camera(60.1646, 24.9600, 360, 48.35, 57.84, 0.0); MySceneView.SetViewpointCamera(sceneCamera); // Populate the combo box. RendererCombo.ItemsSource = new[] { "SimpleRenderer - Buildings without texture", "UniqueValueRenderer - Buildings by usage", "ClassBreakRenderer - Buildings by year completed", "NullRenderer - Buildings with original texture" }; // Default to original textures. RendererCombo.SelectedIndex = 3; } private void RendererCombo_SelectionChanged(object sender, EventArgs e) { ApplyRenderer(RendererCombo.SelectedIndex); } // Switches the selected renderer according to the renderer type. private void ApplyRenderer(int index) { switch (index) { case 0: ApplySimpleRenderer(); break; case 1: ApplyUniqueValueRenderer(); break; case 2: ApplyClassBreakRenderer(); break; case 3: ApplyNullRenderer(); break; } } // Simple renderer using a multilayer mesh symbol with a material fill layer (colorMixMode = Replace) and edges. private void ApplySimpleRenderer() { var material = new MaterialFillSymbolLayer(System.Drawing.Color.Yellow) { ColorMixMode = ColorMixMode.Replace, Edges = new SymbolLayerEdges3D(System.Drawing.Color.Black, 0.5) }; var mesh = new MultilayerMeshSymbol(material); _sceneLayer.Renderer = new SimpleRenderer(mesh); } // Unique value renderer using multilayer mesh symbols by building usage // The default Multiply colorMixMode blends the new color with the texture. private void ApplyUniqueValueRenderer() { MultilayerMeshSymbol Mesh(int a, int r, int g, int b) { return new MultilayerMeshSymbol(new MaterialFillSymbolLayer(System.Drawing.Color.FromArgb(a, r, g, b))); } var defaultMesh = Mesh(255, 230, 230, 230); List<UniqueValue> uniqueValues = new List<UniqueValue> { new UniqueValue("commercial buildings", "commercial buildings", Mesh(200, 245, 213, 169), new List<string> { "general or commercial" }), new UniqueValue("residential buildings", "residential buildings", Mesh(255, 210, 254, 208), new List<string> { "residential" }), new UniqueValue("other", "other", Mesh(150, 253, 198, 227), new List<string> { "other" }) }; _sceneLayer.Renderer = new UniqueValueRenderer( new List<string> { "usage" }, uniqueValues: uniqueValues, defaultLabel: string.Empty, defaultSymbol: defaultMesh); } // Class breaks renderer uses multilayer mesh symbols based on the building's year of completion. // The Tint colorMixMode applies the new color over a desaturated texture. private void ApplyClassBreakRenderer() { // Local helper to make the mesh symbol with tint. MultilayerMeshSymbol Mesh(int a, int r, int g, int b) { return new MultilayerMeshSymbol(new MaterialFillSymbolLayer(System.Drawing.Color.FromArgb(a, r, g, b)) { ColorMixMode = ColorMixMode.Tint }); } var classBreaks = new List<ClassBreak> { new ClassBreak("before 1900", "before 1900", 1725, 1899, Mesh(255, 230, 238, 207)), new ClassBreak("1900 - 1956", "1900 - 1956", 1900, 1956, Mesh(255, 155, 196, 193)), new ClassBreak("1957 - 2000", "1957 - 2000", 1957, 2000, Mesh(255, 105, 168, 183)), new ClassBreak("after 2000", "after 2000", 2001, 3000, Mesh(255, 75, 126, 152)) }; _sceneLayer.Renderer = new ClassBreaksRenderer("yearCompleted", classBreaks); } private void ApplyNullRenderer() { _sceneLayer.Renderer = null; } } }