Cloud Storage(ウェブサイトホスティング) + App Engine(FastAPI) でFirebase Authenticationの認証フローを組んでみた
はじめに
みなさんこんにちはクラウド事業本部コンサルティング部の浅野です。
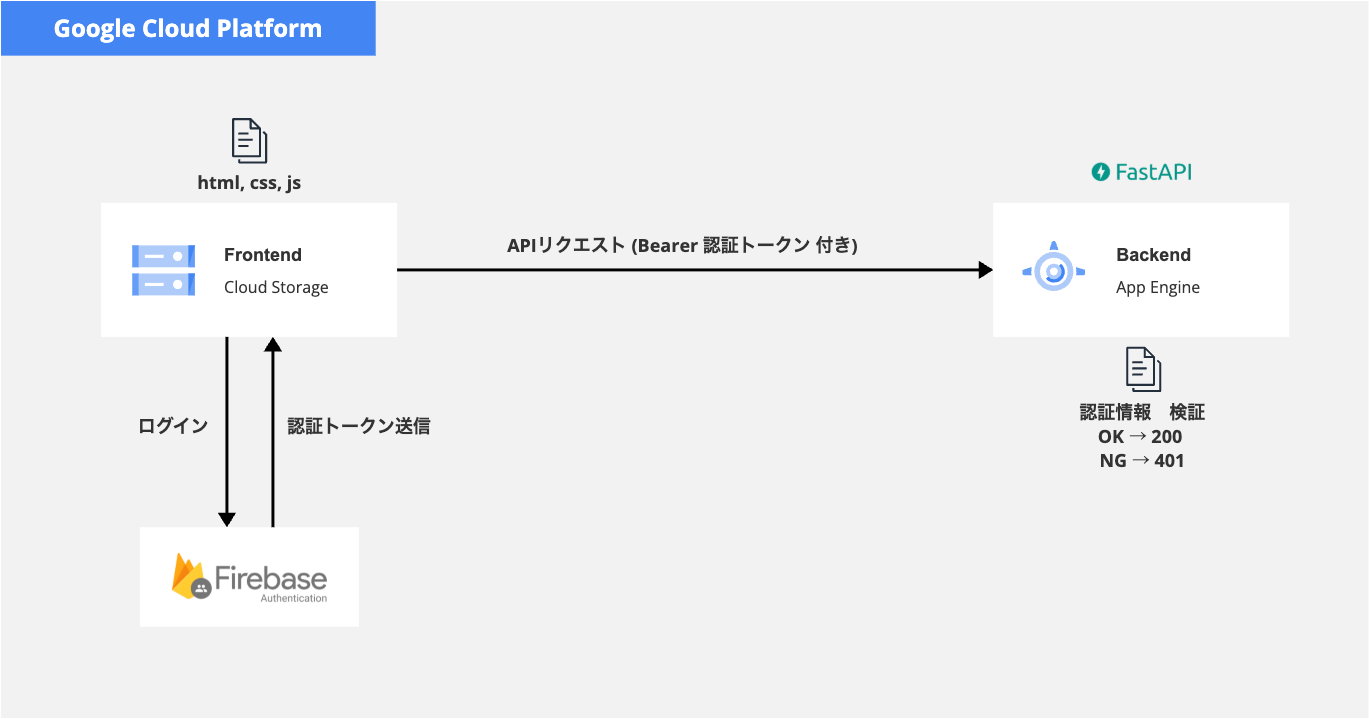
今回はGoogle Cloudを使用してフロント部分をCloud Storageに保存してウェブサイトホスティング設定を行い、サーバーサイドにApp Engine(FastAPI)を用いてFirebase Authenticationの認証構成を組んでみました。
コード部分は今流行りのClaude Codeに任せており、FirebaseやCORSの設定部分しか触らずに構築できました。めっちゃ便利ですね~
構成
ソースコード
※Firebase Authenticationのセッションは丸1時間で切れ、時間変更はできません。実務で使用するコードではフロントエンドにて更新処理を入れる必要がありますが、今回は検証のため入れてません。
前提
-
gcloud CLI がインストールされている
-
Google Cloudプロジェクト設定が完了している
App Engine Admin API の有効化
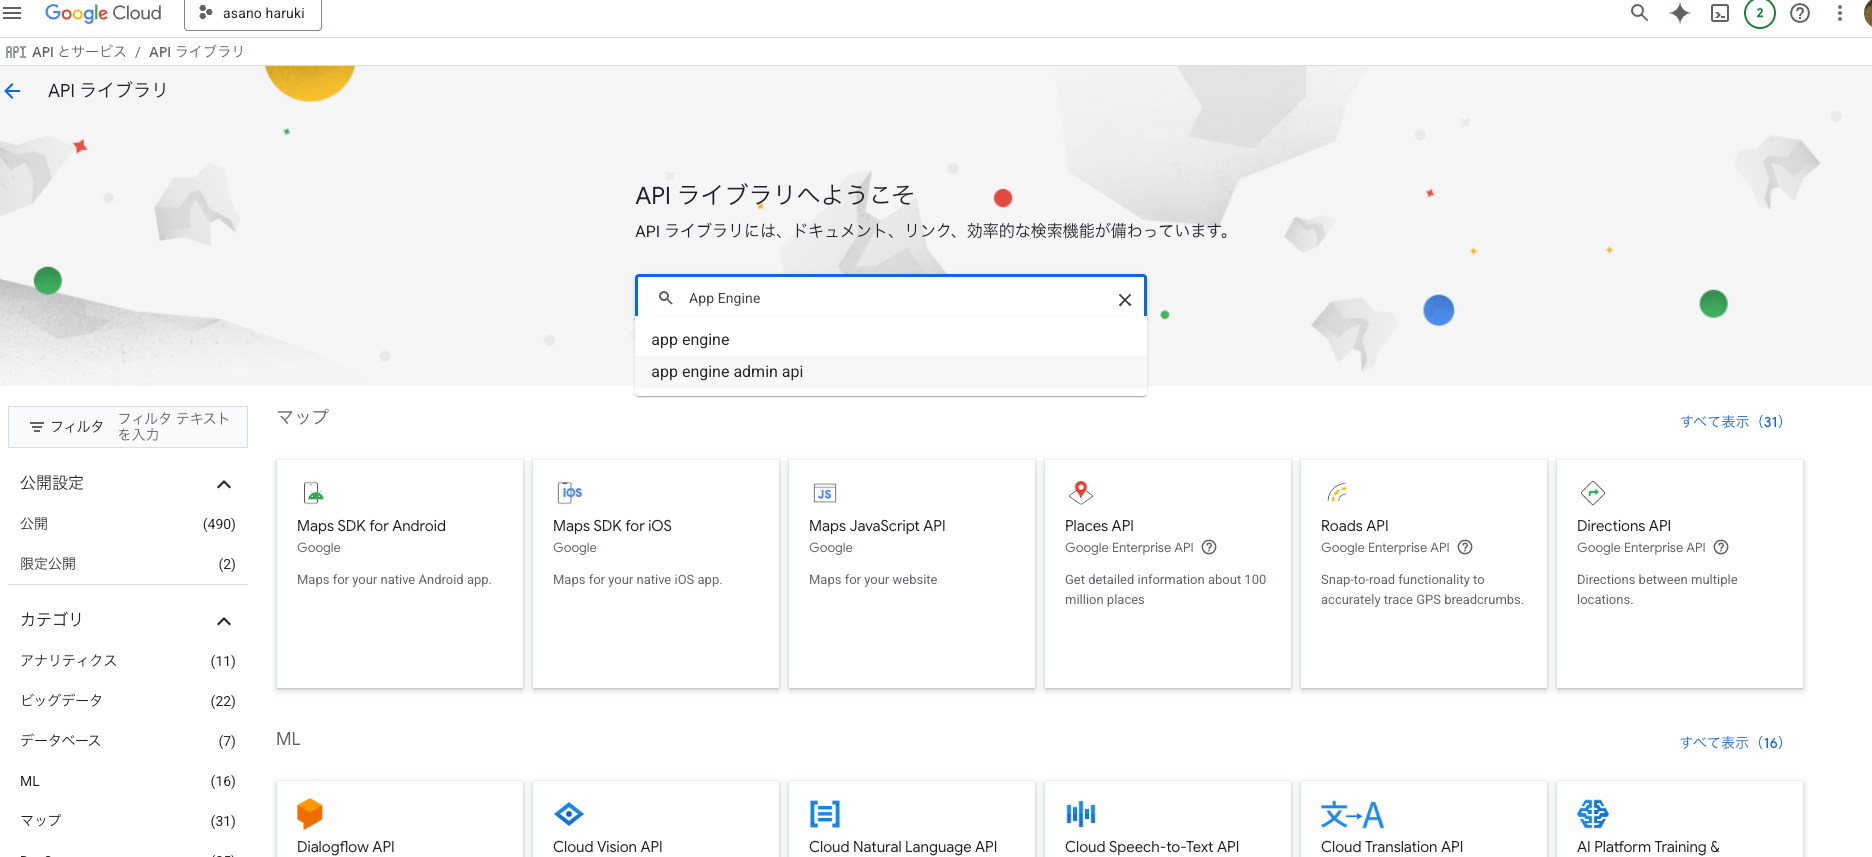
Google App Engineを使用するために、まずは任意のプロジェクトのコンソール画面にてApp Engine Admin APIを有効化する必要があります。
- サイドバーから「APIとサービス」 > 「ライブラリ」を選択
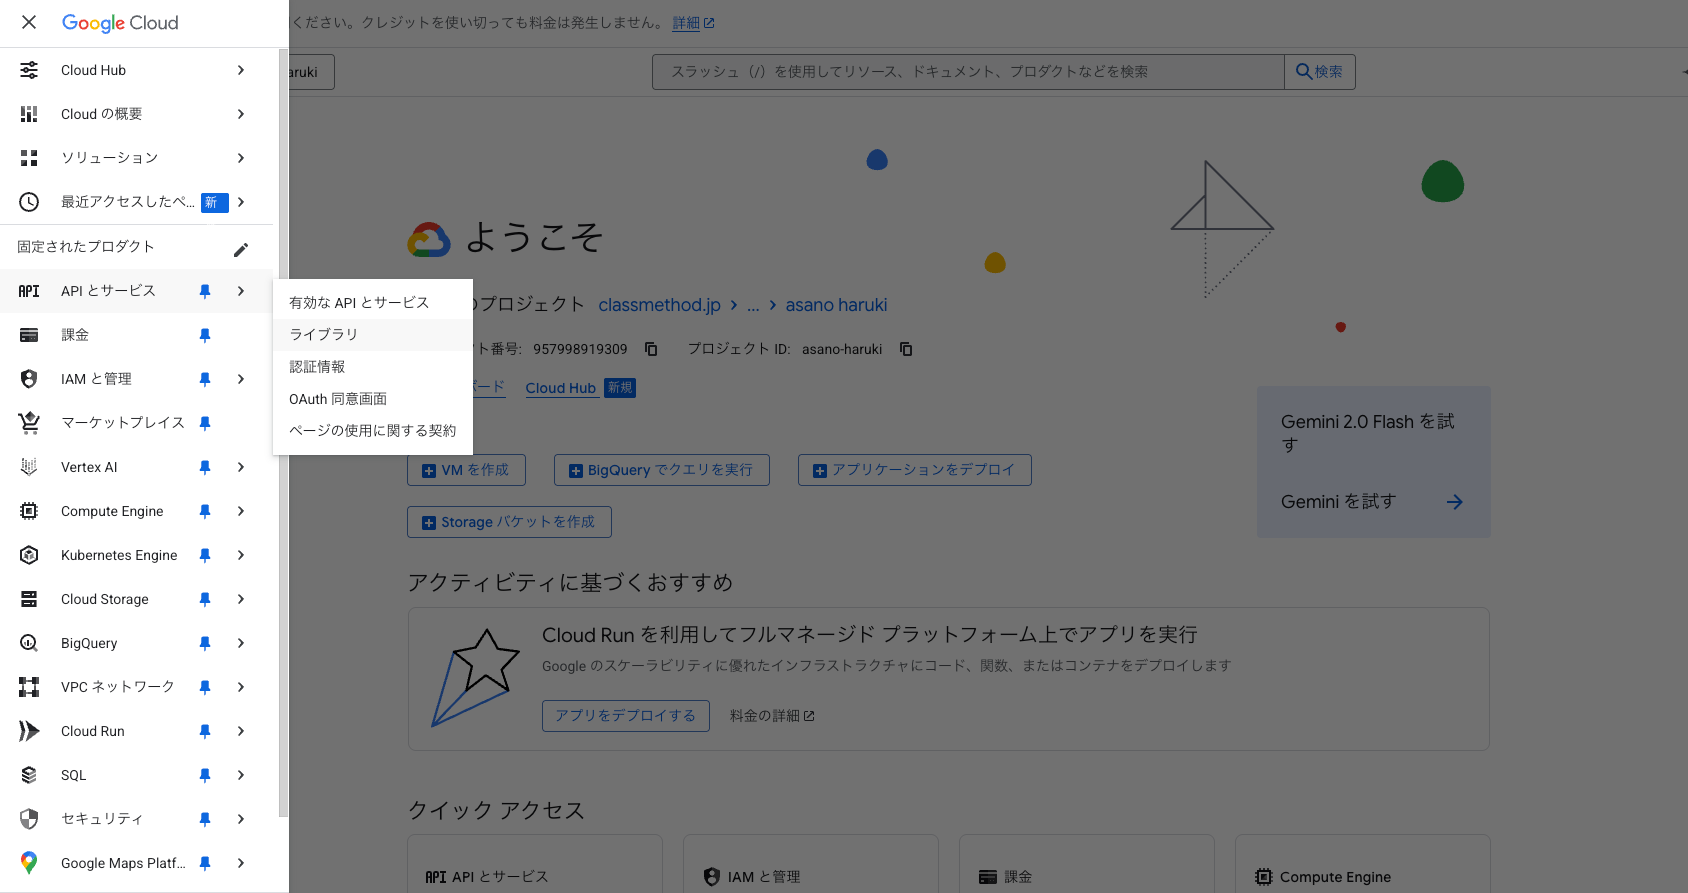
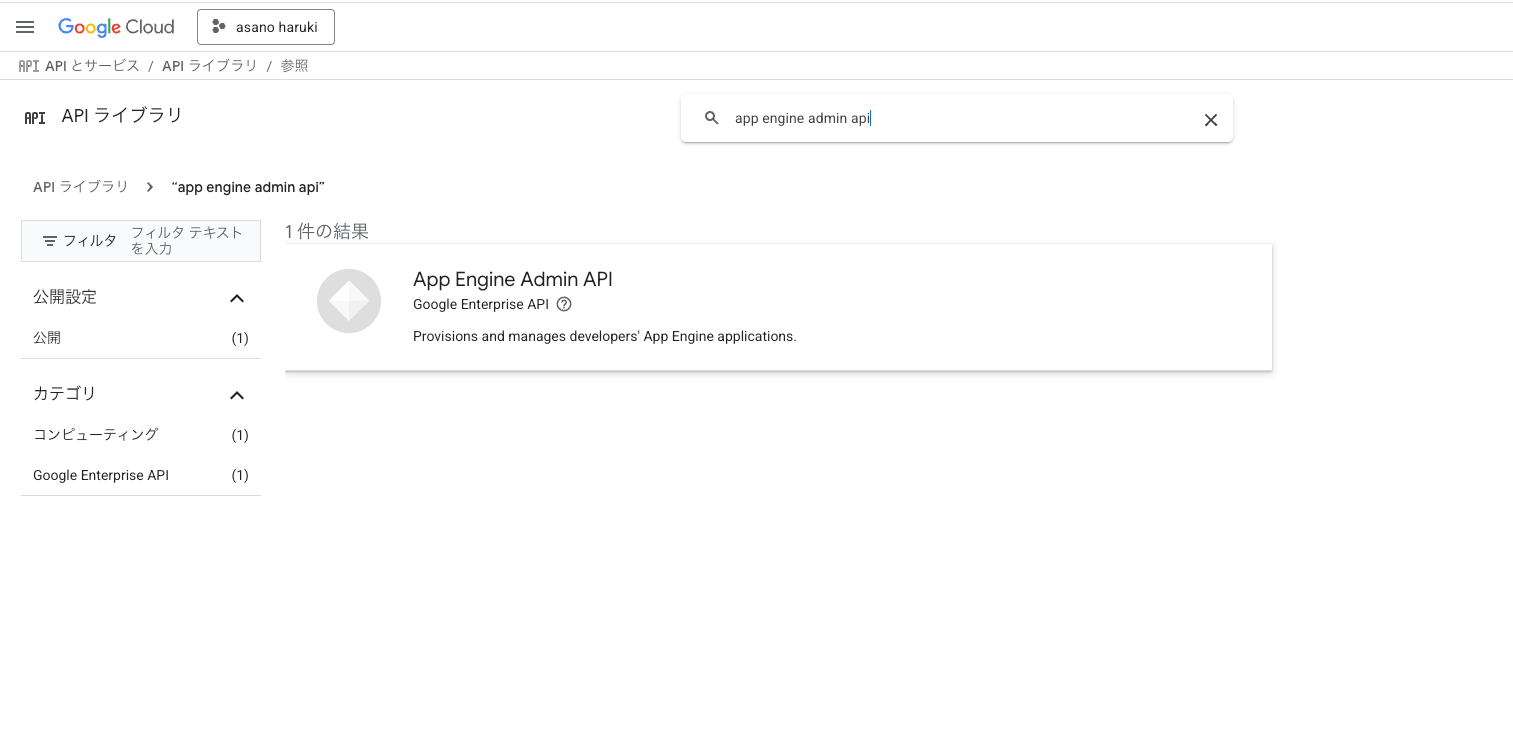
- 検索画面にて「App Engine」と入力し「app engine admin api」を選択
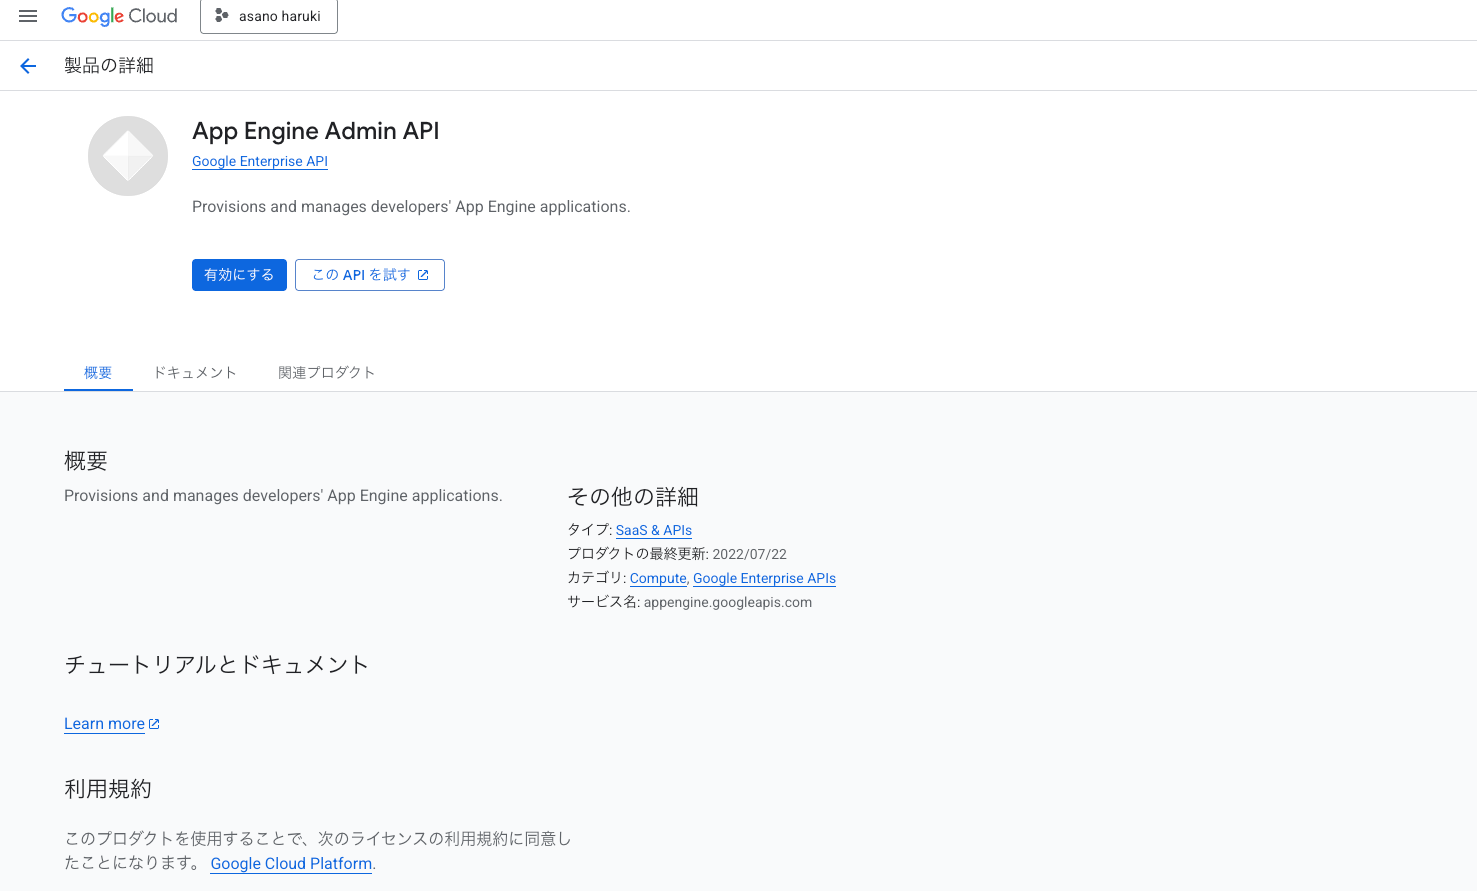
- 「App Engine Admin API」を押下
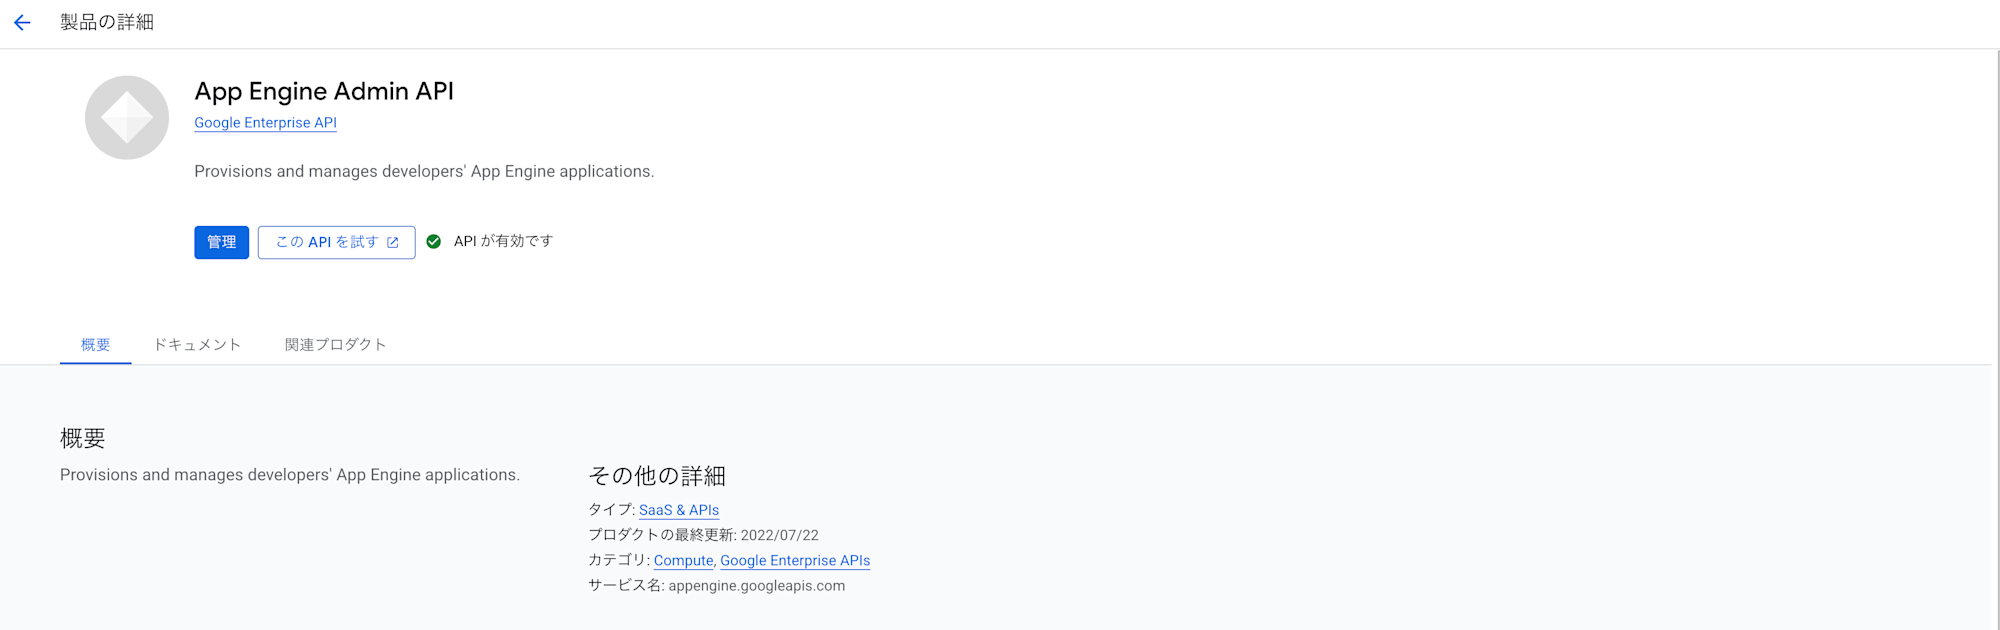
- 「有効化」を選択すると有効化され、準備完了
Firebase Authentication設定
続いてFirebase プロジェクトを作成し、Authenticationを使用する準備を行います。
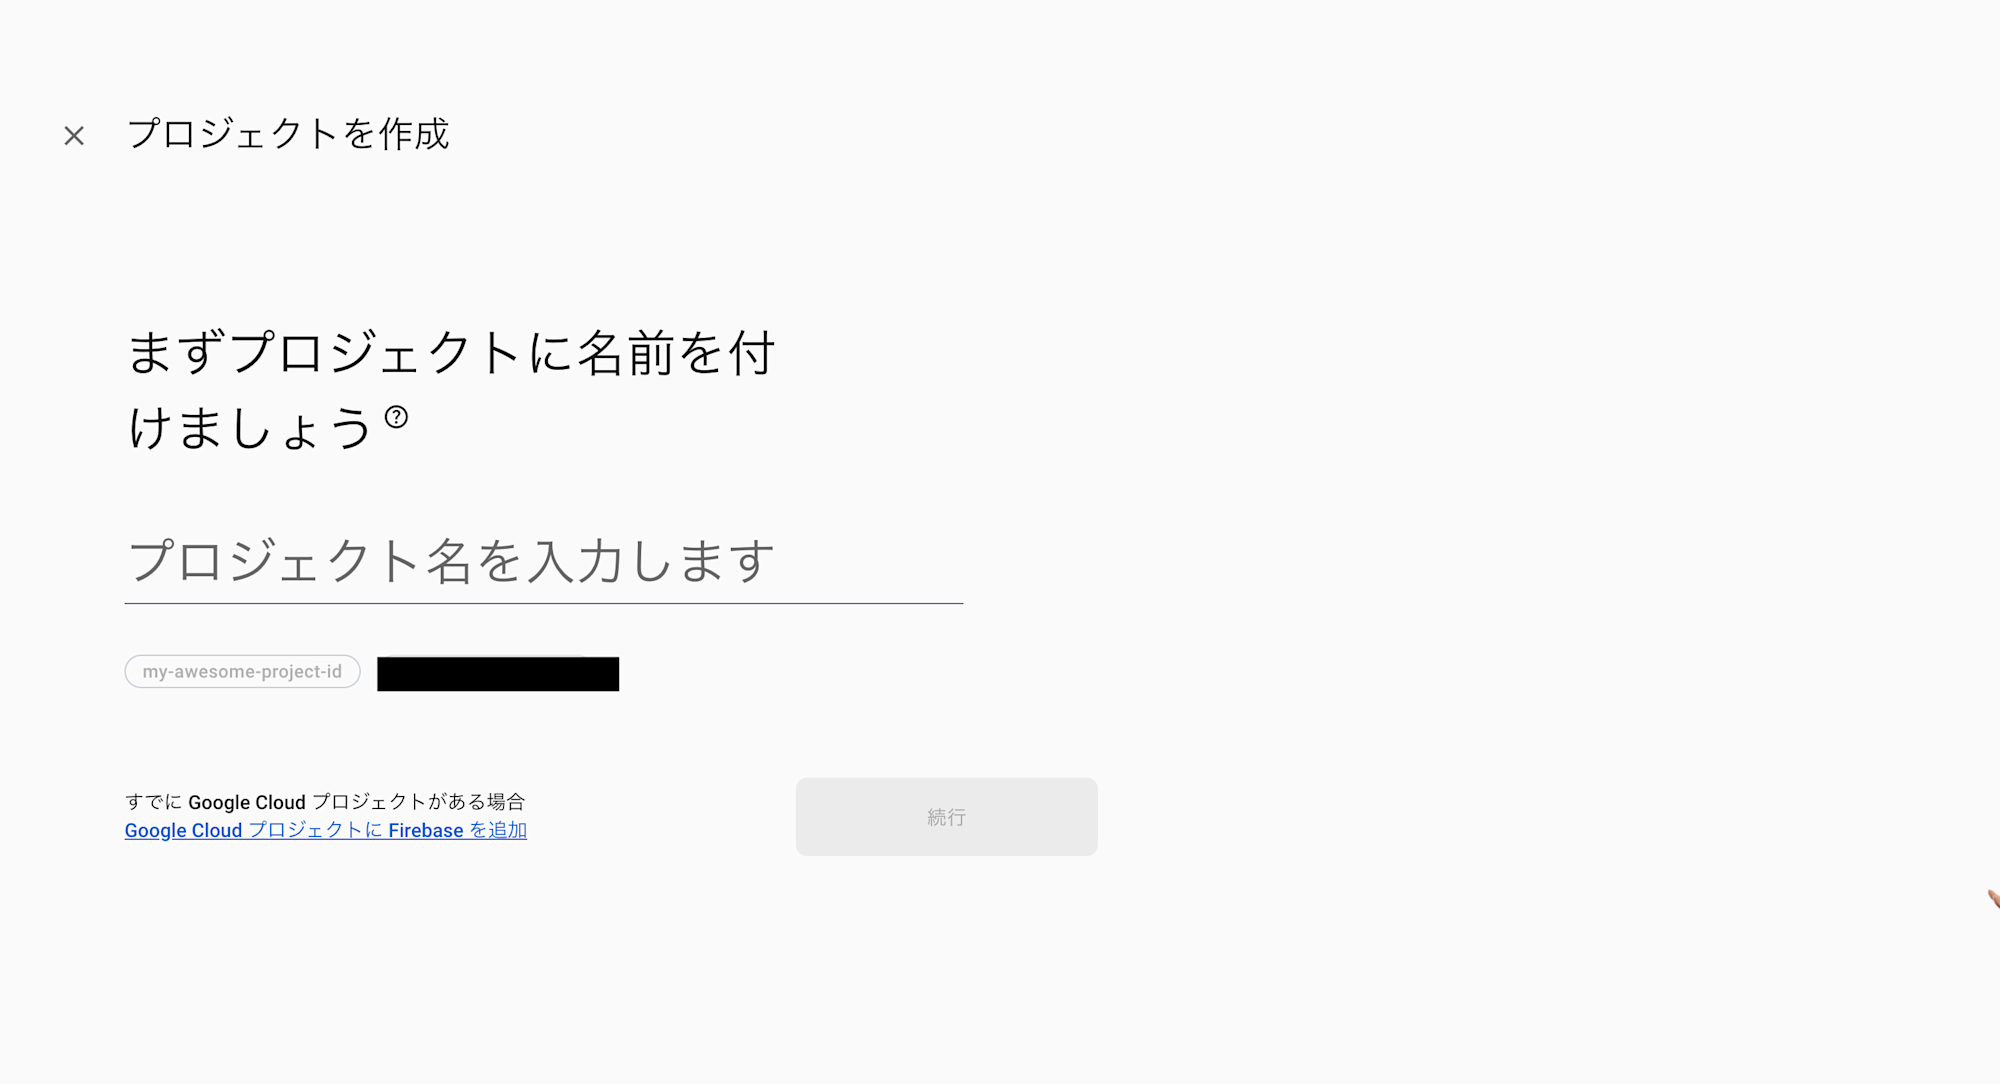
- Firebaseコンソール画面に行き、「プロジェクトの作成」から適宜名前を決定しプロジェクトを作成
※今回は「demo-project」というプロジェクトを作成しました。
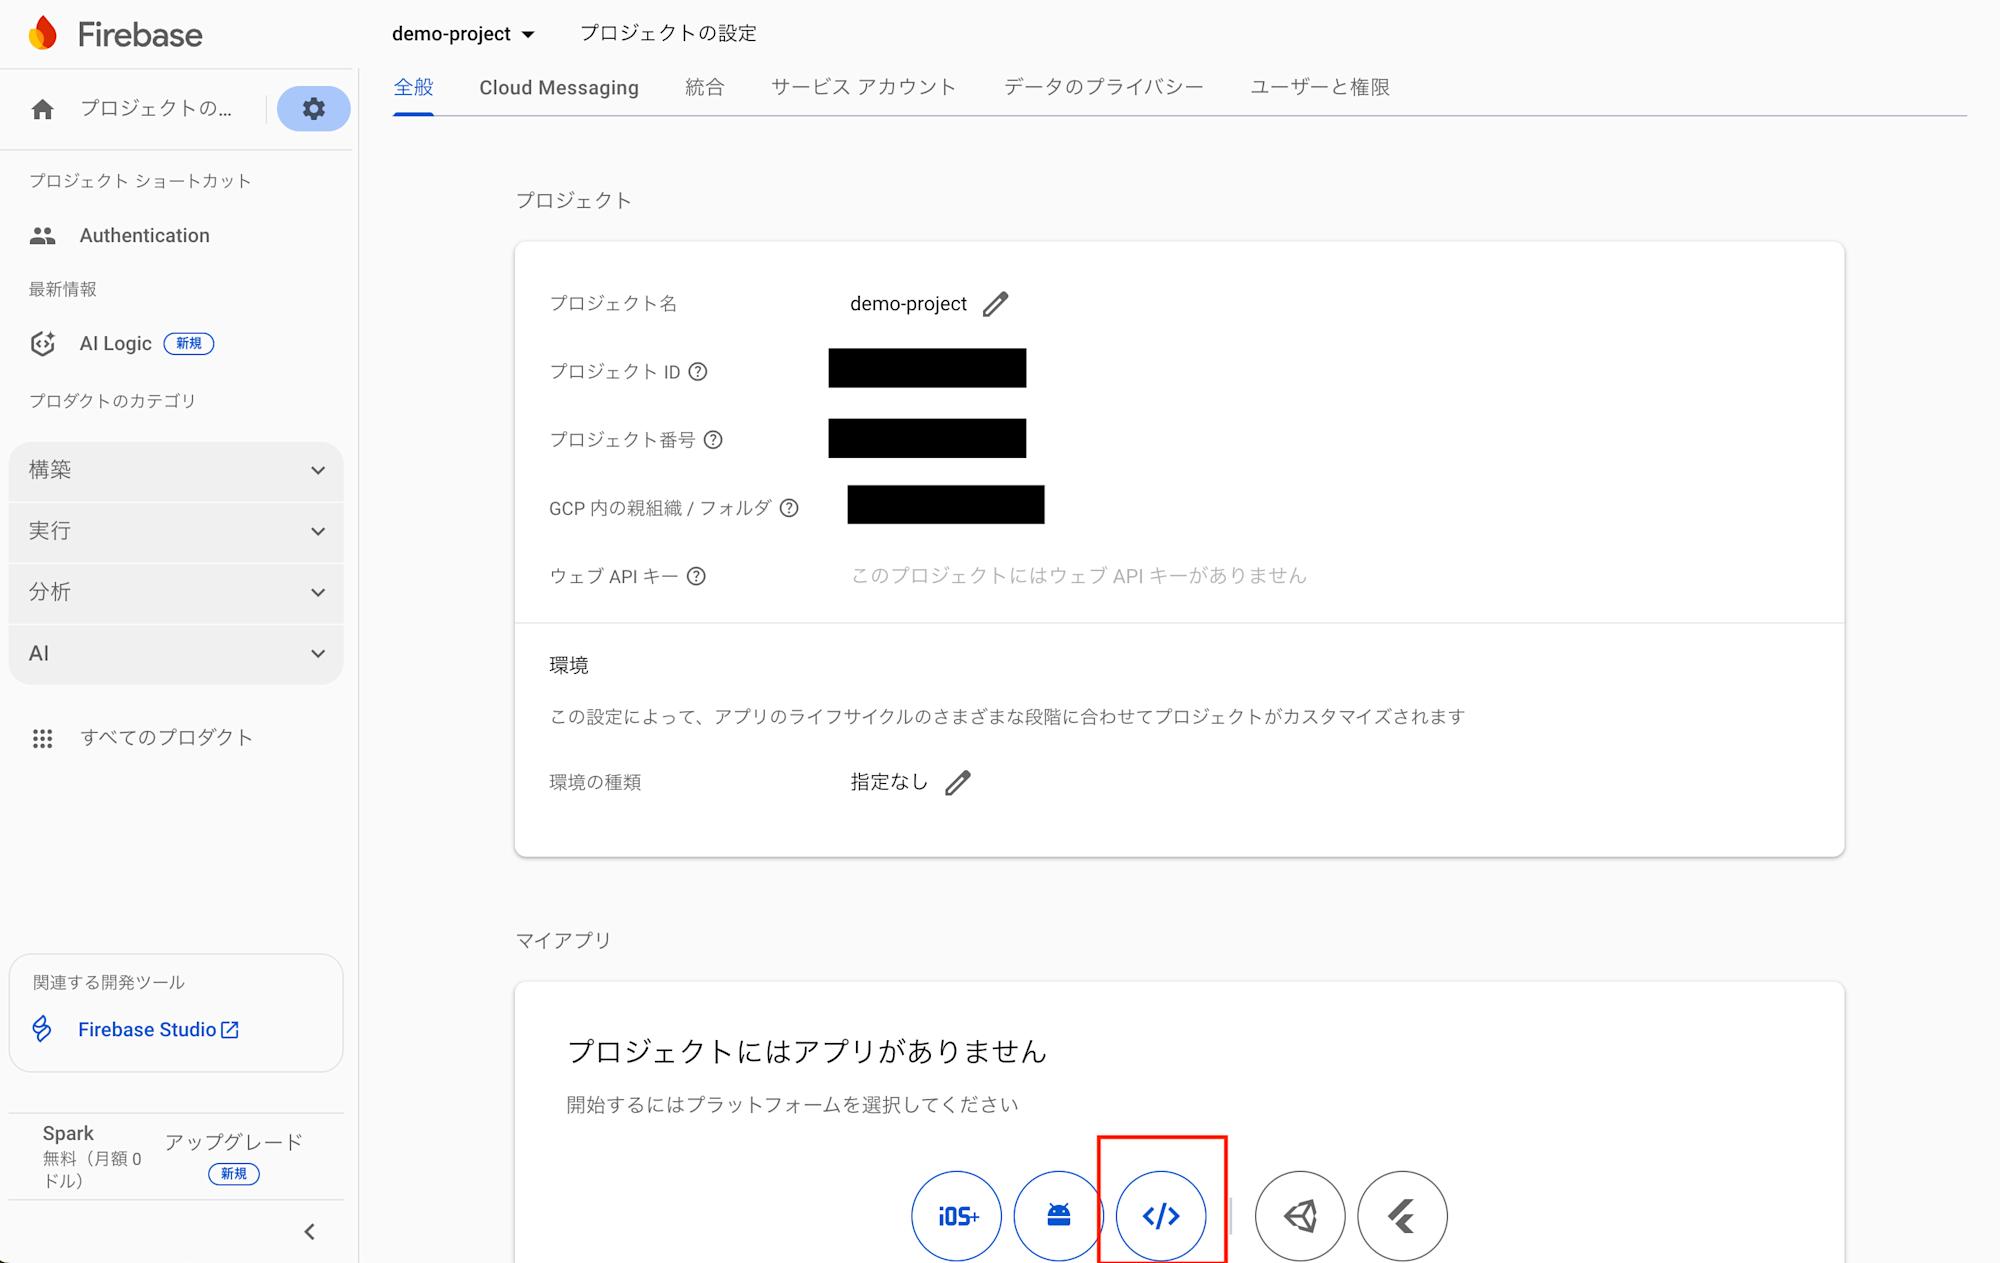
- プロジェクト作成が完了するとサイドバーの歯車から「プロジェクトの設定」を選択
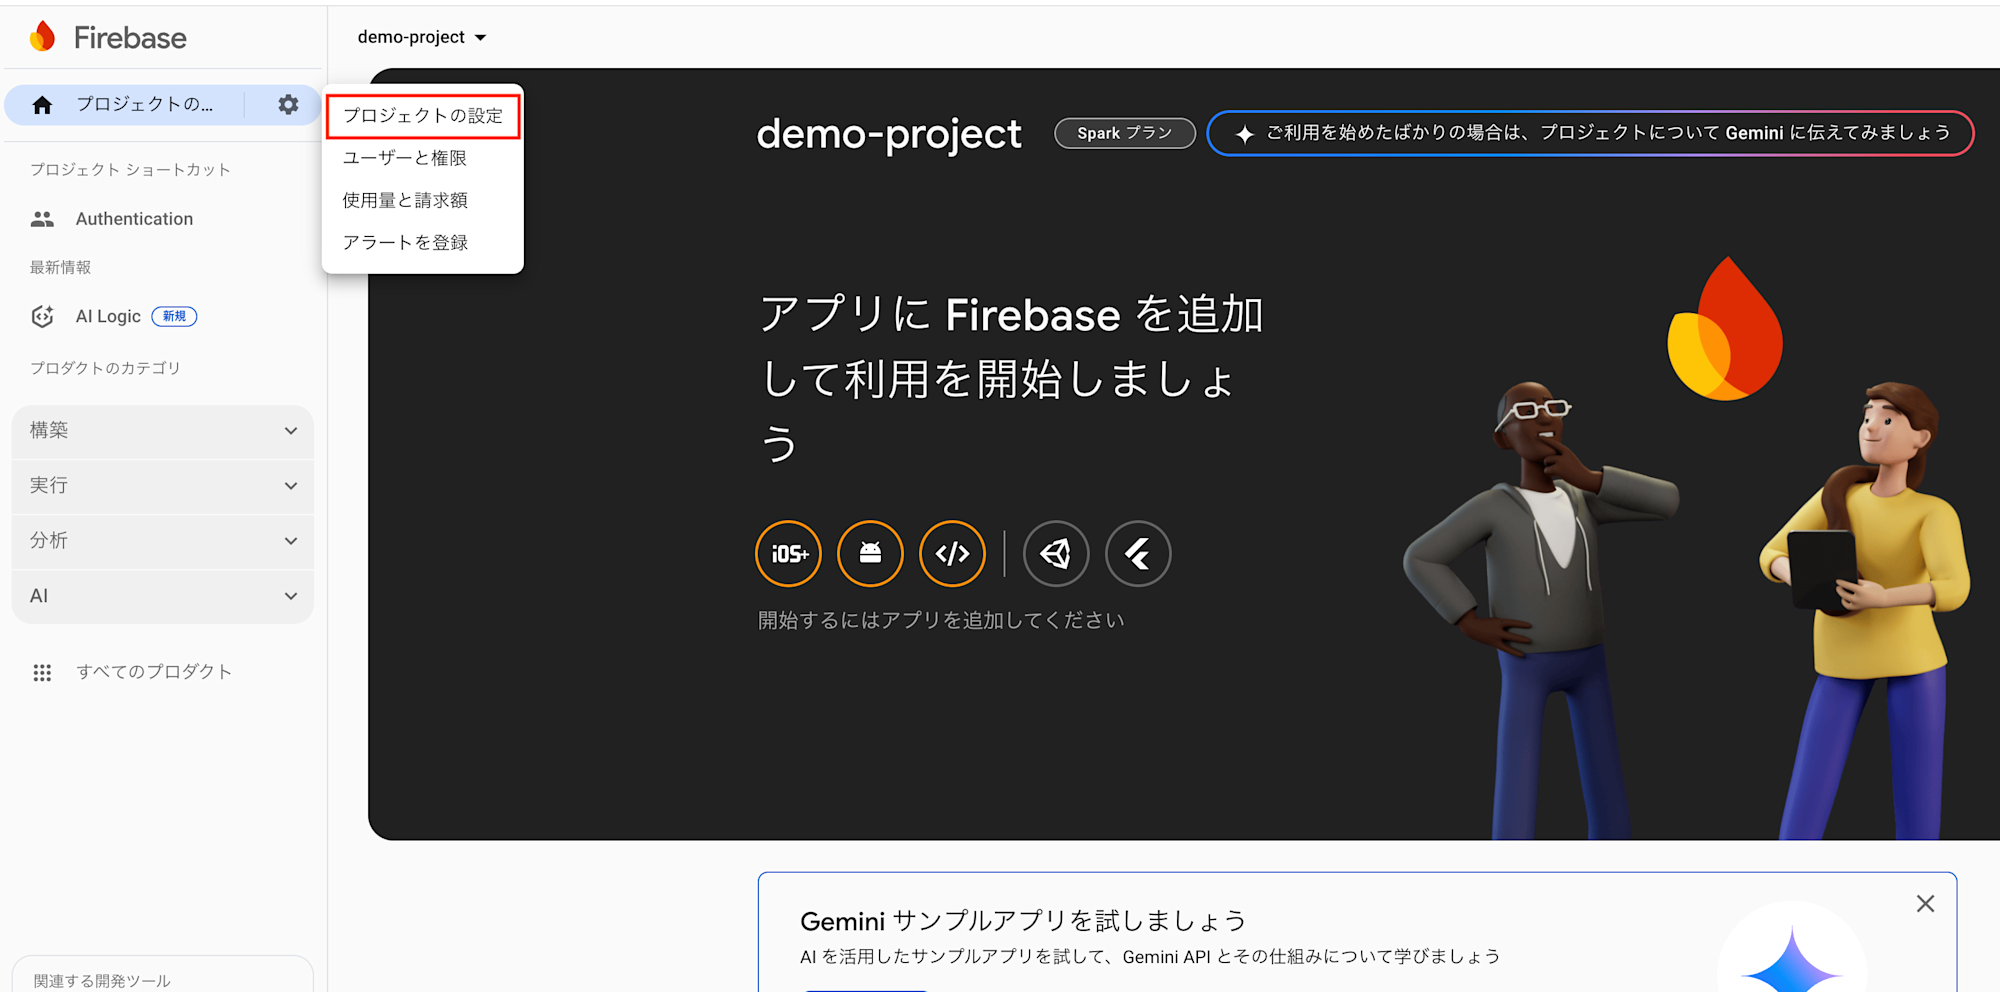
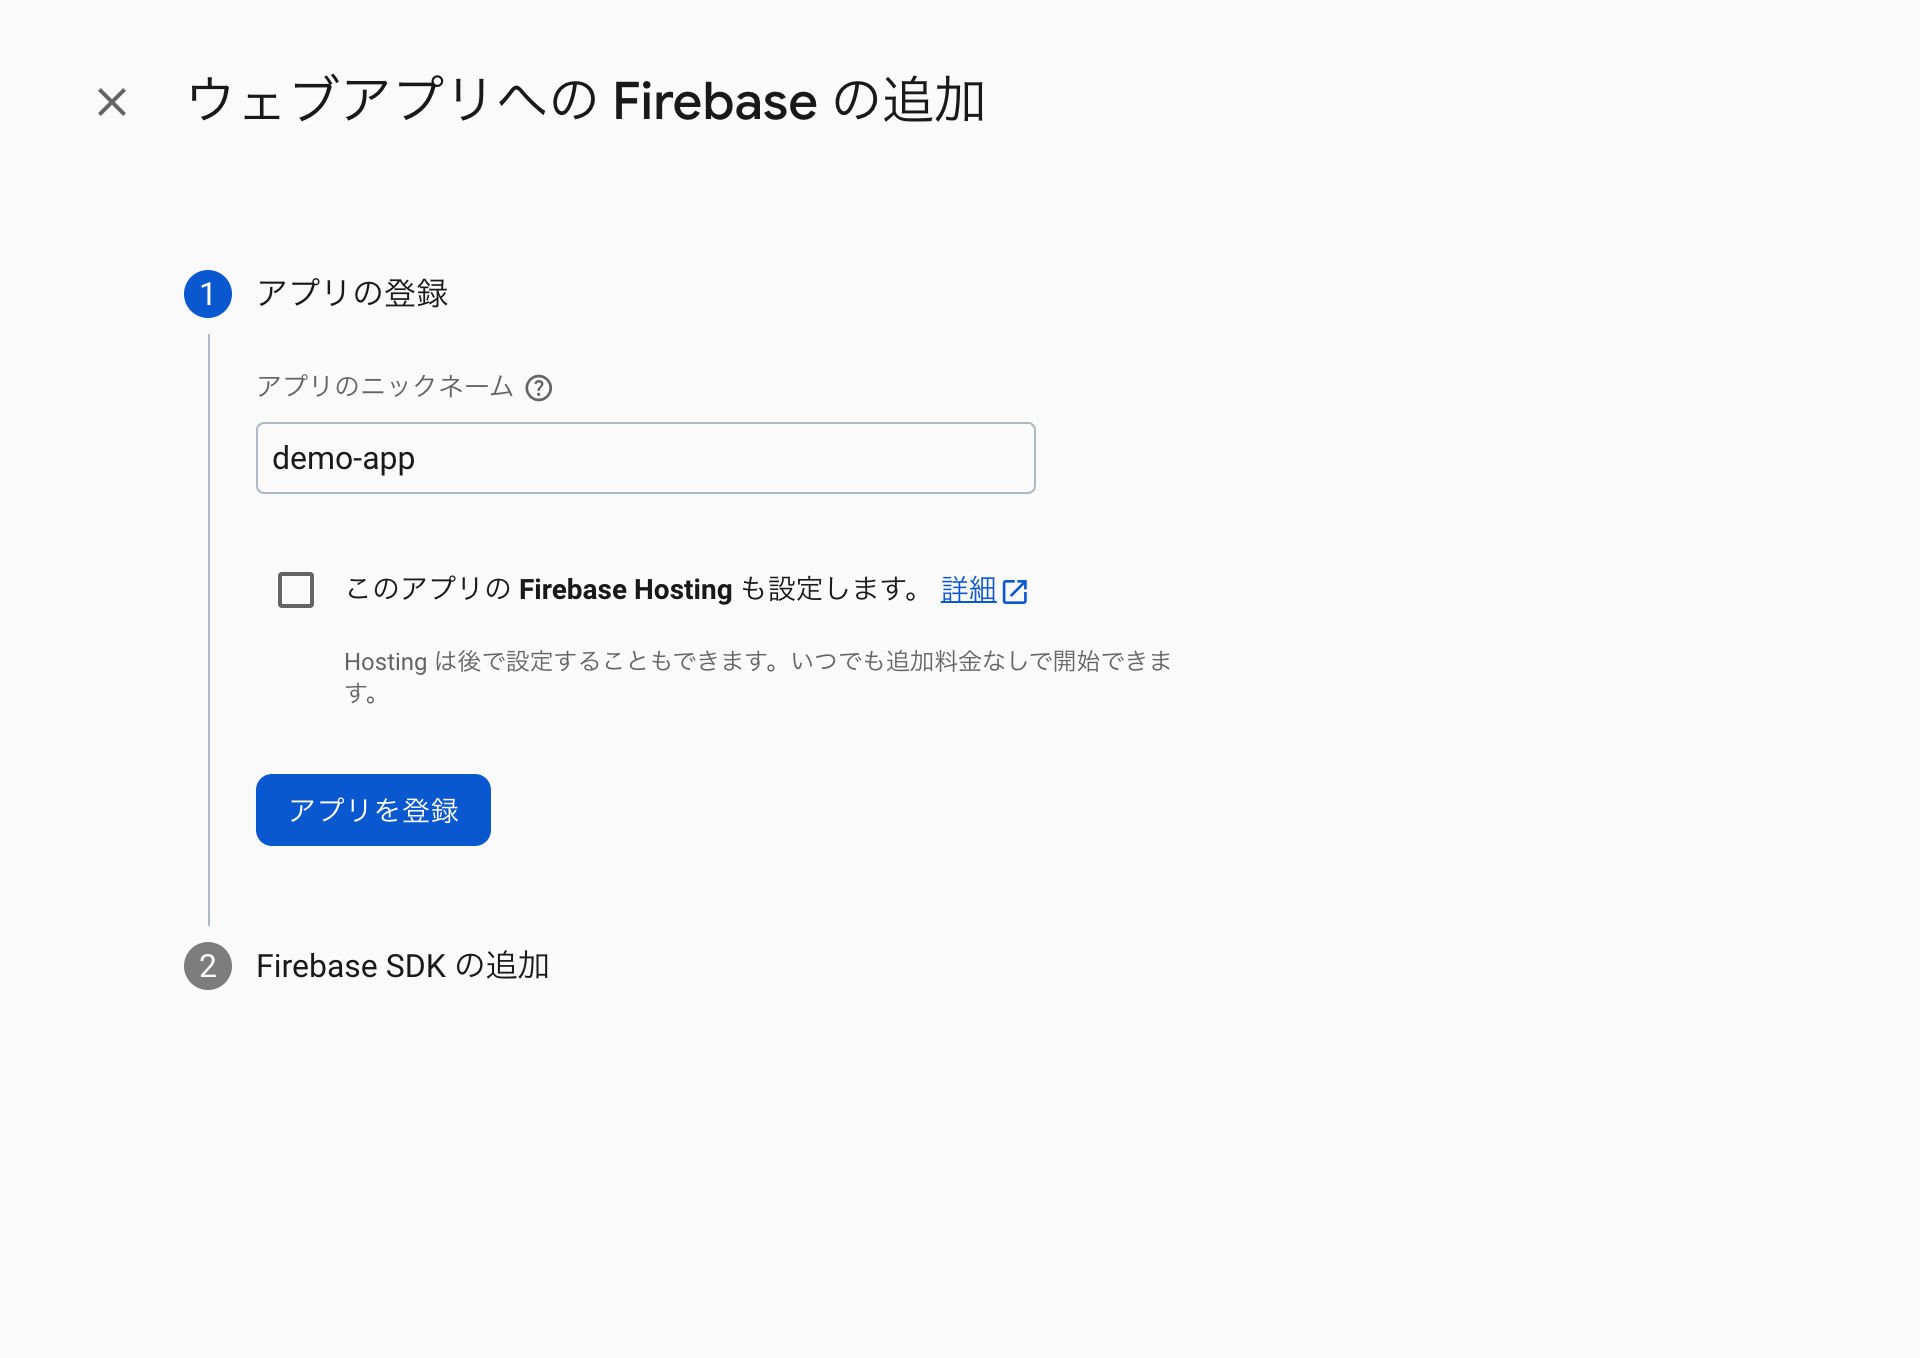
- 画面下のマイアプリからFirebaseアプリを作成 今回はウェブで使用するため、「</>」ボタンを選択
-
適宜アプリ名を入力し作成 今回は「demo-app」で作成
※今回はFirebaseでウェブサイトをホスティングしないので「Firebase Hosting」設定は不要
-
アプリを作成すると「SDKの設定と構成」 > 「Config」を閲覧、この設定内容をフロントエンド上のJavascript SDKにて設定する

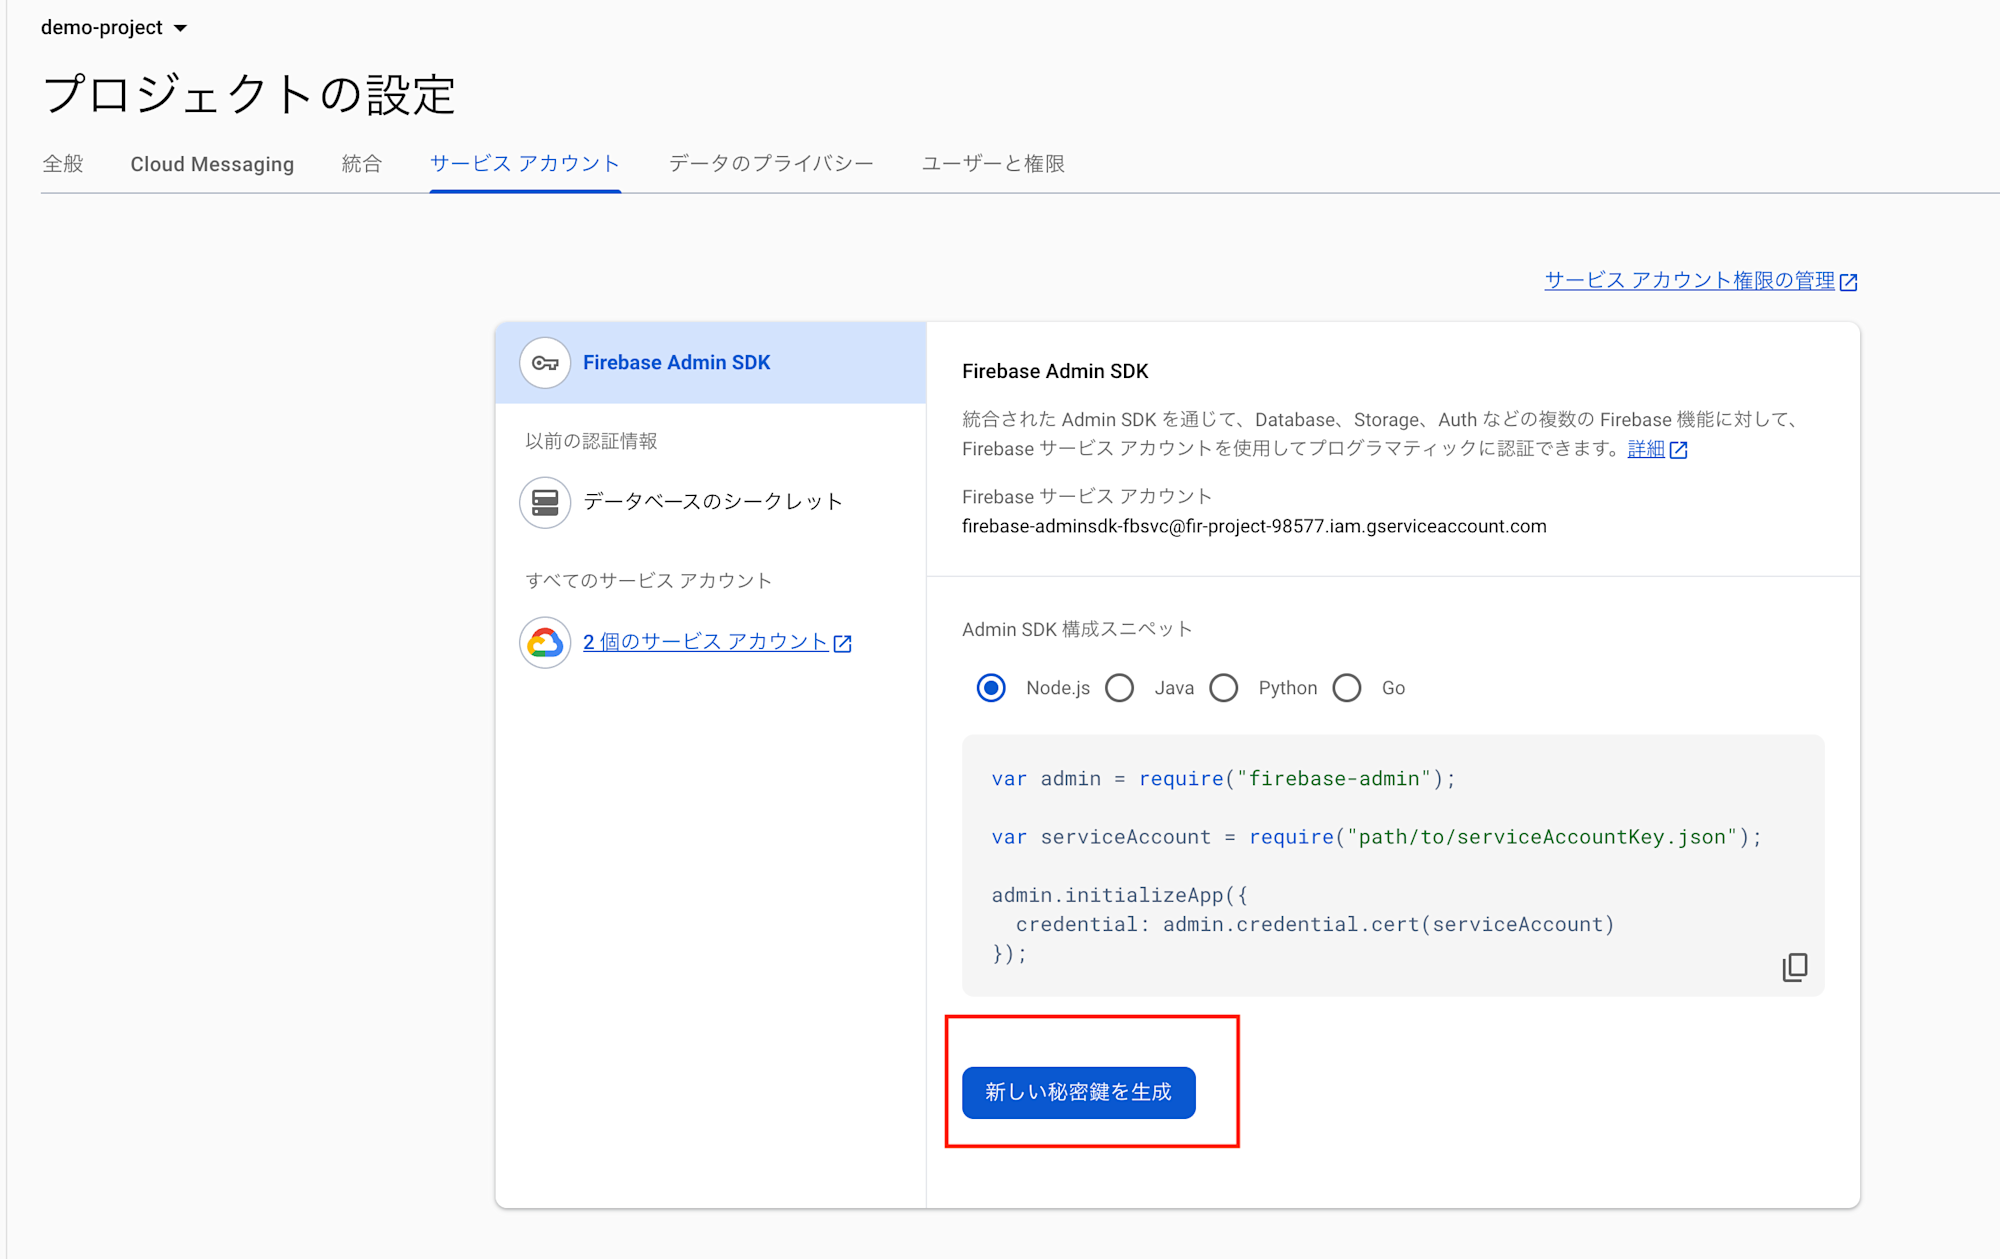
- 続いて「プロジェクト設定」に戻り、「サービスアカウント」タブから「新しい秘密鍵を生成」を押下し、シークレット情報(json)を保存
※この内容をサーバーサイドに設定します。
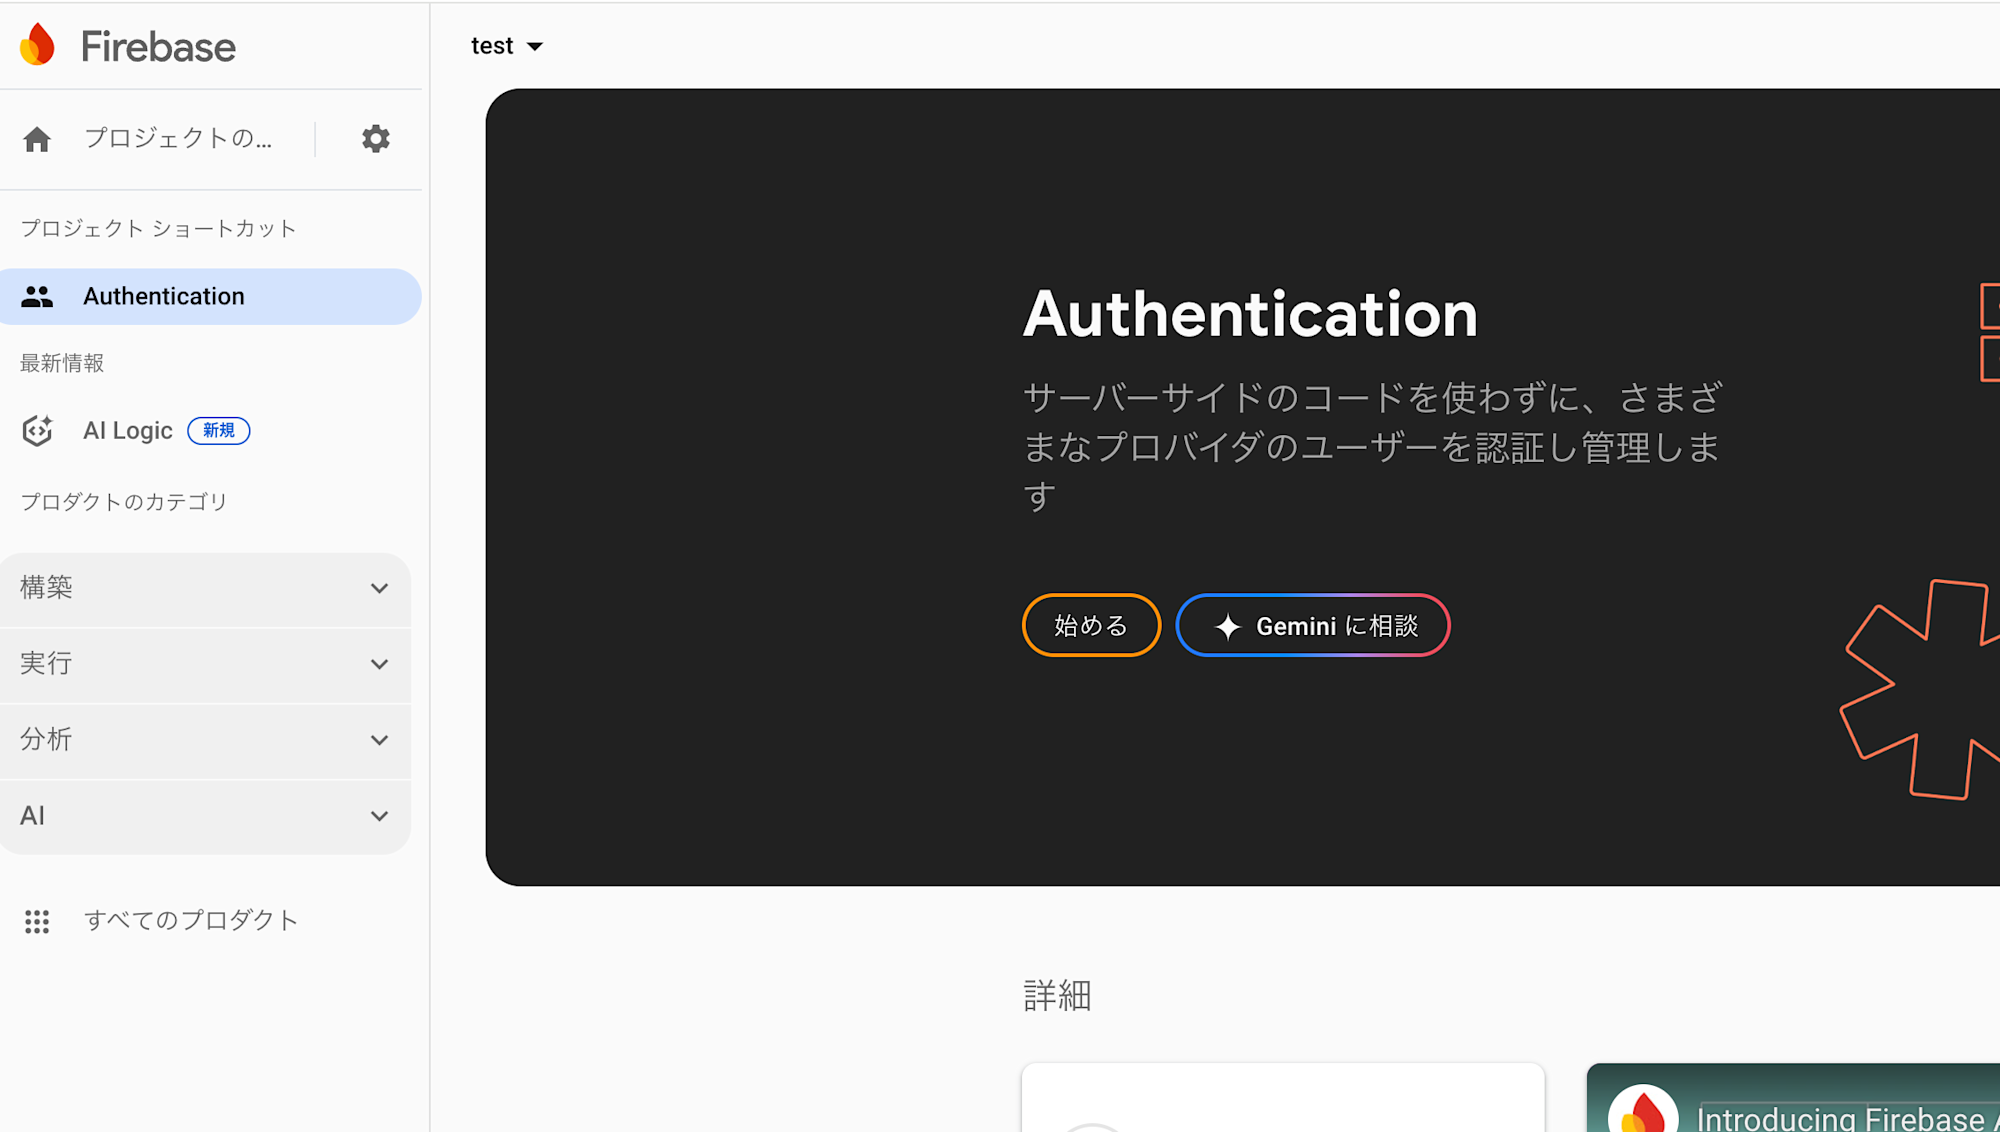
- 続いてFirebase Authenticationをコンソール上から選択し以下のような画面になっている場合は「始める」を押下し、有効化
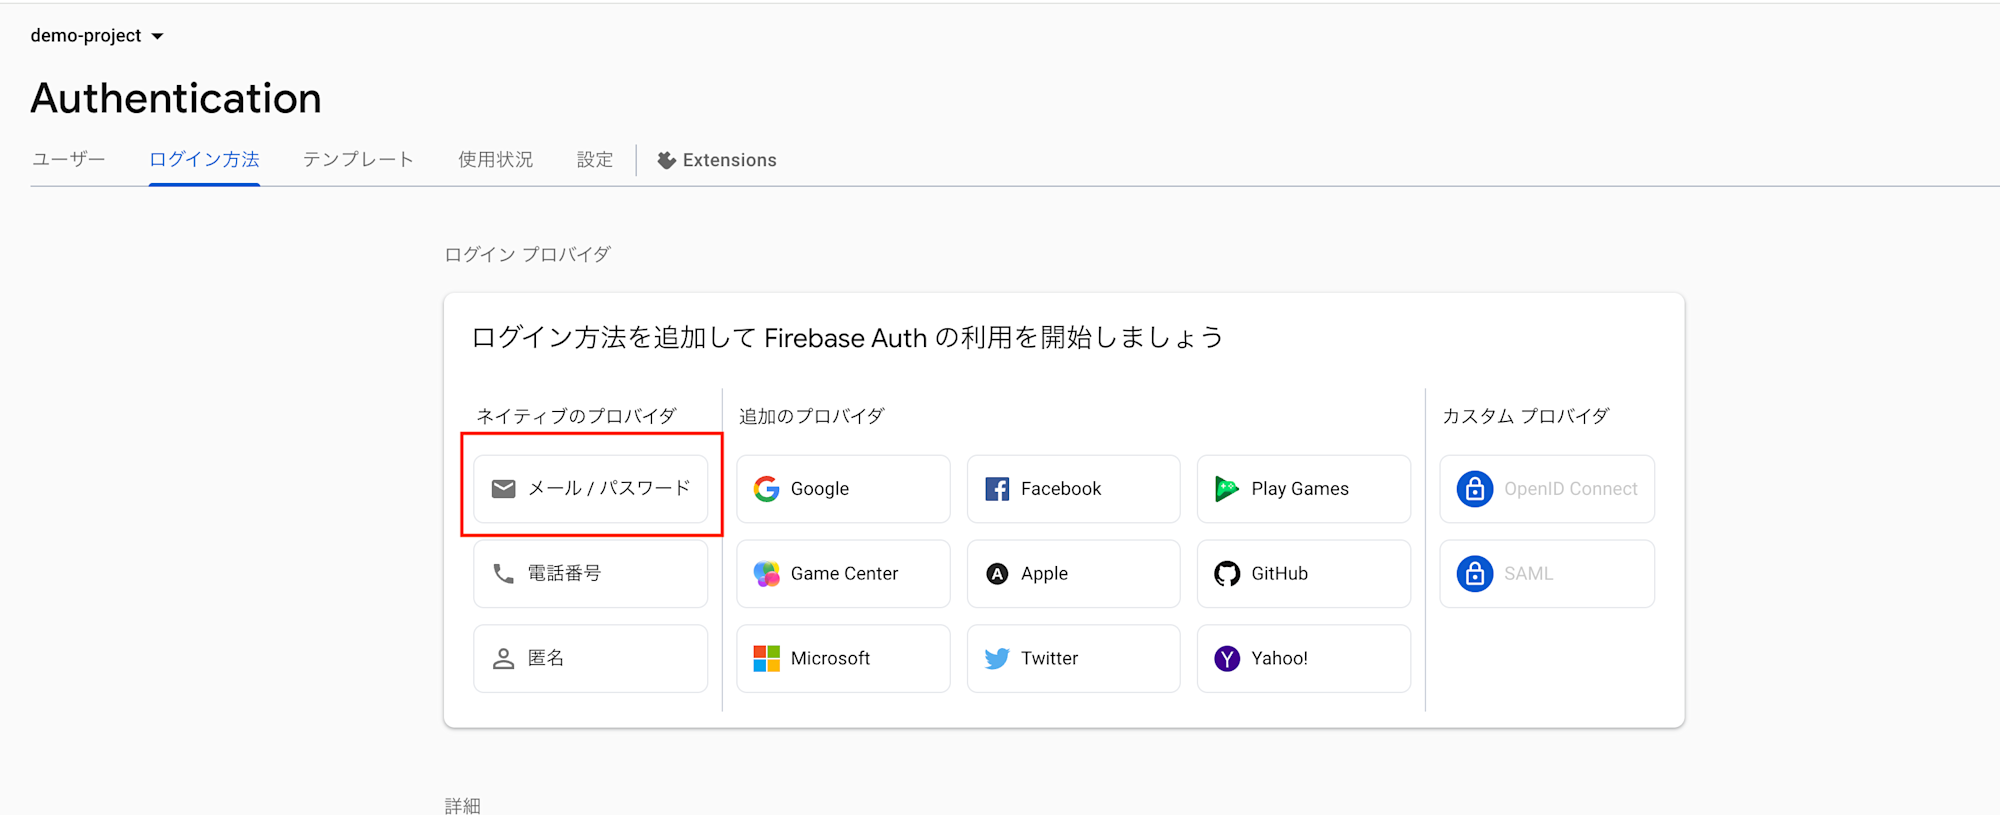
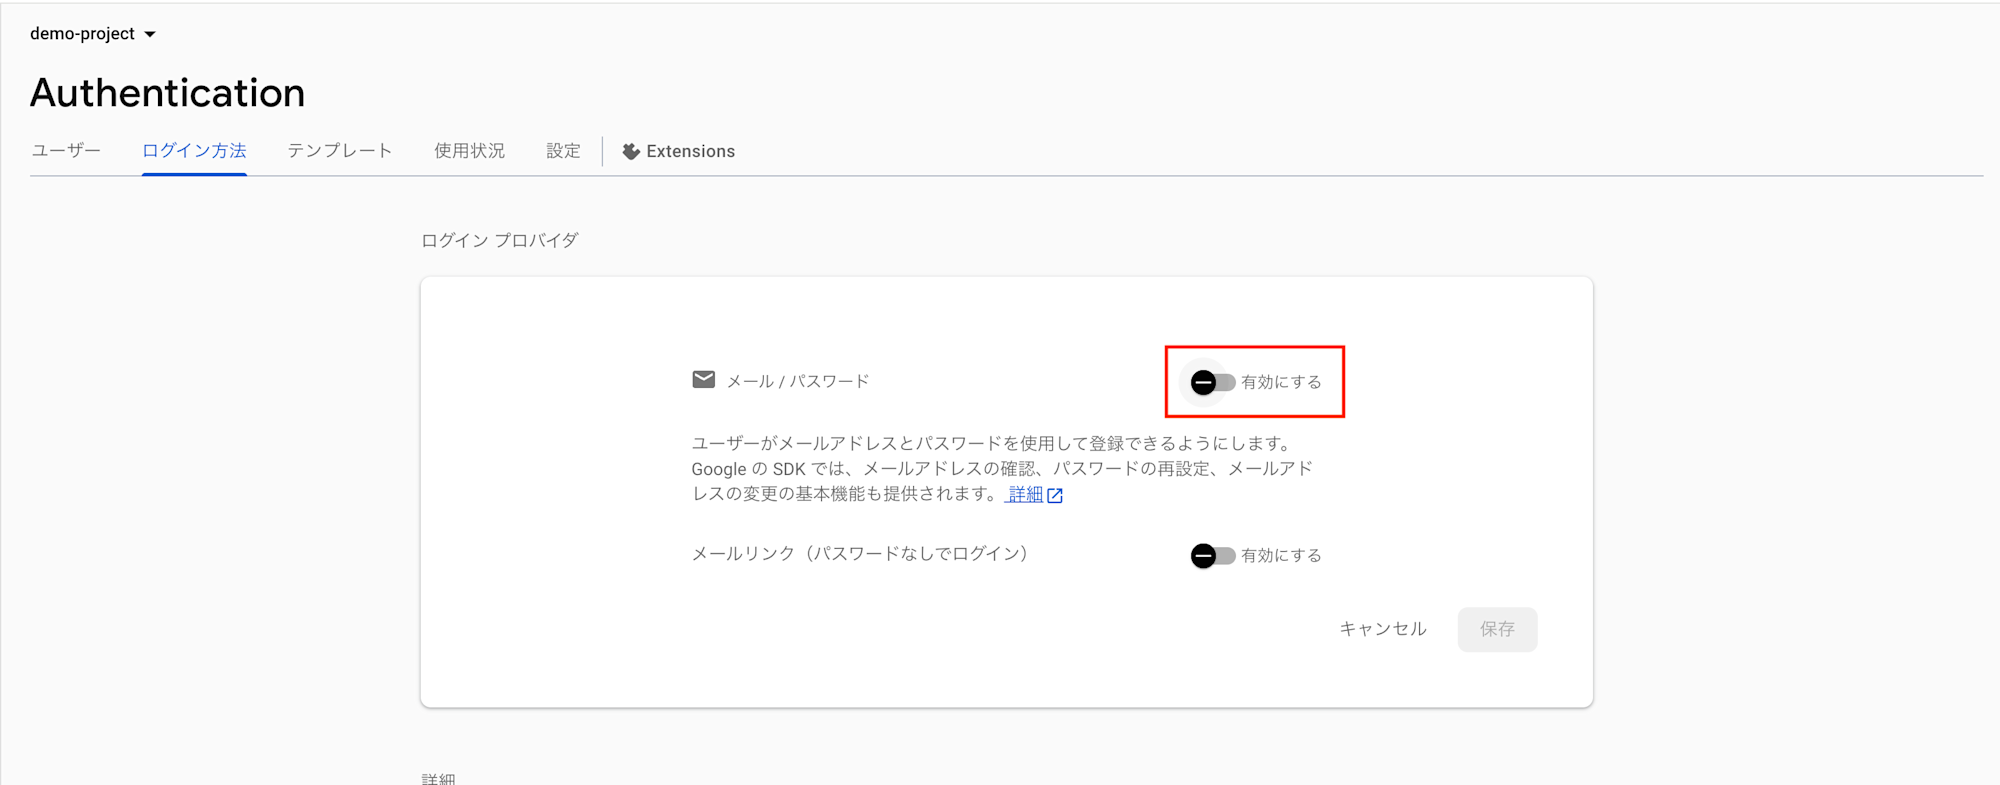
- 画面が切り替わり「ログイン方法」が選択できるので「メール/パスワード」を選択し、「有効にする」にトグルを切り替え
※別途OAuthプロパイダーにてログイン機能を実装したい場合はここで選択
App Engine(バックエンド) デプロイ
コードの詳細は上記リポジトリ内を確認してください。
構成としては「.env」にFirebase周りの環境変数を記載し、「create-secrets.sh」であらかじめSecret Managerに一括でシークレットキーを作成できるようにしています。
しかし「app.yaml」のみではSecret Managerの値を直接参照できないので、Cloud Buildを用いてビルドと同時にSecret Managerの値を「app.yaml」からincludeできるようにファイルを作成し、App Engine上に環境変数としてSecret Managerの値を挿入できるようにしています。
├── backend │ ├── app.yaml │ ├── config.py │ ├── cloudbuild.yaml │ ├── create-secrets.sh │ ├── .env.example │ ├── .gcloudignore │ ├── main.py │ └── requirements.txt main.py
フロント画面(Cloud Storage)ドメインのCORSを許可するように設定しています。
from flask import Flask, request, jsonify from flask_cors import CORS from firebase_admin import auth from config import initialize_firebase import functools app = Flask(__name__) # CORS設定 cors = CORS(app, resources={r"/*": {"origins": ["https://storage.googleapis.com"]}}) initialize_firebase() def require_auth(f): @functools.wraps(f) def decorated_function(*args, **kwargs): token = request.headers.get('Authorization') if not token: return jsonify({'error': 'No token'}), 401 try: if token.startswith('Bearer '): token = token[7:] decoded_token = auth.verify_id_token(token) request.user = decoded_token return f(*args, **kwargs) except: return jsonify({'error': 'Invalid token'}), 401 return decorated_function @app.route('/api/protected') @require_auth def protected(): return jsonify({ 'message': '認証成功', 'user': {'uid': request.user.get('uid'), 'email': request.user.get('email')} }) if __name__ == '__main__': app.run(debug=True) デプロイ手順
- Secret Manager有効化(初回のみ)
gcloud services enable secretmanager.googleapis.com - 「.env」の内容を Secret Manager 上にアップロード
chmod +x create-secrets.sh ./create-secrets.sh - Cloud Buildが使用するサービスアカウントにSecret Managerの操作権限をあらかじめ付与
gcloud projects add-iam-policy-binding {プロジェクトID} \ --member="serviceAccount:{アカウントID}-compute@developer.gserviceaccount.com" \ --role="roles/secretmanager.secretAccessor" - Cloud Buildを使用してApp Engine上に環境をデプロイ(東京リージョン)
gcloud builds submit --region=asia-northeast1 - 確認 (app.yamlにてサービス名を指定しています。)
gcloud app browse -s {App Engine上で指定したサービス名} Cloud Storage(フロントエンド) デプロイ
Firebase SDK の設定周りを格納する「config.js」を「index.html」に読み込んで使用しています。
└── frontend ├── .gcloudignore ├── config.js └── index.html config.js
App Engine上にデプロイされた「API_BASE_URL」とFirebase SDKの設定情報を記載してください。
const firebaseConfig = { apiKey: "", authDomain: "", projectId: "", storageBucket: "", messagingSenderId: "", appId: "" }; // バックエンドAPI URL const API_BASE_URL = ""; index.html
コードはAIで生成したため、詳細な解説は省略します。
最近では滅多に見ませんが、久しぶりに生JSをみました。
FirebaseUIを使用して画面を構成しています。
重要なのはサインインオプションで上記有効化したメール/パスワード認証のみを許可しており、フロントで得た認証トークンをAuthorizationヘッダーにくっつけてAPIリクエスト時に送信していることですね。
このトークンをバックエンドで検証し認証が通っているか判断します。
<!DOCTYPE html> <html> <head> <meta charset="UTF-8"> <title>Firebase Auth Demo</title> <script src="https://www.gstatic.com/firebasejs/9.23.0/firebase-app-compat.js"></script> <script src="https://www.gstatic.com/firebasejs/9.23.0/firebase-auth-compat.js"></script> <script src="https://www.gstatic.com/firebasejs/ui/6.1.0/firebase-ui-auth.js"></script> <link type="text/css" rel="stylesheet" href="https://www.gstatic.com/firebasejs/ui/6.1.0/firebase-ui-auth.css" /> </head> <body> <h1>Firebase Auth Demo</h1> <div id="firebaseui-auth-container"></div> <div id="user-section" style="display:none"> <div class="user-section"> <h3>ログイン中</h3> <p><strong>Email:</strong> <span id="user-email"></span></p> <button onclick="testAPI()">API テスト</button> <button onclick="signOut()">ログアウト</button> </div> <div id="results" class="results"></div> </div> <script src="config.js"></script> <script> firebase.initializeApp(firebaseConfig); const auth = firebase.auth(); const ui = new firebaseui.auth.AuthUI(auth); const uiConfig = { callbacks: { signInSuccessWithAuthResult: () => false, }, signInFlow: 'popup', signInOptions: [ { provider: firebase.auth.EmailAuthProvider.PROVIDER_ID, requireDisplayName: false, signInMethod: firebase.auth.EmailAuthProvider.EMAIL_PASSWORD_SIGN_IN_METHOD, } ], credentialHelper: firebaseui.auth.CredentialHelper.NONE, autoUpgradeAnonymousUsers: false, signInSuccessUrl: null, immediateFederatedRedirect: false, }; auth.onAuthStateChanged(user => { if (user) { document.getElementById('firebaseui-auth-container').style.display = 'none'; document.getElementById('user-section').style.display = 'block'; document.getElementById('user-email').textContent = user.email; } else { document.getElementById('firebaseui-auth-container').style.display = 'block'; document.getElementById('user-section').style.display = 'none'; ui.start('#firebaseui-auth-container', uiConfig); } }); function signOut() { auth.signOut(); } async function testAPI() { try { const token = await auth.currentUser.getIdToken(); const res = await fetch(`${API_BASE_URL}/api/protected`, { headers: { 'Authorization': `Bearer ${token}` } }); const data = await res.json(); document.getElementById('results').innerHTML = ``; } catch (e) { document.getElementById('results').innerHTML = ``; } } </script> </body> </html> デプロイ手順
- frontend/config.jsのAPI URLをApp Engine上のエンドポイントに合わせ、Firebase SDKの情報を設定
const API_BASE_URL = ""; - バケット作成・ウェブサイトホスティング設定
gsutil mb -l asia-northeast1 gs://YOUR_BUCKET_NAME gsutil web set -m index.html gs://YOUR_BUCKET_NAME - アップロード・公開
// 内容をバケットにコピー gsutil -m cp -r * gs://YOUR_BUCKET_NAME // バケット公開権限を設定 gsutil iam ch allUsers:objectViewer gs://YOUR_BUCKET_NAME 動作確認
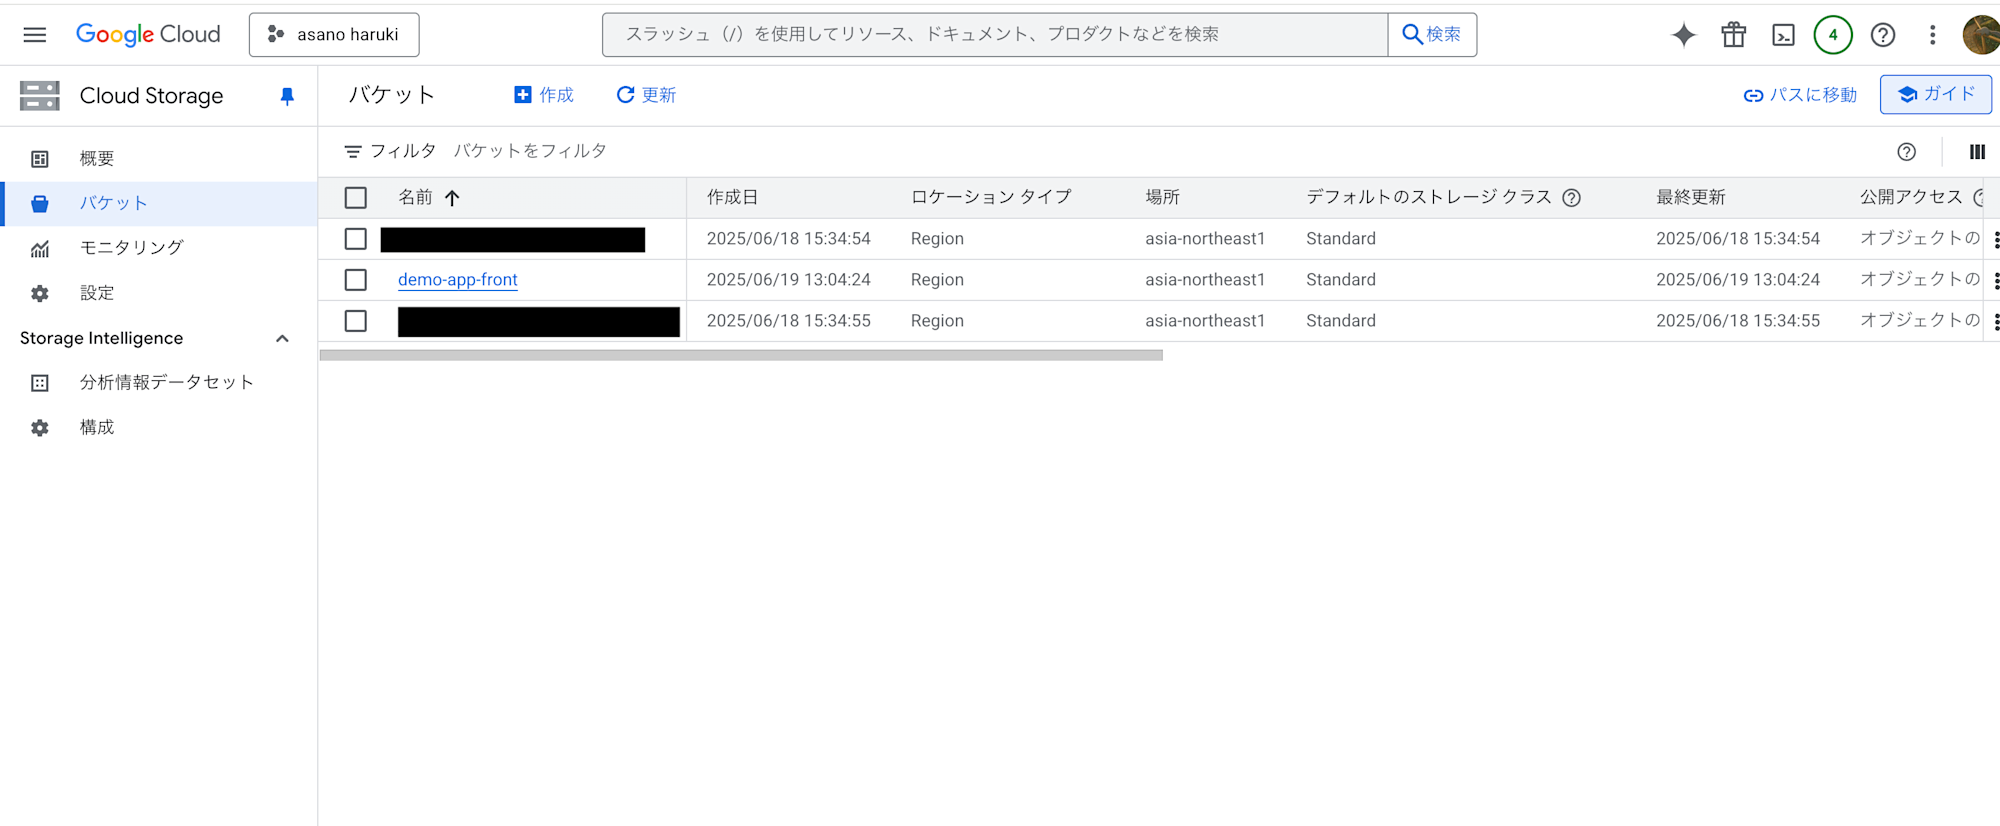
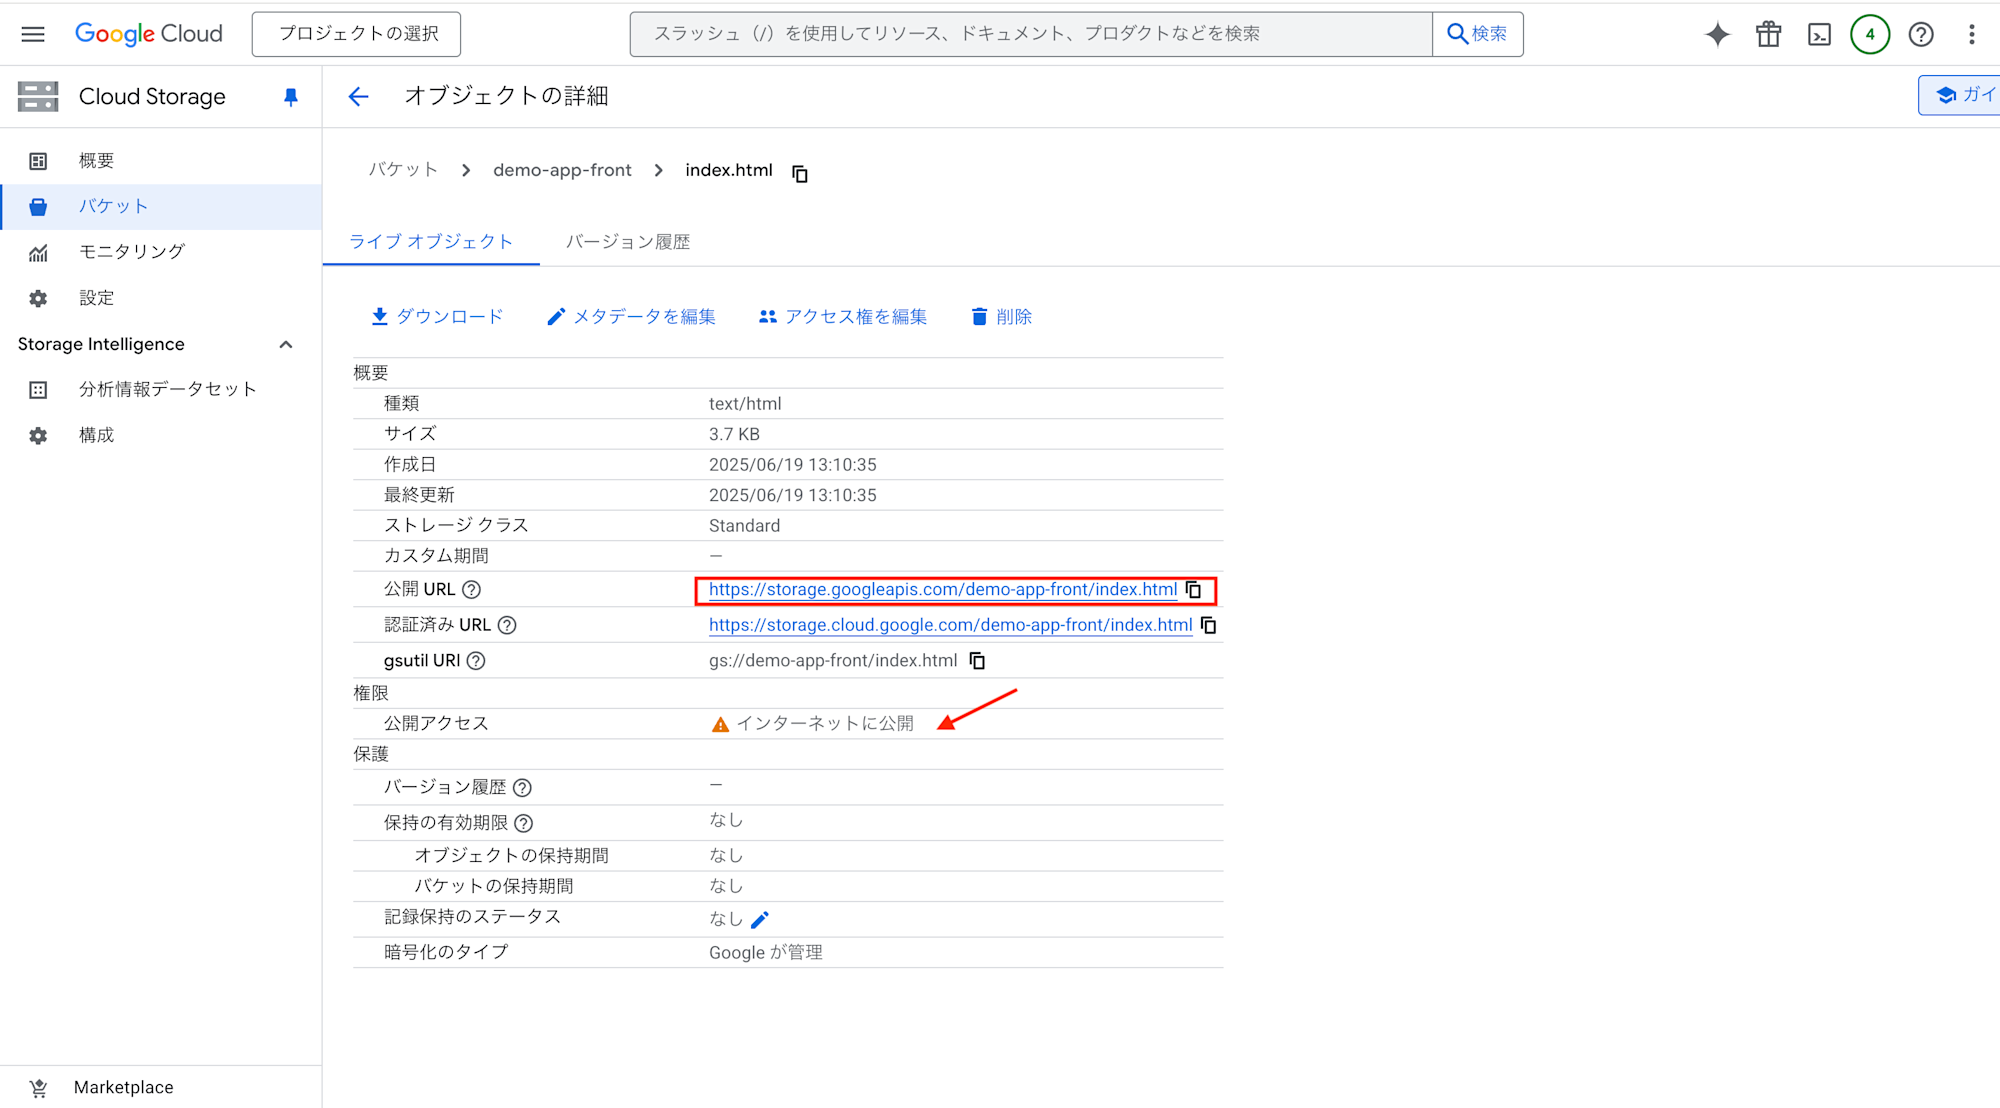
- Cloud Storageにデプロイ後、コンソール画面に行き「demo-app-front」バケットのオブジェクトURLを確認
-
公開アクセス:「インターネットに公開」であることを確認し、URLにアクセス(現在は削除済み)
-
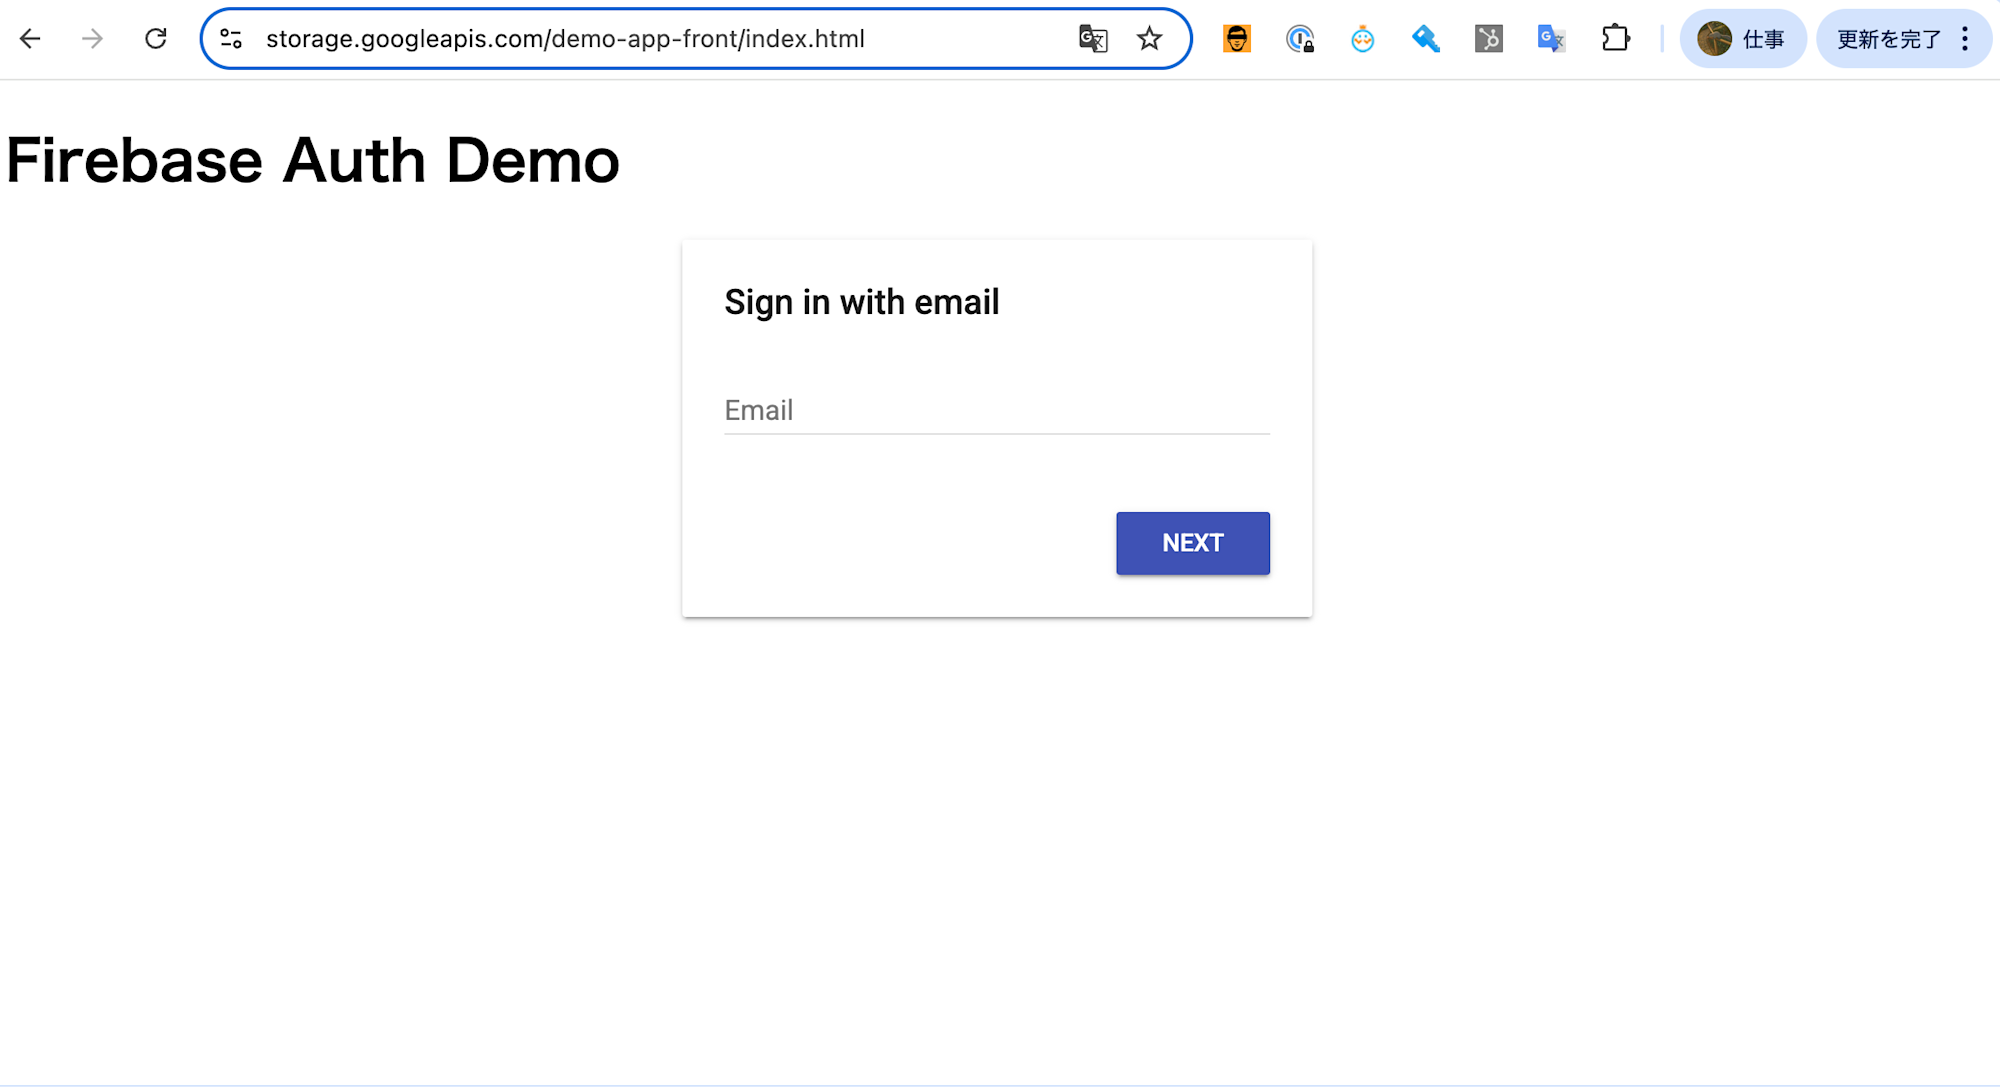
FirebaseUIの画面上でメールアドレスを入力し「Next」をクリック
-
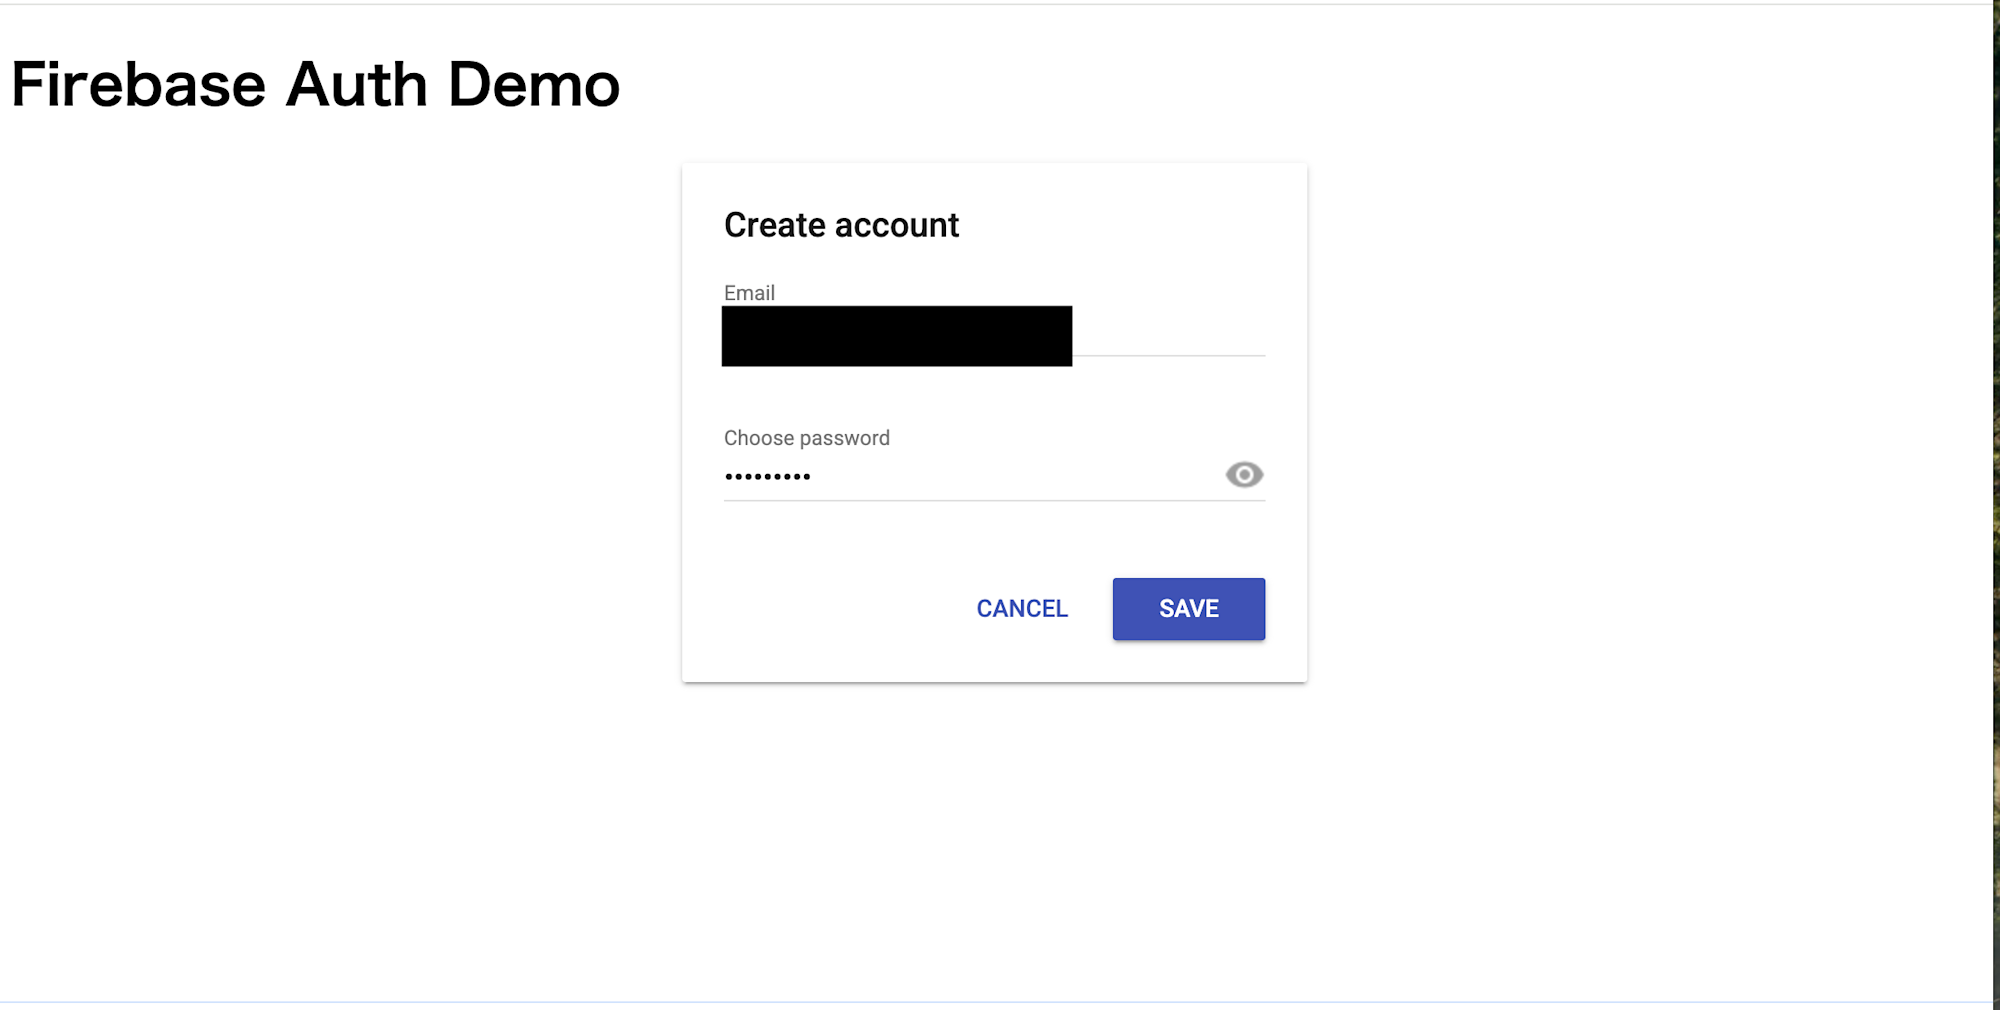
適宜パスワードを入力し「SAVE」 (今回の設定では初回サインイン = サインアップ)
- 認証が無事通ったら「APIテスト」ボタンを押下し、App Engineサーバーにリクエストを送信し、APIレスポンスのJSONテキストが無事返ってくると成功
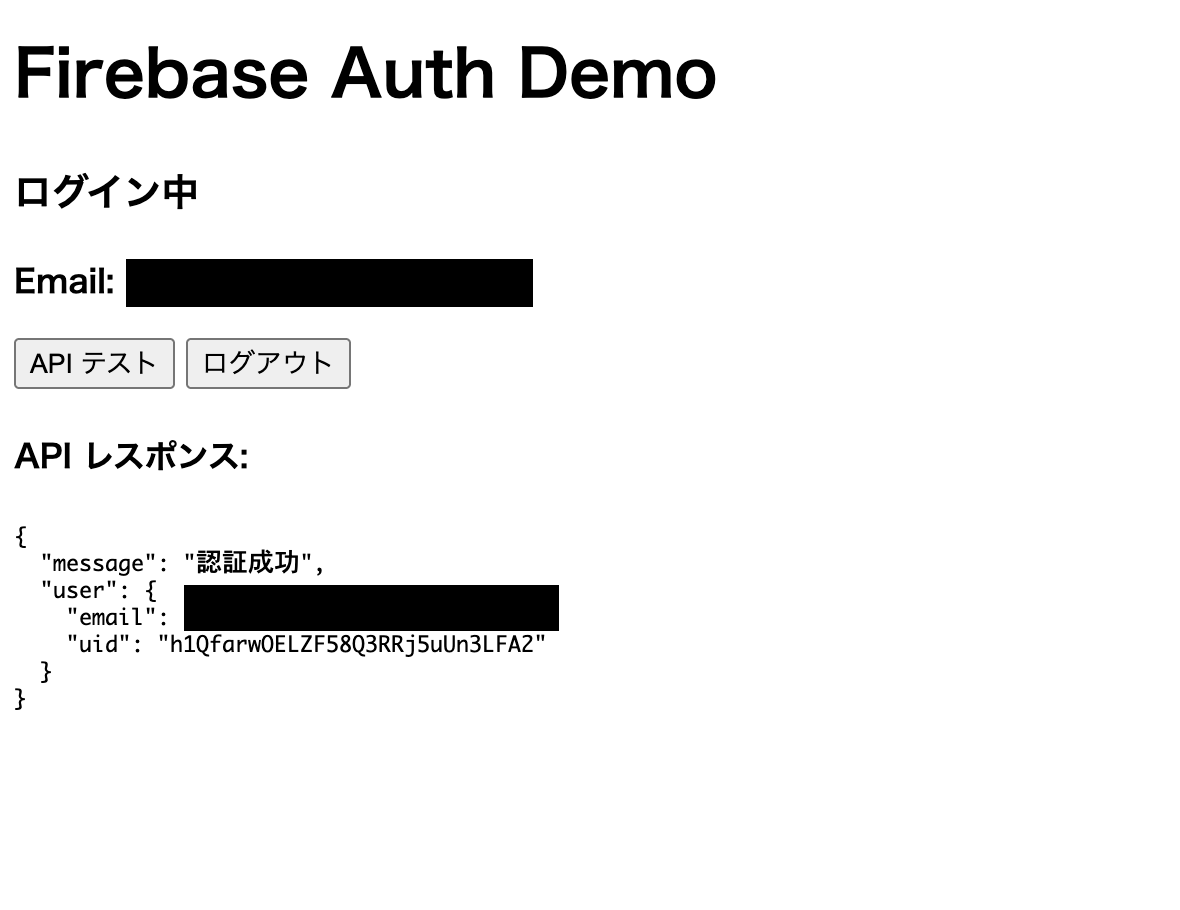
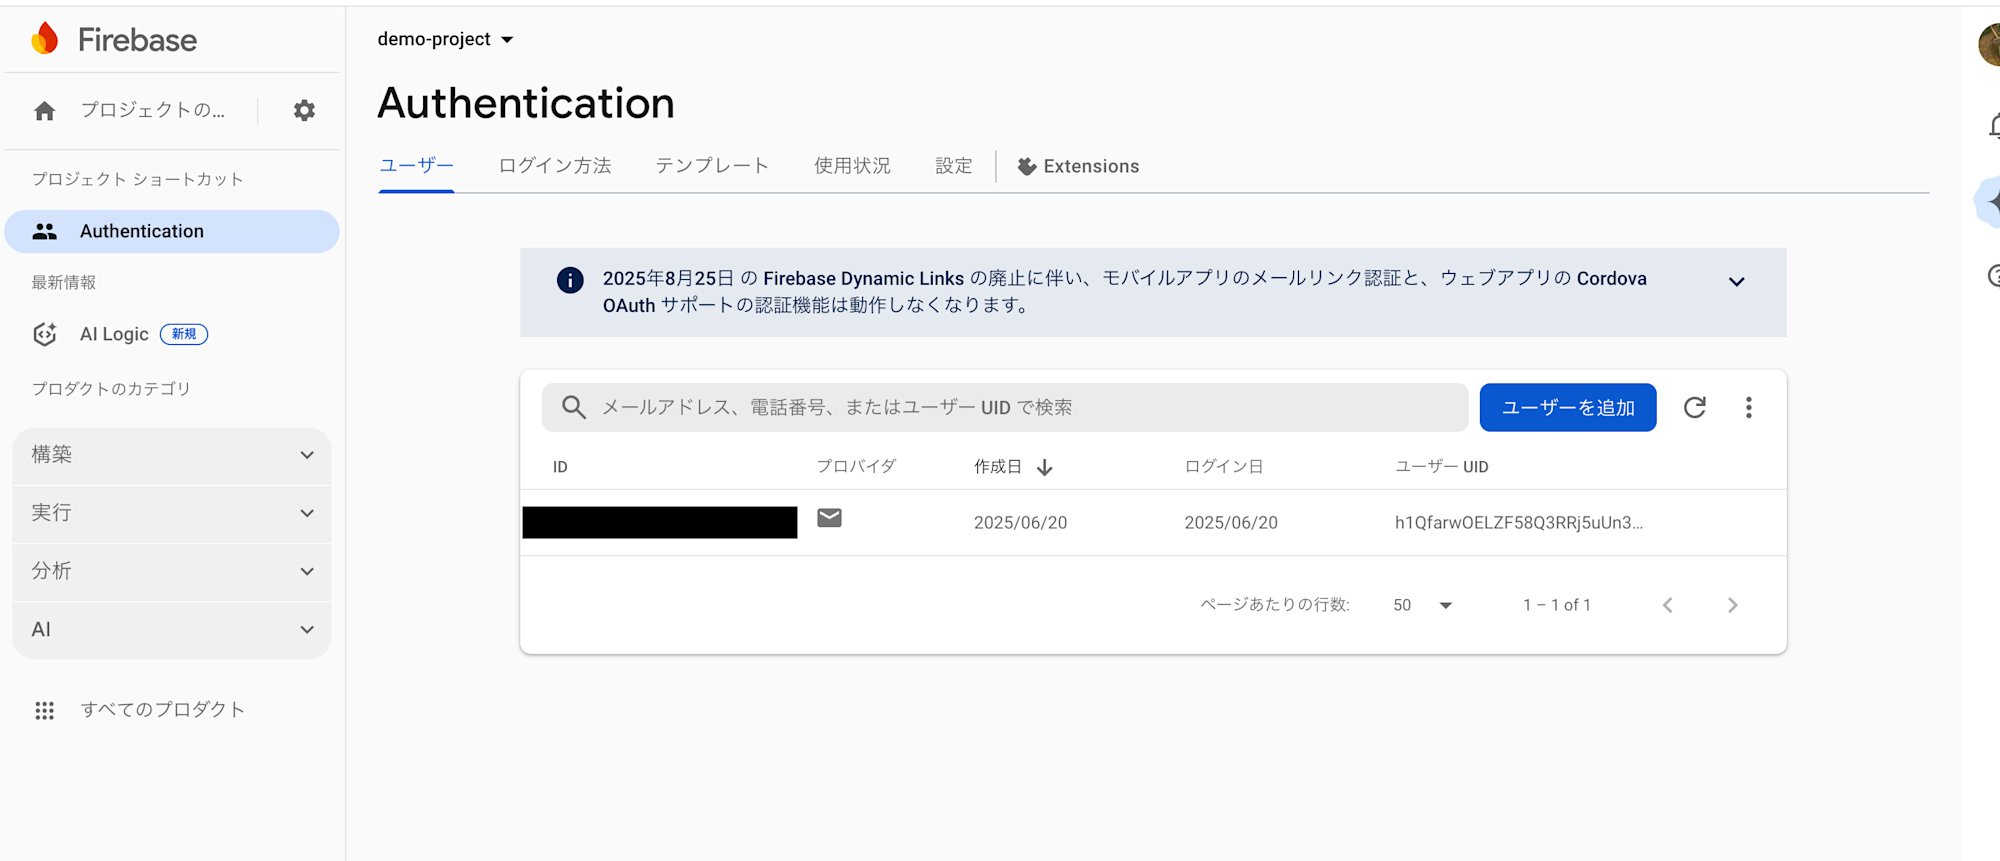
- Firebase Authenticationの画面を確認し、無事ユーザーが生成できていたら終了
最後に
Firebase AuthenticationはJWT認証ベースなのでSPAとかで採用されるケースもあると思います。App Engineについてはデプロイがとても簡単で、スケーリングなどフルマネージドに対応してくれるのでAPIサーバーを構成する際にはもってこいのサービスだと感じました。
今回は実践的な構成を構築してみました。これから地道にGoogle Cloudのキャッチアップも続けて行きたいです。今回は以上です。