
“Javascript Notes App”, just do a quick search and they are all over the Internet. But no, this is not another one of those “keep notes in local storage for beginners”. I figured the world needs better examples of modern web apps, so here it is, a “Notes PWA” that runs even when offline – You read that right, an installable and offline web app. Read on!
ⓘ I have included a zip file with all the source code at the start of this tutorial, so you don’t have to copy-paste everything… Or if you just want to dive straight in.
TABLE OF CONTENTS
DOWNLOAD & NOTES

Firstly, here is the download link to the example code as promised.
QUICK NOTES & REQUIREMENTS
- This is not a “newbie-friendly” open-source project plus example. It involves the use of service workers, indexed database, cache storage.
- Too much of a hassle to create an “online example”, just download the source code or grab it from Github.
- “Grade A” browser required, alongside an
https://server.http://localhostis fine for testing too.
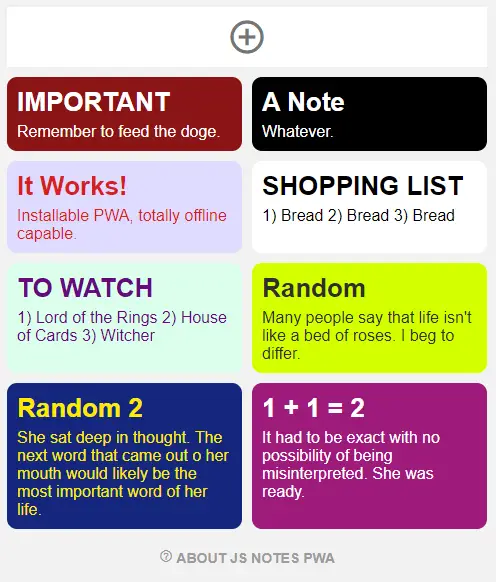
SCREENSHOT
LICENSE & DOWNLOAD
This project is released under the MIT License. You are free to use it for your own personal and commercial projects, modify it as you see fit. On the condition that there the software is provided “as-is”. There are no warranties provided and “no strings attached”. Code Boxx and the authors are not liable for any claims, damages, or liabilities.
HOW IT WORKS

Not going to explain everything line-by-line (will take forever), but here’s a quick walkthrough of the Javascript Notes PWA.
PART 1) SINGLE PAGE APP
<!-- (A) NOTES LIST --> <div id="pgA"> <div id="nAdd" class="mi" onclick="notes.show()"> add_circle_outline </div> <div id="nList"></div> </div> <!-- (B) NOTE FORM --> <div id="pgB"><form onsubmit="return notes.save()"> <label>Title</label> <input id="nTitle" type="text" autocomplete="off" required> <label>Text</label> <textarea id="nText" autocomplete="off" required></textarea> <label>Text Color</label> <input id="ntColor" type="color" value="#ffffff"> <label>Background Color</label> <input id="nbColor" type="color" value="#000000"> <div id="nAction"> <input type="button" class="mi" value="reply" onclick="notes.toggle('B')"> <input type="button" id="nDel" class="mi" value="delete" onclick="notes.del()"> <input type="submit" class="mi" value="save"> </div> </form></div>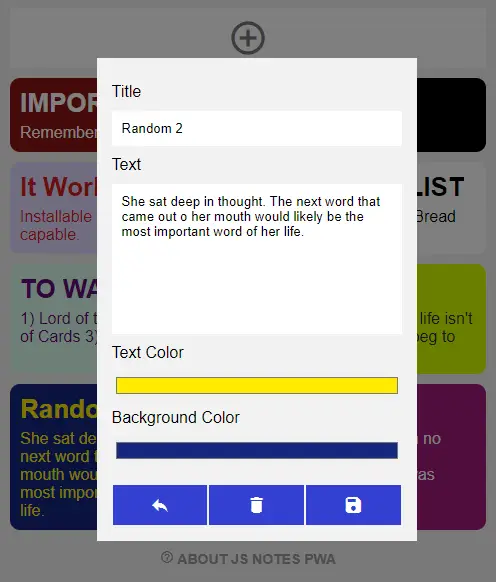
That’s right, there’s only one HTML file in the entire project.
<div id="pgA">The “main screen” where we show all the notes.<div id="pgB">An add/edit note form.
PART 2) JAVASCRIPT – INDEXED DATABASE
// (A) INDEXED DB const IDB = window.indexedDB || window.mozIndexedDB || window.webkitIndexedDB || window.msIndexedDB; var notesDB = { // (B) INITIALIZE DATABASE db : null, init : () => new Promise((resolve, reject) => { // (B1) OPEN NOTES DATABASE notesDB.db = IDB.open("JSNotes", 1); // (B2) CREATE NOTES DATABASE notesDB.db.onupgradeneeded = e => { // (B2-1) NOTES DATABASE notesDB.db = e.target.result; // (B2-2) IDB UPGRADE ERROR notesDB.db.onerror = e => { alert("Indexed DB upgrade error - " + evt.message); console.error(e); reject(e.target.error); }; // (B2-3) EVENTS STORE if (e.oldVersion < 1) { let store = notesDB.db.createObjectStore("notes", { keyPath: "id", autoIncrement: true }); } }; // (B3) IDB OPEN OK notesDB.db.onsuccess = e => { notesDB.db = e.target.result; resolve(true); }; // (B4) IDB OPEN ERROR notesDB.db.onerror = e => { alert("Indexed DB init error - " + e.message); console.error(e) reject(e.target.error); }; }), // (C) TRANSACTION "MULTI-TOOL" tx : (action, store, data, idx) => new Promise((resolve, reject) => { // (C1) GET OBJECT STORE let req, tx = notesDB.db.transaction(store, "readwrite").objectStore(store); // (C2) PROCESS ACTION switch (action) { // (C2-1) NADA default: reject("Invalid database action"); break; // (C2-2) ADD case "add": req = tx.add(data); req.onsuccess = e => resolve(true); break; // (C2-3) PUT case "put": req = tx.put(data); req.onsuccess = e => resolve(true); break; // (C2-4) DELETE case "del": req = tx.delete(data); req.onsuccess = e => resolve(true); break; // (C2-5) GET case "get": req = tx.get(data); req.onsuccess = e => resolve(e.target.result); break; // (C2-6) GET ALL case "getAll": req = tx.getAll(data); req.onsuccess = e => resolve(e.target.result); break; // (C2-7) CURSOR case "cursor": if (idx) { resolve(tx.index(idx).openCursor(data)); } else { resolve(tx.openCursor(data)); } break; } req.onerror = e => reject(e.target.error); }) };An indexed database is a huge component of this project, and this library handles it.
notesDB.init()Runs on page load to setup and “install” the database. Basically just creates aJSNotestable with a singlenotesstore (table).notesDB.tx()Runs a database transaction – Add, edit, delete, get, etc…
PART 3) NOTES JAVASCRIPT
3A) INITIALIZE
var notes = { // (A) INIT APP init : async () => { // (A1) REQUIREMENTS CHECK - INDEXED DB if (!IDB) { alert("Your browser does not support indexed database."); return; } // (A2) REQUIREMENTS CHECK - STORAGE CACHE if (!"caches" in window) { alert("Your browser does not support cache storage."); return; } // (A3) REGISTER SERVICE WORKER if ("serviceWorker" in navigator) { navigator.serviceWorker.register("CB-worker.js"); } // (A4) DATABASE + INTERFACE if (await notesDB.init()) { notes.toggle("A"); notes.list(); } }, // (B) TOGGLE PAGE toggle : p => document.getElementById("pg"+p).classList.toggle("show"), // ... } window.addEventListener("DOMContentLoaded", notes.init); On window load, notes.init() will run. This should be pretty self-explanatory even if you “eyeball glance” through it.
- Check browser requirements.
- Install a service worker. This is required to make this into an “installable web app”.
- Initialize and set up the indexed database.
3B) LIST NOTES
// (C) LIST NOTES list : async () => { // (C1) GET & "RESET" HTML LIST let nList = document.getElementById("nList"); nList.innerHTML = ""; // (C2) GET & DRAW ENTRIES for (let n of await notesDB.tx("getAll", "notes")) { let d = document.createElement("div"); d.className = "note"; d.style.color = n.tc; d.style.backgroundColor = n.bc; d.innerHTML = `<h1 class="title">${n.title}</h1> <div class="txt">${n.txt}</div>`; d.onclick = () => notes.show(n.id); nList.appendChild(d); } },notes.list() Get all the notes from the database, and draw the HTML list.
3C) SHOW NOTE
// (D) SHOW ADD/EDIT NOTE FORM nid : null, // current note id show : async (id) => { // (D1) EDIT NOTE if (id) { notes.nid = +id; let note = await notesDB.tx("get", "notes", notes.nid); document.querySelector("#nTitle").value = note.title; document.querySelector("#nText").value = note.txt; document.querySelector("#ntColor").value = note.tc; document.querySelector("#nbColor").value = note.bc; document.querySelector("#nDel").style.display = "block"; } // (D2) ADD NOTE else { notes.nid = null; document.querySelector("#pgB form").reset(); document.querySelector("#nDel").style.display = "none"; } // (D3) OPEN NOTE FORM notes.toggle("B"); },notes.show() Remember that there is a “notes form” in the HTML above? When the user clicks on “add note” or “edit note”, this function will set up and show the form accordingly.
3D) SAVE & DELETE NOTES
// (E) SAVE NOTE save : () => { // (E1) DATA TO SAVE let data = { title : document.getElementById("nTitle").value, txt : document.getElementById("nText").value, tc : document.getElementById("ntColor").value, bc : document.getElementById("nbColor").value }; // (E2) SAVE ENTRY if (notes.nid) { data.id = notes.nid; notesDB.tx("put", "notes", data); } else { notesDB.tx("add", "notes", data); } // (E3) DONE! notes.nid = null; notes.toggle("B"); notes.list(); return false; }, // (F) DELETE NOTE // id : delete this note id del : async () => { if (confirm("Delete note?")) { await notesDB.tx("del", "notes", notes.nid); notes.nid = null; notes.toggle("B"); notes.list(); }}notes.save()Get notes data from the HTML form, and save it into the database.notes.del()Remove a note from the database.
PART 4) INSTALLABLE WEB APP
4A) HTML META DATA
<!-- WEB APP MANIFEST --> <!-- https://web.dev/add-manifest/ --> <link rel="manifest" href="CB-manifest.json"> <!-- ANDROID + CHROME + APPLE + WINDOWS APP --> <meta name="mobile-web-app-capable" content="yes"> <meta name="theme-color" content="white"> <link rel="apple-touch-icon" href="assets/icon-512.png"> <meta name="apple-mobile-web-app-capable" content="yes"> <meta name="apple-mobile-web-app-status-bar-style" content="black"> <meta name="apple-mobile-web-app-title" content="Offline JS Notes"> <meta name="msapplication-TileImage" content="assets/icon-512.png"> <meta name="msapplication-TileColor" content="#ffffff">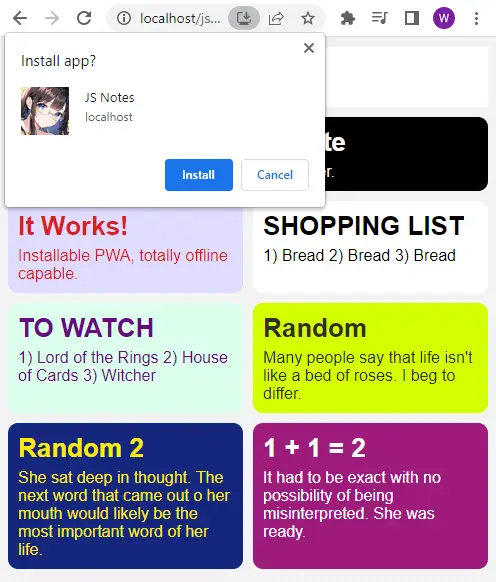
With the HTML and Javascript, this is already a perfectly working web app. But to turn this into an “installable web app”, we need to address 3 things:
- Add the above HTML “web app metadata”.
- Register a web manifest.
- Register a service worker.
4B) WEB MANIFEST
{ "short_name": "Notes", "name": "JS Notes", "icons": [{ "src": "assets/favicon.png", "sizes": "64x64", "type": "image/png" }, { "src": "assets/icon-512.png", "sizes": "512x512", "type": "image/png" }], "start_url": "js-notes.html", "scope": "/", "background_color": "white", "theme_color": "white", "display": "standalone" }The manifest file is what it is – The app name, icon, theme, settings, etc…
4C) SERVICE WORKER
// (A) CREATE/INSTALL CACHE self.addEventListener("install", evt => { self.skipWaiting(); evt.waitUntil( caches.open("NotesPWA") .then(cache => cache.addAll([ "assets/favicon.png", "assets/head-notes-pwa.webp", "assets/icon-512.png", "assets/js-notes-db.js", "assets/js-notes.js", "assets/js-notes.css", "assets/maticon.woff2", "CB-manifest.json", "js-notes.html" ])) .catch(err => console.error(err)) ); }); // (B) CLAIM CONTROL INSTANTLY self.addEventListener("activate", evt => self.clients.claim()); // (C) LOAD FROM CACHE FIRST, FALLBACK TO NETWORK IF NOT FOUND self.addEventListener("fetch", evt => evt.respondWith( caches.match(evt.request).then(res => res || fetch(evt.request)) ));If you have not heard of service workers, it is pretty much “Javascript that runs in the background”.
- (A) Save all the project files into the browser cache.
- (C) Hijack the fetch requests, serve the cached files if found, and fallback to the network if not.
Simply put, “installing” the app into the browser and enabling “offline mode”.
EXTRA BITS & LINKS

That’s all for the tutorial, and here is a small section on some extras and links that may be useful to you.
COMPATIBILITY CHECKS
- Arrow Functions – CanIUse
- Service Workers – CanIUse
- Cache Storage – CanIUse
- Indexed DB – CanIUse
Most of the required features are already well-supported on modern “Grade A” browsers.
THE END

Thank you for reading, and we have come to the end. I hope that it has helped you to better understand, and if you want to share anything with this guide, please feel free to comment below. Good luck and happy coding!