
I lead a team that’s responsible for anywhere from 15-25 Go microservices at any given time. We’re constantly creating new services and libraries, so it’s become important to streamline the project creation process. I’m mostly writing this article for myself as a kind of self-documentation, but hopefully, you’ll find it useful as you create new Go projects for yourself.
Example project structure in Go 🔗
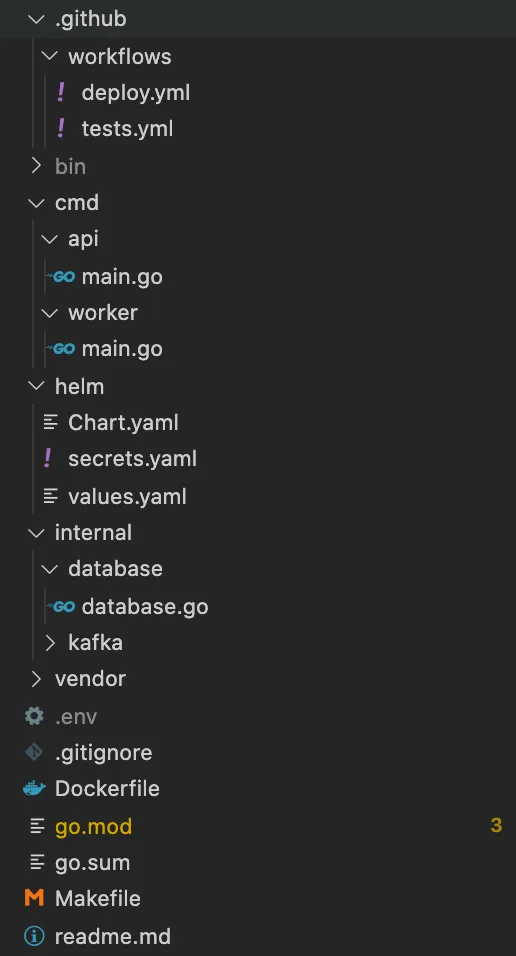
By the end of this walkthrough, you’ll have a project structure that looks something like this.
Step 1 - Create a Remote Repo and Clone It 🔗
I’m a sucker for the old GOPATH. Using the actual GOPATH is no longer recommended, but I find the single workspace principle neat and orderly. As such, I keep all my projects in:
~/workspace/src/REMOTE/NAMESPACE/PROJECT
The fastest way to start a new project is to hop into GitHub, Gitlab, or wherever your source control is located and create a new project with the default README.md. Then you can clone it down using git clone and the remote Git connection is already set up. For example:
cd ~/workspace/src/github.com/wagslane git clone https://github.com/wagslane/go-rabbitmq cd go-rabbitmq Step 2 - Folder Structure 🔗
After running cd to get into our new project, we create an internal directory that will store packages that are meant to be scoped to this project. It will usually contain packages like database, kafka, bayesian, etc. If you didn’t know, the internal directory is a Go convention and doesn’t allow the Go compiler to accidentally use its packages in an external project.
Next, we create a cmd folder where we’ll store all the executable main packages that will be built at compile time. Each executable will have its own directory in cmd.
We also need a Makefile that will automatically build all the executables in the cmd directory, run tests, check linting and formatting etc. It looks something like this:
all: test vet fmt lint build test: go test ./... vet: go vet ./... fmt: go list -f '{{.Dir}}' ./... | grep -v /vendor/ | xargs -L1 gofmt -l test -z $$(go list -f '{{.Dir}}' ./... | grep -v /vendor/ | xargs -L1 gofmt -l) lint: go list ./... | grep -v /vendor/ | xargs -L1 golint -set_exit_status build: go build -o bin/api ./cmd/api go build -o bin/worker ./cmd/worker Now we have simple commands to run from the repo’s root that will do most of the common tasks we care about. (The above assumes a single executable named api in the cmd directory)
make build # build the code make test # test the code make vet # check the vetting make lint # check the linting make fmt # check the formatting make # ensure everything passes and builds All of our CI/CD and infrastructure files should reference this Makefile. That way if the way we build and test our code changes in the future, we only need to change configurations in one place.
Step 3 - Go Mod and Vendoring Dependencies 🔗
We always vendor dependencies on my team. This means we use the go mod tool to download all of our dependencies and commit them to source control alongside our code. There’s debate about whether or not this is considered best practice, but we’ve found comfort in the fact that we have copies of the remote source in case something happens to it.
And it’s not like vendor is on the same order of magnitude as node_modules…

To get started, and assuming you actually have a program in your cmd folder, just run:
go mod init go mod tidy # unnecessary first time but good habit go mod vendor This will create three new things in your project root:
go.mod- list of dependencies and versionsgo.sum- hashes of dependencies for security reasons- vendor directory - source code of all dependencies
Step 4 - .gitignore 🔗
I don’t like pre-built .gitignore files, I like project-specific ones so I start from scratch. This is my typical starting point:
.env # ignore local environment variable file bin/ # ingore built executables Step 5 - Dockerfile (optional) 🔗
If you’re containerizing your apps (you probably should), then you’ll need a Dockerfile. From here on out everything we do assumes you’re using Kubernetes or something similar to deploy apps.
A minimal Dockerfile could look something like this:
FROM debian:stretch-slim WORKDIR / RUN apt-get update && apt-get install -y ca-certificates ADD bin /bin/ CMD ["/bin/sh"] We use a lightweight OS, Debian stretch-slim. Remember, we’re deploying statically compiled executables! Go is a compiled language, we don’t need to include the whole Go toolchain in our deploys.
After that, we just add our executables to the /bin directory and launch a shell.
Step 6 - GitHub Actions (optional) 🔗
So I’m going to get a bit sloppy here. And the reason for that is GitHub Actions configurations are VERY dependent on the exact tools you use to deploy your apps. We use Kubernetes, Helm, Helm Secrets, and AWS ECR.
That said, the test file is universally useful. In github/workflows/tests.yml:
name: Tests on: pull_request: branches: [master] jobs: test: name: Test runs-on: ubuntu-latest env: GOFLAGS: -mod=vendor GOPROXY: "off" steps: - name: Set up Go 1.146 uses: actions/setup-go@v2 with: go-version: 1.146 id: go - name: Check out code into the Go module directory uses: actions/checkout@v1 - name: Format run: make lint - name: Vet run: make vet - name: Test run: make test - name: Build run: make build Then, for your deploys you might use something like this in github/workflows/deploy.yml:
name: Deploy on: push: branches: [ master ] jobs: deploy: name: Deploy runs-on: ubuntu-latest env: GOFLAGS: -mod=vendor GOPROXY: "off" steps: - name: Print run: echo "Deploying to $DEPLOY_ENV" - name: Set up Go 1.146 uses: actions/setup-go@v2 with: go-version: 1.146 id: go - name: Check out code into the Go module directory uses: actions/checkout@v1 # Only necessary because we are using Helm and need to pull template files # from a centrally controlled remote repository - name: Check out helm templates uses: actions/checkout@v2 with: repository: {NAMESPACE}/{PROJECT} path: helm-templates ref: v1.3.1 token: ${{ secrets.REPO_PAT }} - name: Move templates to local project directory run: mv {PROJECT}/templates helm/templates - name: Build Go code run: make build # We use AWS ECR to store built images, then Helm instructs Kubernetes to pull them down - name: Configure AWS Credentials uses: aws-actions/configure-aws-credentials@v1 with: aws-access-key-id: ${{ secrets.AWS_ACCESS_KEY_ID }} aws-secret-access-key: ${{ secrets.AWS_SECRET_ACCESS_KEY }} aws-region: us-east-1 - name: Login to Amazon ECR id: login-ecr uses: aws-actions/amazon-ecr-login@v1 - name: Build, tag, and push image to Amazon ECR env: ECR_REGISTRY: ${{ steps.login-ecr.outputs.registry }} IMAGE_TAG: ${{ github.sha }} run: | docker build -t $ECR_REGISTRY/${GITHUB_REPOSITORY#*/}:$IMAGE_TAG . docker push $ECR_REGISTRY/${GITHUB_REPOSITORY#*/}:$IMAGE_TAG - name: Logout of Amazon ECR if: always() run: docker logout ${{ steps.login-ecr.outputs.registry }} - name: Install aws-iam-authenticator uses: prepor/action-aws-iam-authenticator@master - name: Deploy Helm run: | curl -LO https://git.io/get_helm.sh chmod 700 get_helm.sh ./get_helm.sh mkdir ~/.helm mkdir ~/.helm/plugins helm plugin install https://github.com/futuresimple/helm-secrets helm secrets upgrade --install ${GITHUB_REPOSITORY#*/} ./helm --namespace ${GITHUB_REPOSITORY#*/} -f helm/values.yaml -f helm/secrets.yaml --debug --set deployment.image.tag=$GITHUB_SHA kubectl get deploy -n ${GITHUB_REPOSITORY#*/} --no-headers -o custom-columns=":metadata.name" | xargs -n 1 kubectl rollout status -n ${GITHUB_REPOSITORY#*/} deploy I’ve totally left out all the Helm and ECR details in this tutorial, mostly because you either:
- Are already familiar with them so you don’t care
- Are using something else so you don’t care
- Can easily find resources dedicated to those larger topics. Here is a quickstart for you if you need it.