Local Development Environment for Kubernetes using Minikube
- Abhishek Tiwari
- Hacking
- 10.59350/y1zm7-nfg23
- Crossref
- September 10, 2017
Table of Contents
Kubernetes can be an ultimate local development environment particularly if you are wrangling with a large number of microservices. In this post, we will cover how you can create a local development workflow using Minikube and tools such as Make to iterate fast without the wait imposed by your continuous integration pipeline. With this workflow, you can code and test changes immediately.
Traditionally, you can test your code changes by rebuilding the Docker images (either locally or via your continuous integration pipeline), then pushing the image to a Docker registry after the successful build, and then redeploy to your Kubernetes cluster.
Overall development workflow
Here is our simplified development workflow,
- Make changes in your code on your local laptop
- Build local Docker images and deploy them to Minikube
- Test your code changes after deploying into Minikube
- If changes are good, commit them to version control repository
- Your version control system triggers continuous integration pipeline
- Continuous integration builds Docker images and push it your registry
We are mainly interested in the fast iteration of step 1-3. In later sections, we will discuss how we can streamline step 1-3 using GNU Make and other tools.
Prerequisite
Before we get started, let’s have a look at various dependencies you need to install in order to make this workflow work for you.
Docker
As we are dealing with Docker images, I assume you have downloaded and installed Docker for your operating system. I use Docker for Mac.
VirtualBox
You will require VirtualBox (or a similar VM driver such as xhyve driver or VMware Fusion depending on your operating system) which enables Minikube to run a single-node Kubernetes cluster inside a VM. So make sure you have downloaded VirtualBox and installed it.
Kubectl
Kubectl is a command line utility (CLI) for running commands against Kubernetes clusters. You need kubectl to interact with your local Kubernetese cluster (i.e. Minikube) as well as remote clusters.
On Mac, you can install Kubectl using one of the following methods,
- Using the Google Cloud SDK:
gcloud components install kubectl - Using Homebrew package manager:
brew install kubectl
For other operating systems please see detailed documentation on how to install kubectl.
Kubectl Basics
There are some basic kubectl commands and concepts you should get familiar with.
Using kubectl you can interact with various Kubernetes clusters by setting an appropriate context. Typically a kubeconfig file is used to configure access to one or more clusters and include details required for a context. On Mac, this can be found at ~/.kube/config. For more details please review this page on how to configure access to multiple clusters by using configuration files.
kubectl cluster-info kubectl config --kubeconfig=config view kubectl config use-context minikube kubectl config --kubeconfig=config set-context minikube --cluster=minikube kubectl config --help Using kubectl you can interact with namespaces.Namespaces are virtual clusters and typically used to isolate projects deployed on Kubernetes cluster.
kubectl get namespace kubectl create namespace dev When interacting with different namespaces, you can set temporary namespace,
kubectl -n dev get pods Or permanently for all subsequent kubectl commands in that context,
kubectl config set-context $(kubectl config current-context) --namespace=dev kubectl get pods You can also list and edit pods, deployments, services, ingress, and nodes.
kubectl get pods kubectl get deployments kubectl get services kubectl get ingress kubectl get nodes Minikube
Depending on your operating system, you should download and install appropriate Minikube binaries.
On Mac, you can install latest stable version of Minikube using Homebrew,
brew cask install minikube Alternatively, you can run the following command from your Mac terminal and it will install a specific version (v0.24.1) of Minikube.
curl -Lo minikube https://storage.googleapis.com/minikube/releases/v0.24.1/minikube-darwin-amd64 && chmod +x minikube && sudo mv minikube /usr/local/bin/ Minikube Basics
Starting the Minikube will create a single-node Kubernetes cluster inside a VM. Minikube start command also creates minikube context and set it as default.
minikube start minikube status Kubernetes dashboard is a web-based user interface. You can create and modify individual Kubernetes resources from this UI. It also provides information on the state of Kubernetes resources in your cluster.
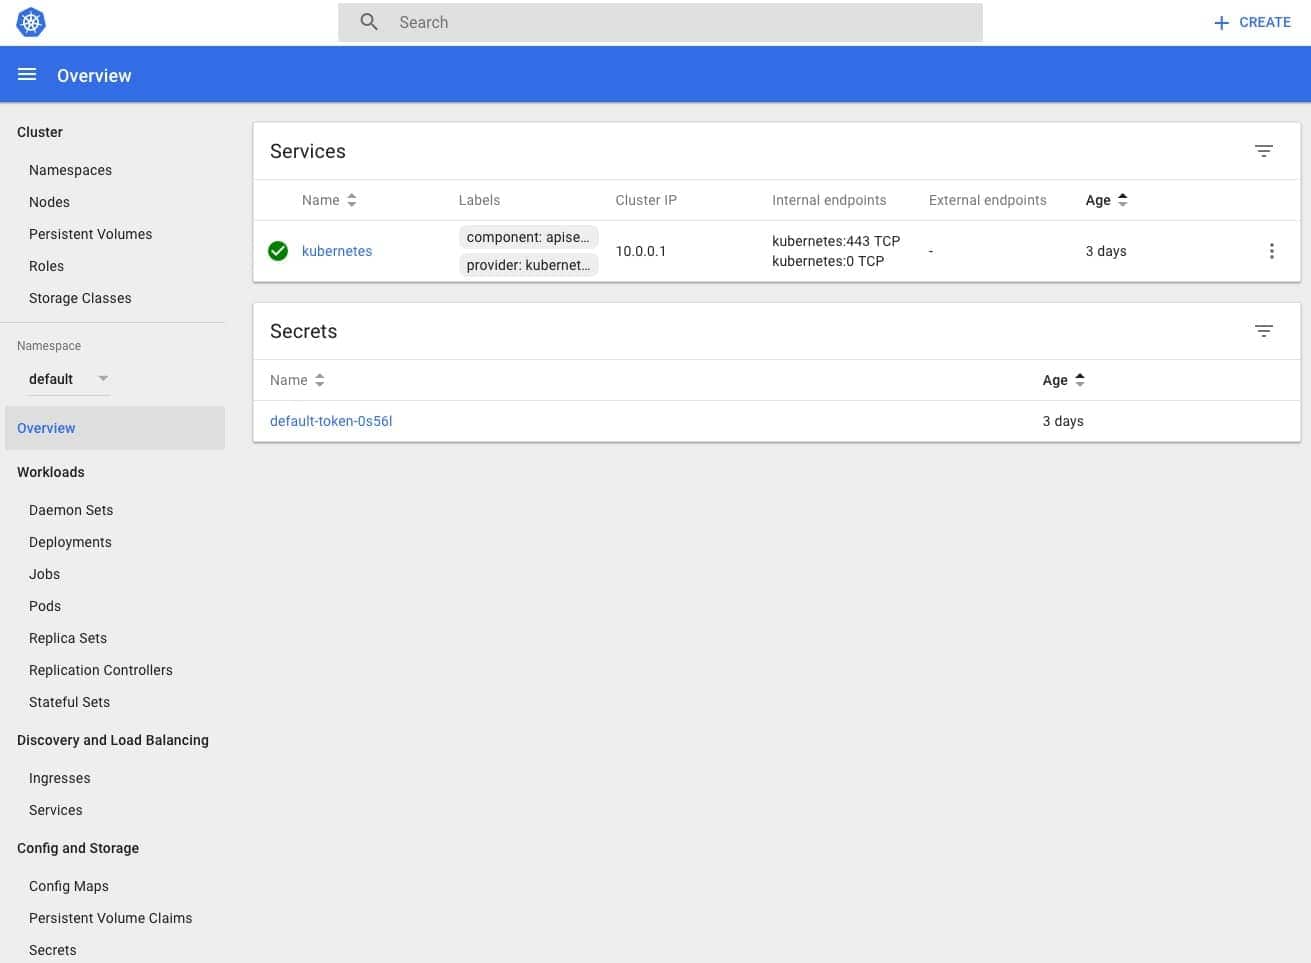
By default, Minikube comes with dashboard add-on enabled, and we can access the Kubernetes dashboard in the browser by typing following command.
minikube dashboard Another way to access dashboard is to use kubectl. Run the following command in your terminal:
kubectl proxy kubectl will handle authentication with API server and make Dashboard available at http://localhost:8001/ui.
You can always stop or delete minikube cluster,
minikube stop minikube delete In addition, Minikube provides a range of Kubernetes versions to run. You can print a list of available versions to use,
minikube get-k8s-versions Then start Minikube by passing a specific version,
minikube start --kubernetes-version v1.7.0 In addition, you can run Minikube with more customised configurations such as you can specify a different network plugin than default or use a different virtual machine driver rather than VirtualBox. You can also change default allocation of memory and CPU.
minikube start --kubernetes-version v1.7.0 \ --extra-config=proxy.IPTables.SyncPeriod.Duration=5000000000 \ --extra-config=proxy.IPTables.MinSyncPeriod.Duration=3000000000 \ These additional start options can be viewed by running,
minikube start --help Manage Minikube Add Ons
Minikube provides a set of built-in add-ons and some of them such as dashboard is enabled by default. These add-ons that can be enabled, disabled, or opened inside of the local Kubernetes environment.
minikube addons list For development purpose, I highly recommend enabling heapster add-on. Heapster enables multi-level monitoring and performance analysis including pods, nodes, and cluster.
Under the hood, it is using InfluxDB as the storage backend for metric data and Grafana as visualization UI.
minikube addons enable heapster minikube addons open heapster Once enabled we can open Grafana UI (to interact with Heapster) in the browser.
I also highly recommend enabling Ingress functionality for your Minikube,
minikube addons enable ingress Kubernetes Config Generator
When working with Kubernetes, creating and managing config files can be a really tedious job. I highly recommend kubegen - a tool which can simplify your day-to-day Kubernetes workflow, by automating the generation of boilerplate config codes for you and letting you focus on the important things.
Assuming you have Node JS and NPM already installed on your development machine, to install kubegen you need to execute the following command:
npm install -g generator-kubegen Basically, kubegen is a Yeoman generator. When we run yo kubegen on terminal it ask few questions and based on your inputs it creates config files such as deployment.yml (deployment config), svc.yml (service config), ing.yml (ingress config).
Rapid Development Cycle
Now that we have setup our local Kubernetes development environment lets take it for a ride. We are going to build a Python application message-api. This application will be deployed inside our local Minikube cluster.
Make changes in your code on your local laptop
To start with, we are going to keep this application quite simple. It has
- A
Dockerfile - A
requirements.txtwith only one dependencyflask - An
app.pywith a list offlaskroutes and view functions
Now let’s review the content of Dockerfile. Dockerfile has instructions to install requirements for the application and run an application server which enables this application to handle HTTP request/response on container port 5000.
FROM python:3-alpine RUN mkdir -p /usr/src/app WORKDIR /usr/src/app COPY requirements.txt /usr/src/app/ RUN pip install --no-cache-dir -r requirements.txt COPY . /usr/src/app EXPOSE 5000 CMD [ "python", "./app.py" ] Our app.py is also quite simple. We just added one flask GET request /api/v1.0/messages which returns a list of messages.
from flask import Flask, jsonify app = Flask(__name__) messages = [ { 'id': 1, 'message': u'Hello World', }, { 'id': 2, 'message': u'Hello Docker', }, ] @app.route('/api/v1.0/messages', methods=['GET']) def get_tasks(): return jsonify({'messages': messages}) if __name__ == '__main__': app.run(host='0.0.0.0') Build local Docker images and deploy them to Minikube
A. Build Docker image message-api against the minikube
eval $(minikube docker-env) docker build -t message-api:v1 . Please note that eval $(minikube docker-env) enables us to interact and build against docker daemon inside the minikube VM.
B. Create a deployment message-api
kubectl run hello-python --image=message-api:v1 --port=5000 C. Expose deployment message-api as service
kubectl expose deployment hello-python --type=NodePort kubectl get services As you can see, everytime you make changes in your code you still have to repeat few things: build a new Docker images (Step-A) and then update our deployment to use updated Docker image (Step-D).
D. Update the deployment to use updated Docker image
kubectl set image deployment/message-api *=message-api:v1 To avoid this repetition we are going to add a Makefile in our project folder. In this Makefile we will add an update command which basically allows us to automate step-A and step-D.
.PHONY: update update: @eval $$(minikube docker-env) ;\ docker image build -t message-api:v1 -f Dockerfile . kubectl set image deployment/message-api *=message-api:v1 Now all we need is to run make update command after every code change and we will see update results in Minikube.
Test your code changes after deploying into Minikube
Open or get URL for service message-api so we can validate the changes,
minikube service hello-python minikube service --url hello-python 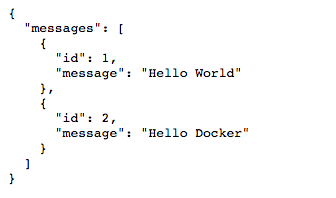
/api/v1.0/messages we will something like following.My workflow
I generally use a more evolved version of workflow described in the previous section. Using kubegen I create Kubernetes YAML files for deployment, service and ingress resources.

I use config files generated by kubegen in my configurable Makefile. On header section of the file, you can change the name of the repo (used for naming image, deployment, service, and ingress). You can edit namespace and path of config files along with version strings. You can an view example Makefile snippet below. As you can see, there are a few new make commands to streamline my Kubernetes development workflow,
make createbuilds the local image, then uses that image to create a deployment which is exposed as service.make ingresscreates an ingress using the config files specified in the header section (IFILE)make updatecreates a time stamped version of the image and update the deployment to use this new image
REPO=message-api TIMESTAMP=tmp-$(shell date +%s ) NSPACE=dev DFILE=message-api/deployment.yml SFILE=message-api/svc.yml IFILE=message-api/ing.yml VERSION=v1 .PHONY: update update: @eval $$(minikube docker-env) ;\ docker image build -t $(REPO):$(TIMESTAMP) -f Dockerfile . kubectl set image -n $(NSPACE) deployment/$(REPO) *=$(REPO):$(TIMESTAMP) .PHONY: delete delete: kubectl delete -n $(NSPACE) deployment,service $(REPO) .PHONY: create create: @eval $$(minikube docker-env) ;\ docker image build -t $(REPO):v1 -f Dockerfile . kubectl create -f $(DFILE) kubectl create -f $(SFILE) .PHONY: ingress ingress: kubectl create -f $(IFILE) .PHONY: push push: build docker tag $(REPO):$(VERSION) $(REPO):latest docker push $(REPO):$(VERSION) docker push $(REPO):latest build: @eval $$(minikube docker-env -u);\ docker image build -t $(REPO):$(VERSION) -f Dockerfile . The big picture
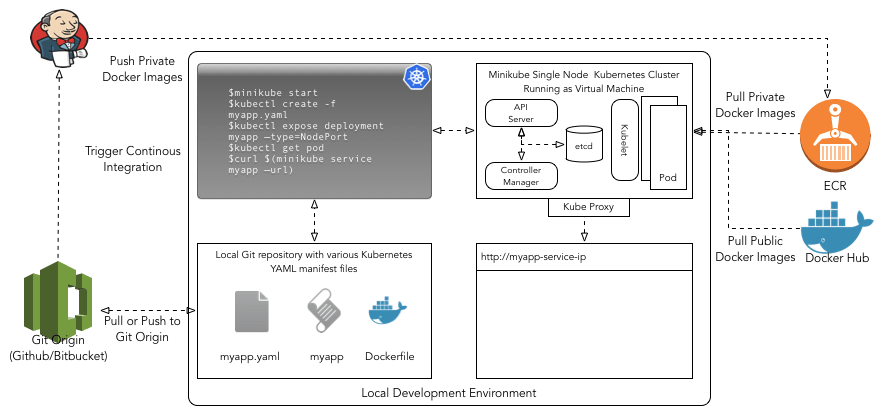
In this post, we mainly focused on the local development environment using Minikube. As illustrated below this is a part of the bigger picture i.e. overall end-to-end workflow. In upcoming posts, we will cover other tools with the potential to fast-track development activities utilizing Kubernetes cluster.