
Ammonite lets you use the Scala language for scripting purposes: in the REPL or as scripts.
Ammonite-REPL | A Modernized Scala REPL. With syntax highlighting, multi-line editing, the ability to load maven artifacts directly in the REPL, and many other quality-of-life improvements missing in the default Scala REPL. |
Scala Scripts | Lightweight Programming in Scala. Create scripts that you can run easily from the command line, without the overhead of setting up a "project" or waiting for SBT's slow startup times. |
If you use Ammonite, you will probably find the following book by the Author helpful in using Ammonite to the fullest:
Ammonite is a project by Li Haoyi. If you use Ammonite and enjoyed it, please chip in to support our development at:
Any amount will help us develop Ammonite into the best possible REPL and script runner for the Scala community!
The goal of Ammonite is to liberate your Scala code from heavyweight "projects", using the lightweight Ammonite runtime: if you want to run some Scala, open the Ammonite-REPL and run it, interactively! If you want to run it later, save it into some Scala Scripts and run those later.
If you are already working in Scala, you no longer have to drop down to Python or Bash for your scripting needs: you can use Scala Scripts for your scripting needs, and avoid the overhead of working in multiple languages.
Each of the above projects is usable standalone; click on the links to jump straight to their docs, or scroll around and browse through the navigation bar on the left. If you're wondering what you can do with Ammonite, there is an
Which contains a bunch of fun things that you can do, whether in the interactive Ammonite-REPL or in some Scala Scripts. You can also take a look at how people are using Ammonite in the wild:
To see what people are doing with it. And there are more talks available below:
The bulk of this page describes the latest stable release of Ammonite, 3.0.2. If you're willing to live on the edge, we also publish Unstable Versions from any commits that get pushed or pull-requests that land in the master branch:
The Ammonite-REPL is an improved Scala REPL, reimplemented from first principles. It is much more featureful than the default REPL and comes with a lot of ergonomic improvements and configurability that may be familiar to people coming from IDEs or other REPLs such as IPython or Zsh.
Ammonite-REPL is a superior version of the default Scala REPL, as a debugging tool, and for many other fun and interesting things!
Installation on Linux
If you want to use Ammonite as a plain Scala shell, download the standalone Ammonite 3.0.2 executable for Scala 2.13 (also available for Older Scala Versions):
$ sudo sh -c '(echo "#!/usr/bin/env sh" && curl -L https://github.com/com-lihaoyi/Ammonite/releases/download/3.0.2/2.13-3.0.2) > /usr/local/bin/amm && chmod +x /usr/local/bin/amm' && amm Or to try out the latest features in our Unstable Release 3.0.2:
$ sudo sh -c '(echo "#!/usr/bin/env sh" && curl -L https://github.com/com-lihaoyi/Ammonite/releases/download/3.0.2/2.13-3.0.2) > /usr/local/bin/amm && chmod +x /usr/local/bin/amm' && amm You can also download a bootstrap script, that can be downloaded and committed to version control as a file `amm`:
curl -L https://github.com/lihaoyi/ammonite/releases/download/3.0.2/2.13-3.0.2-bootstrap > amm && chmod +x amm Installation on macOS
Same as Installation on Linux. Or you can install it via brew:
$ brew install ammonite-repl Installation on Windows
Download the Latest version and rename it to amm.bat
Running Ammonite REPL
You can then run Ammonite via the `./amm` command.
This will give you access to the Ammonite-REPL:
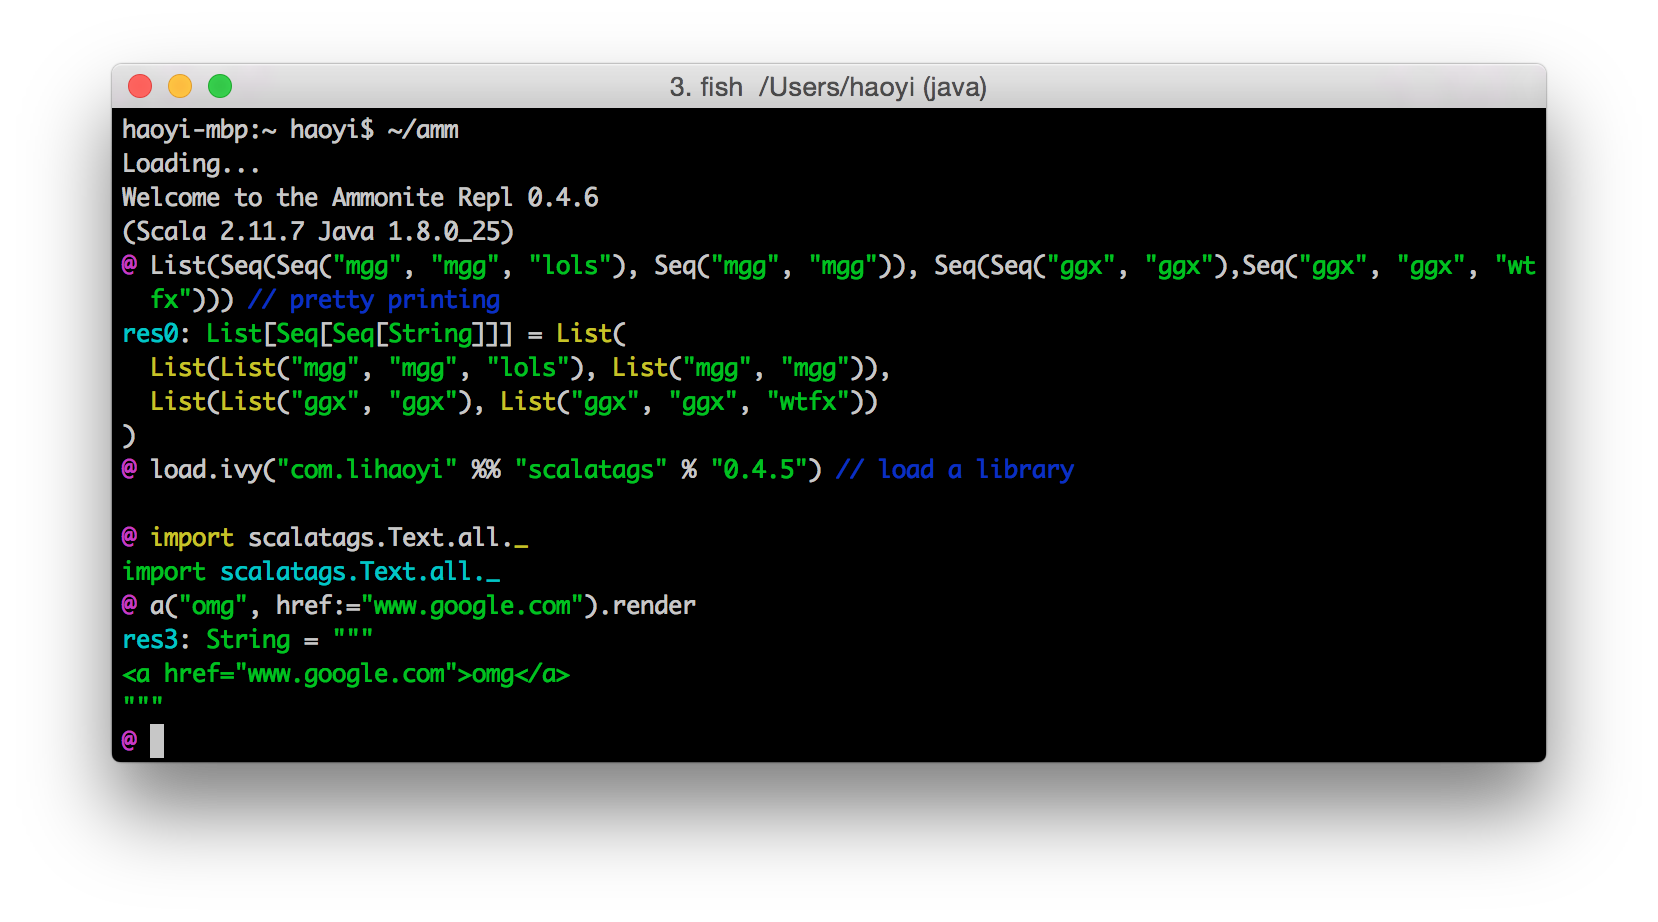
With Pretty Printing, Syntax Highlighting for input and output, Artifact Loading in-REPL, and all the other nice Features!
If you want to use Ammonite as a filesystem shell, take a look at Ammonite-Shell. If you're not sure what to do with Ammonite, check out the Ammonite Cookbook for some fun ideas!
If you want some initialization code available to the REPL, you can add it to your ~/.ammonite/predef.sc.
If you have any questions, come hang out on the mailing list or gitter channel and get help!
You can also try out Ammonite 3.0.2 in an existing SBT project. To do so, add the following to your build.sbt
libraryDependencies += { val version = scalaBinaryVersion.value match { case "2.10" => "1.0.3" case "2.11" => "1.6.7" case _ ⇒ "3.0.2" } "com.lihaoyi" % "ammonite" % version % "test" cross CrossVersion.full } sourceGenerators in Test += Def.task { val file = (sourceManaged in Test).value / "amm.scala" IO.write(file, """object amm extends App { ammonite.AmmoniteMain.main(args) }""") Seq(file) }.taskValue // Optional, required for the `source` command to work (fullClasspath in Test) ++= { (updateClassifiers in Test).value .configurations .find(_.configuration.name == Test.name) .get .modules .flatMap(_.artifacts) .collect{case (a, f) if a.classifier == Some("sources") => f} } Or to try out the latest features in our Unstable Release 3.0.2:
libraryDependencies += "com.lihaoyi" % "ammonite" % "3.0.2" % "test" cross CrossVersion.full After that, simply hit
sbt projectName/test:run or if there are other main methods in the Test scope
sbt projectName/test:runMain amm to activate the Ammonite REPL.
You can also pass a string to the Main call containing any commands or imports you want executed at the start of every run, along with other configuration. If you want Ammonite to be available in all projects, simply add the above snippet to a new file ~/.sbt/0.13/global.sbt.
Features
Ammonite-REPL supports many more features than the default REPL, including:
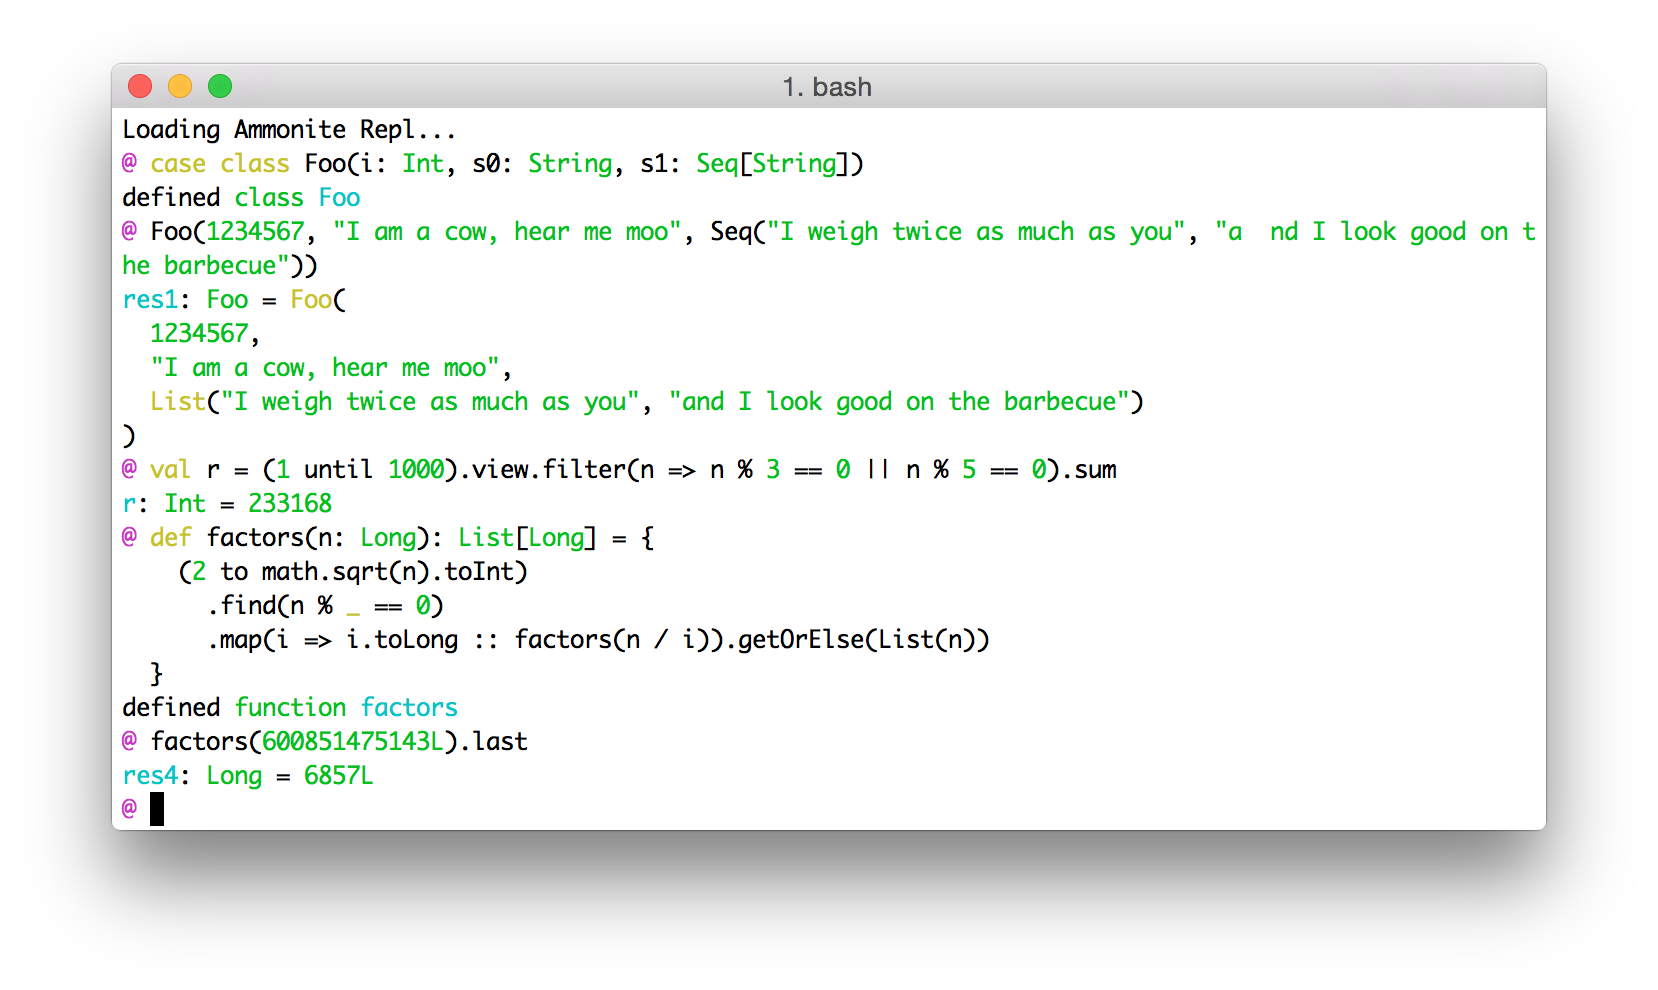
Pretty-printed output
@ Seq.fill(10)(Seq.fill(3)("Foo")) res0: Seq[Seq[String]] = List( List("Foo", "Foo", "Foo"), List("Foo", "Foo", "Foo"), List("Foo", "Foo", "Foo"), List("Foo", "Foo", "Foo"), List("Foo", "Foo", "Foo"), List("Foo", "Foo", "Foo"), List("Foo", "Foo", "Foo"), List("Foo", "Foo", "Foo"), List("Foo", "Foo", "Foo"), List("Foo", "Foo", "Foo") ) @ case class Foo(i: Int, s0: String, s1: Seq[String]) defined class Foo @ Foo(1, "", Nil) res2: Foo = ${Print.Foo(i = "1", s0 = "\"\"", s1 = "List()")} @ Foo( @ 1234567, @ "I am a cow, hear me moo", @ Seq("I weigh twice as much as you", "and I look good on the barbecue") @ ) res3: Foo = ${Print.Foo( i = 1234567, s0 = "\"I am a cow, hear me moo\"", s1 = "List(\"I weigh twice as much as you\", \"and I look good on the barbecue\")", indent = " " )}Ammonite-REPL uses PPrint to display its output by default. That means that everything is nicely formatted to fit within the width of the terminal, and is copy-paste-able!
By default, Ammonite truncates the pretty-printed output to avoid flooding your terminal. If you want to disable truncation, call show(...) on your expression to pretty-print its full output. You can also pass in an optional height = ... parameter to control how much you want to show before truncation.
Configurable Truncation
@ Seq.fill(20)(100) res0: Seq[Int] = List( 100, 100, 100, 100, 100, 100, 100, 100, 100, 100, 100, 100, 100, 100, ... @ show(Seq.fill(20)(100)) res1: ammonite.pprint.Show[Seq[Int]] = List( 100, 100, 100, 100, 100, 100, 100, 100, 100, 100, 100, 100, 100, 100, 100, 100, 100, 100, 100, 100 ) @ show(Seq.fill(20)(100), height = 3) res2: ammonite.pprint.Show[Seq[Int]] = List( 100, 100, ... @ repl.pprinter() = repl.pprinter().copy(defaultHeight = 5) @ Seq.fill(20)(100) res4: Seq[Int] = List( 100, 100, 100, 100, ... Ammonite-REPL intelligently truncates your output when it's beyond a certain size. You can request for the full output to be printed on-demand, print a certain number of lines, or even change the implicit pprintConfig so subsequent lines all use your new configuration.
Editing
Ammonite by default ships with a custom implementation of readline, which provides...
Syntax Highlighting
Ammonite syntax highlights both the code you're entering as well as any output being echoed in response. This should make it much easier to work with larger snippets of input.
All colors are configurable, and you can easily turn off colors entirely via the Configuration.
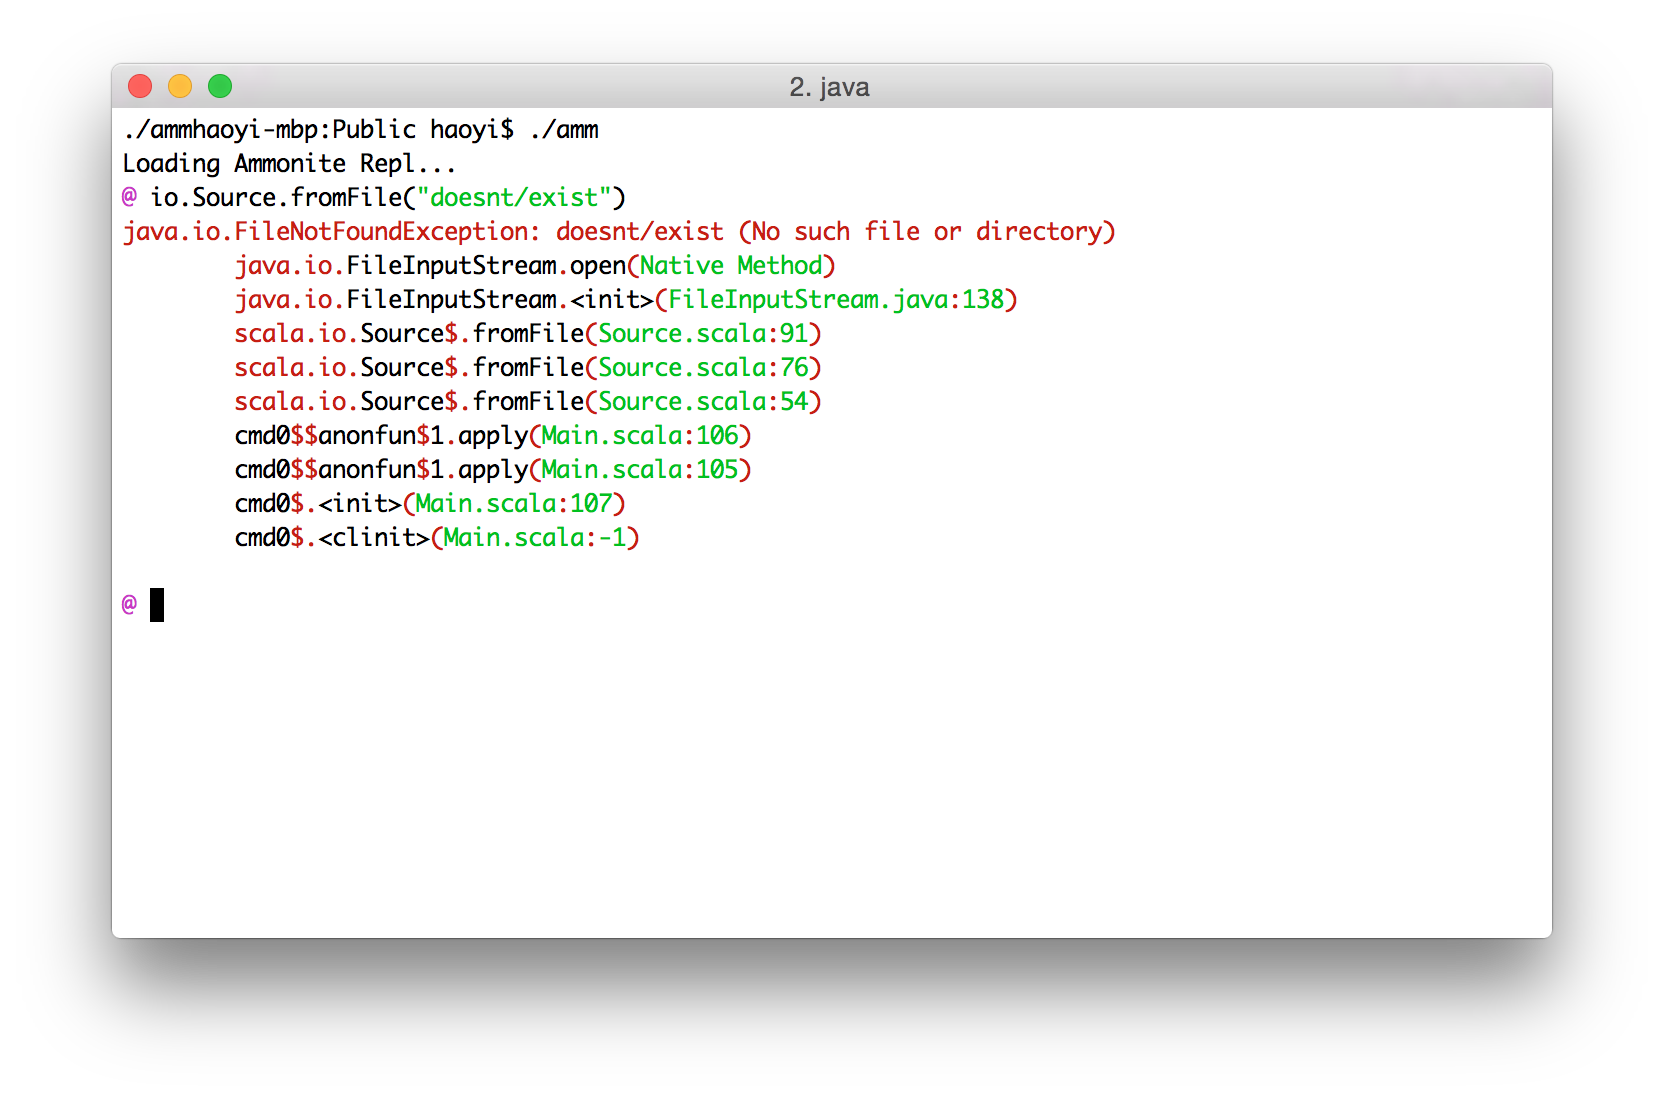
Stack traces are similarly highlighted, for easier reading:
Multi-line editing
You can use the Up and Down arrows to navigate between lines within your snippet. Enter executes the code only when you're on the last line of a multi-line snippet, meaning you can take your time, space out your code nicely, and fix any mistakes anywhere in your snippet. History is multi-line too, meaning re-running a multi-line snippet is trivial, even with tweaks.
Long gone are the days where you're desperately trying to cram everything in a single line, or curse quietly when you notice a mistake in an earlier line you are no longer able to fix. No more painstakingly crafting a multi-line snippet, and then having to painstakingly fish it line by individual line out of the history so you can run it again!
Desktop key-bindings
You can use Alt-Left/Right to move forward/backwards by one word at a time or hold down Shift to select text to delete. These compose as you'd be used to: e.g. Shift-Up selects all the text between your current cursor and the same column one row up.
Tab and Shift-Tab now work to block-indent and -dedent sections of code, as you'd expect in any desktop editor like Sublime Text or IntelliJ. This further enhances the multi-line editing experience, letting your nicely lay-out your more-complex REPL commands the same way you'd format code in any other editor.
Console key-bindings
All the readline-style navigation hotkeys like Ctrl-W to delete a word or Esc-Left/Right to navigate one word left/right still work. If you're comfortable with consoles like Bash, Python, IPython or even the default Scala console, you should have no trouble as all the exact same hotkeys work in Ammonite
History Search
Apart from browsing your command-line history with UP, you can also perform a history search by entering some search term and then pressing UP. That will pull up the most recent history line with that term in it, underlined. You can continue to press UP or DOWN to cycle through the matches, or Backspace or continue typing characters to refine your search to what you want.
You can press TAB, or any other command character (LEFT, RIGHT, ...) to end the search and let you continue working with the currently-displayed command. Pressing ENTER will end the search and immediately submit the command to be run.
You can also kick off a history search using Ctrl-R, and use Ctrl-R to cycle through the matches.
Block Input
To enter block input (many independent lines all at once) into the Ammonite-REPL, simply wrap the multiple lines in curly braces { ... }, and Ammonite will wait until you close it before evaluating the contents:
@ { @ val x = 1 @ val y = 2 @ x + y @ } x: Int = 1 y: Int = 2 res0_2: Int = 3 As you can see, the contents of the { ... } block are unwrapped and evaluated as top-level statements. You can use this to e.g. declare mutually recursive functions or classes & companion-objects without being forced to squeeze everything onto a single line.
If you don't want this un-wrapping behavior, simply add another set of curlies and the block will be evaluated as a normal block, to a single expression:
@ {{ @ val x = 1 @ val y = 2 @ x + y @ }} res0: Int = 3Undo & Redo

The Ammonite command-line editor allows you to undo and re-do portions of your edits:
-
Ctrl -: Undo last change -
Alt/Esc -: Redo last change
Each block of typing, deletes, or navigation counts as one undo. This should make it much more convenient to recover from botched copy-pastes or bulk-deletions.
Magic Imports
Ammonite provides a set of magic imports that let you load additional code into a REPL session: these are imports which start with a $, and are *top-level* inside the REPL command or your Scala Scripts.
import $file
This lets you load Scala Scripts into the REPL. For example given a small script defining one value we want
// MyScript.sc val elite = 31337 We can load it into our REPL session using:
@ import $file.MyScript @ MyScript.elite res1: Int = 31337 If the script is in a sub-folder, simply use:
@ import $file.myfolder.MyScript Or if the script is in an outer folder,
@ import $file.^.MyScript Or if we want to import the contents of the script in one go:
@ import $file.MyScript, MyScript._ import $file.$ @ elite res1: Int = 31337 While this is a trivial example, your MyScript.sc file can contain anything you want, not just vals: function defs, classes objects or traits, or imports from other scripts. For more documentation on how these scripts work, check out the Scala Scripts section.
There are some subtleties when dealing with $file imports that are worth remembering
- Imported Scripts are Re-used
- Cannot directly import from inside a Script
- Renamed-scripts and multiple-scripts
Note you can also perform file imports from your predef file, which are resolved relative to that file's path. This is useful if your predef is large and you want to break it up into multiple files.
Imported Scripts are Re-used
Note that script files imported multiple times are re-used; even if the same script is imported multiple times, it will only be compiled once, and its top-level definitions or statements will only be evaluated once. If you want to run code over and over, def a function in the script you are importing and you can call it repeatedly.
If you want to re-load a script, you should use Ammonite's Save/Load Session functionality to sess.save() the session before importing the script, and sess.load()ing to reset the script before re-importing it.
Cannot directly import from inside a Script
You cannot import things from "inside" that script in
one chain:@ import $file.MyScript._ Rather, you must always import the script-object first, and then import things from the script object after:
@ import $file.MyScript, MyScript._ Renamed-scripts and multiple-scripts
You can re-name scripts on-import if you find their names are colliding:
@ import $file.{MyScript => FooBarScript}, FooBarScript._ Or import multiple scripts at once
@ import $file.{MyScript, MyOtherScript} These behave as you would expect imports to work. Note that when importing multiple scripts, you have to name them explicitly and cannot use wildcard `._` imports:
@ import $file._ // doesn't work import $exec
This is similar to import $file, except that it dumps the definitions and imports from the script into your REPL session. This is useful if you are using a script to hold a set of common imports: using import $file to import a script doesn't propagate imports from that script into your REPL.
It is also useful if you want to split up your ~/.ammonite/predef.sc file into multiple scripts: e.g. if you want to break up your predef.sc into two scripts ~/.ammonite/predef.sc and ~/.ammonite/helper.sc. While you could use import $file to import $file.helper within your predef.sc file, it will only bring the helper object into scope within predef.sc or within your REPL. import $exec.helper will properly "dump" all the definitions from helper.sc into your local scope, which is often what you want when dealing with predef files.
See the docs for Scala Scripts for more on how script files work in general.
import $cp
Lets you add files in the class path. You can use either the same syntax as $sect.ref{import $file}, like
@ import $cp.^.scripts.foo // adds ../scripts/foo to the class path Or you can pass file paths between back-ticks, like
@ import $cp.`../scripts/foo.jar` // adds ../scripts/foo.jar to the class path * are also accepted after directory paths, Java properties can be substituted in values passed to import $cp, and several values can be passed, provided they're separated by the standard path separator (; on Linux and macOS, and : on Windows)
@ import $cp.`${spark.home}/jars/*` // adds all JARs under the jars subdirectory of Spark home Ammonite disambiguates the two syntaxes above the following way: if the import consists in a single element after import $cp., and this element contains / (on all platforms), or the local PATH separator (; on Windows, : on Linux and macOS), or a \ if on Windows, then the second syntax above is assumed (class path syntax). Else, the first syntax is assumed.
import $ivy
Lets you import Ivy dependencies from Maven Central, or anywhere else. For example, here is loading Scalaz and using it in the Ammonite-REPL:
@ import $ivy.`org.scalaz::scalaz-core:7.2.27`, scalaz._, Scalaz._ @ (Option(1) |@| Option(2))(_ + _) res1: Option[Int] = Some(value = 3) Note that the different portions of the $ivy import are in a org::library:version format; the :: is used to represent Scala dependencies, similar to %% in SBT's dependency syntax. If you want Java dependencies, you can load them using the org:library:version format, e.g. here we load the Google Guava Java library
@ import $ivy.`com.google.guava:guava:18.0`, com.google.common.collect._ @ val bimap = ImmutableBiMap.of(1, "one", 2, "two", 3, "three") @ bimap.get(1) res2: String = "one" @ bimap.inverse.get("two") res3: Int = 2 As well as the org:::library:version syntax for loading Scala libraries cross-published against the full Scala version (e.g. 2.12.2 rather than just 2.12):
@ import org.scalamacros.paradise.Settings._ error: object scalamacros is not a member of package org @ import $ivy.`org.scalamacros:::paradise:2.1.1`, org.scalamacros.paradise.Settings._ @ boolSetting("key").value res1: Boolean = false If you want to load a compiler plugin, you can do so using import $plugin.$ivy:
@ // Compiler plugins imported without `.$plugin` are not loaded @ import $ivy.`org.typelevel:::kind-projector:0.13.3` @ trait TC0[F[_]] defined trait TC0 @ type TC0EitherStr = TC0[Either[String, *]] error: not found: type * @ // You need to use `import $plugin.$ivy` @ import $plugin.$ivy.`org.typelevel:::kind-projector:0.13.3` @ trait TC[F[_]] defined trait TC @ type TCEitherStr = TC[Either[String, *]] defined type TCEitherStr @ // Importing plugins doesn't affect the run-time classpath @ import $plugin.$ivy.`com.lihaoyi::scalatags:0.7.0` @ import scalatags.Text error: not found: value scalatagsThis makes Ammonite ideal for trying out new libraries or tools. You can pull down projects like Scalaz or Shapeless and immediately start working with them in the REPL:
@ import $ivy.`com.chuusai::shapeless:2.3.3`, shapeless._ @ (1 :: "lol" :: List(1, 2, 3) :: HNil) res1: Int :: String :: List[Int] :: HNil = 1 :: "lol" :: List(1, 2, 3) :: HNil @ res1(1) res2: String = "lol" @ import shapeless.syntax.singleton._ @ 2.narrow res4: 2 = 2Even non-trivial web frameworks like Finagle or Akka-HTTP can be simply pulled down and run in the REPL!
@ import $$ivy.`com.twitter::finagle-http:21.4.0 compat` @ import com.twitter.finagle._, com.twitter.util._ @ var serverCount = 0 @ var clientResponse = 0 @ val service = new Service[http.Request, http.Response] { @ def apply(req: http.Request): Future[http.Response] = { @ serverCount += 1 @ Future.value( @ http.Response(req.version, http.Status.Ok) @ ) @ } @ } @ val server = Http.serve(":$port", service) @ val client: Service[http.Request, http.Response] = Http.client.newService(":$port") @ val request = http.Request(http.Method.Get, "/") @ request.host = "www.scala-lang.org" @ val response: Future[http.Response] = client(request) @ response.onSuccess { (resp: http.Response) => @ clientResponse = resp.statusCode @ } @ Await.ready(response) @ serverCount res12: Int = 1 @ clientResponse res13: Int = 200 @ server.close()Ammonite-REPL is configured with a set of default resolvers but you can add your own using Coursier's Repository APIs
@ import $ivy.`com.github.jupyter:jvm-repr:0.4.0` error: Failed to resolve ivy dependencies @ interp.repositories() ++= Seq(coursierapi.MavenRepository.of( @ "https://jitpack.io" @ )) @ import $ivy.`com.github.jupyter:jvm-repr:0.4.0` @ import jupyter._Including repositories which need authentication:
import coursierapi.{Credentials, MavenRepository} interp.repositories() ++= Seq( MavenRepository .of("https://nexus.corp.com/content/repositories/releases") .withCredentials(Credentials.of("user", "pass")) ) If you need more detailed control over what you are importing, e.g. with attributes, classifiers or exclusions, you can fall back to using the interp.load.ivy(deps: coursierapi.Dependency*) function and configure each Dependency to your heart's content:
@ import os._ @ interp.load.module($printedScriptPath/"loadIvyAdvanced.sc") @ serializerimport $repo
Lets you statically add Maven or Ivy repositories that will be used during artifact resolution. This mechanism does not (yet) allow for credentials registration. (
@ import $repo.`https://jitpack.io` @ import $ivy.`com.github.jupyter:jvm-repr:0.4.0` @ import jupyter._ NB: Prefixing the url pattern with "ivy:", such as import $repo.`ivy:https://dl.bintray.com/typesafe/ivy-releases/[defaultPattern]`, is required for ivy repositories. Maven repositories do not require any prefix
Builtins
The Ammonite REPL contains a bunch of built-in imports and definitions by default. This includes:
-
repl: the object representing the Repl API, aliased asrepl. This allows you (e.g.repl.history) and you can use autocomplete ortypeOfon thereplobject to see what is available. - Utilities: tools such as time, grep or browse that are independent from the REPL, but are extremely useful to have in it.
All of these are imported by default into any Ammonite REPL, in order to provide a rich and consistent REPL experience. If you want to disable these imports and run the REPL with a clean namespace (with only the core implicits needed for result pretty-printing/type-printing to work) pass in defaultPredef = false to the REPL's Main API or --no-default-predef to the REPL from the command-line.
Repl API
Ammonite contains a range of useful built-ins implemented as normal functions on the repl and interp objects, e.g. repl.history, repl.width, repl.frontEnd() to change the front-end terminal implementation, etc.:
trait ReplAPI extends ReplAPIScalaVersionSpecific { /** * Read/writable prompt for the shell. Use this to change the * REPL prompt at any time! */ val prompt: Ref[String] /** * The front-end REPL used to take user input. Modifiable! */ val frontEnd: Ref[FrontEnd] /** * Display help text if you don't know how to use the REPL */ def help: String /** * The last exception that was thrown in the REPL; `null` if nothing has * yet been thrown. Useful if you want additional information from the * thrown exception than the printed stack trace (e.g. many exceptions have * additional metadata attached) or if you want to show the stack trace * on an exception that doesn't normally print it (e.g. seeing the stack * when a Ctrl-C interrupt happened) via `lastException.printStackTrace`. */ def lastException: Throwable /** * History of commands that have been entered into the shell, including * previous sessions */ def fullHistory: History /** * History of commands that have been entered into the shell during the * current session */ def history: History /** * Throw away the current scala.tools.nsc.Global and get a new one */ def newCompiler(): Unit /** * Shows all imports added that bring values into scope for the commands a * user runs; *includes* imports from the built-in predef and user predef files */ def fullImports: Imports /** * Shows the imports added to scope by the commands a user has entered so far; * *excludes* imports from the built-in predef and user predef files */ def imports: Imports /** * If class wrapping is enabled, this lists the names of the previous commands * that the current commands actually references (as told by the scalac). * * E.g. in a session like * ``` * @ val n = 2 * n: Int = 2 * * @ val p = 1 * p: Int = 1 * * @ n + p * res2: Int = 3 * ``` * this would have returned an empty list if called from the same line as `val n = 2` * or `val p = 1`. This would have returned `Seq("cmd0", "cmd1")` if called * from the same line as `n + p`, as both `cmd0`, that defines `n`, and `cmd1`, that * defines `p`, are referenced from this line. */ def usedEarlierDefinitions: Seq[String] /** * Controls how things are pretty-printed in the REPL. Feel free * to shadow this with your own definition to change how things look */ implicit def tprintColorsImplicit: pprint.TPrintColors implicit def codeColorsImplicit: CodeColors def pprinter: Ref[pprint.PPrinter] /** * Current width of the terminal */ def width: Int /** * Current height of the terminal */ def height: Int def show(t: Any): Unit /** * Lets you configure the pretty-printing of a value. By default, it simply * disables truncation and prints the entire thing, but you can set other * parameters as well if you want. */ def show(t: Any, width: Integer = null, height: Integer = null, indent: Integer = null): Unit /** * Functions that can be used to manipulate the current REPL session: * check-pointing progress, reverting to earlier checkpoints, or deleting * checkpoints by name. * * Frames get pushed on a stack; by default, a saved frame is * accessible simply by calling `load`. If you provide a name * when `save`ing a checkpoint, it can later be `load`ed directly * by providing the same name to `load` * * Un-named checkpoints are garbage collected, together with their * classloader and associated data, when they are no longer accessible * due to `restore`. Named checkpoints are kept forever; call `delete` * on them if you really want them to go away. */ def sess: Session def load: ReplLoad def clipboard: Clipboard def _compilerManager: ammonite.compiler.iface.CompilerLifecycleManager } trait ReplLoad { /** * Loads a command into the REPL and * evaluates them one after another */ def apply(line: String): Unit /** * Loads and executes the scriptfile on the specified path. * Compilation units separated by `@\n` are evaluated sequentially. * If an error happens it prints an error message to the console. */ def exec(path: os.Path): Unit } trait Session { /** * The current stack of frames */ def frames: List[Frame] /** * Checkpoints your current work, placing all future work into its own * frames. If a name is provided, it can be used to quickly recover * that checkpoint later. */ def save(name: String = ""): Unit /** * Discards the last frames, effectively reverting your session to * the last `save`-ed checkpoint. If a name is provided, it instead reverts * your session to the checkpoint with that name. */ def load(name: String = ""): SessionChanged /** * Resets you to the last save point. If you pass in `num`, it resets * you to that many savepoints since the last one. */ def pop(num: Int = 1): SessionChanged /** * Deletes a named checkpoint, allowing it to be garbage collected if it * is no longer accessible. */ def delete(name: String): Unit } trait Clipboard { /** * Reads contents from the system clipboard. * @return System clipboard contents if they are readable as `String`, * empty string otherwise. */ def read: String /** * Sets the contents of the system clipboard. * * @param data New contents for the clipboard. */ def write(data: geny.Writable): Unit } All of these are available as part of the repl object which is imported in scope by default. Additional functionality available under the interp object, which is also available in scripts:
trait InterpAPI { /** * When running a script in `--watch` mode, re-run the main script if this * file changes. By default, this happens for all script files, but you can * call this to watch arbitrary files your script may depend on */ def watch(p: os.Path): Unit /** * A generalization of [[watch]], allows watching arbitrary values and not * just the contents of file paths. */ def watchValue[T](v: => T): T /** * The colors that will be used to render the Ammonite REPL in the terminal, * or for rendering miscellaneous info messages when running scripts. */ val colors: Ref[Colors] /** * Tools related to loading external scripts and code into the REPL */ def load: InterpLoad /** * resolvers to use when loading jars */ def repositories: Ref[List[Repository]] /** * Functions that will be chained and called on the coursier * Fetch object right before they are run */ val resolutionHooks: mutable.Buffer[Fetch => Fetch] /** * Exit the Ammonite REPL. You can also use Ctrl-D to exit */ def exit = throw AmmoniteExit(()) /** * Exit the Ammonite REPL. You can also use Ctrl-D to exit */ def exit(value: Any) = throw AmmoniteExit(value) /** * Functions that will be chained and called on the * exitValue before the repl exits */ val beforeExitHooks: mutable.Buffer[Any => Any] implicit def scalaVersion: ScalaVersion def _compilerManager: ammonite.compiler.iface.CompilerLifecycleManager } trait LoadJar { /** * Load a `.jar` file or directory into your JVM classpath */ def cp(jar: os.Path): Unit /** * Load a `.jar` from a URL into your JVM classpath */ def cp(jar: java.net.URL): Unit /** * Load one or more `.jar` files or directories into your JVM classpath */ def cp(jars: Seq[os.Path]): Unit /** * Load a library from its maven/ivy coordinates */ def ivy(coordinates: Dependency*): Unit } trait InterpLoad extends LoadJar { def module(path: os.Path): Unit def plugin: LoadJar }Utilities
Apart from the core Builtins of the REPL, the Ammonite REPL also includes many helpers that are not strictly necessarily but are very useful in almost all REPL sessions. Here are a few of them
The REPL also imports the pipe-operators from Ammonite-Ops by default to make it easy for you to use tools like grep interactively, and imports all the Builtins from the repl.
These tools are useful but not strictly necessary;
source
Ammonite provides the src built-in, which lets you easily peek at the source code of various functions or classes. You can use this to read their doc-comments or inspect their implementation, to help you figure out how to use them.
src accepts two kinda of inputs:
- A method call
foo.bar(...), in which case it will try to bring you to concrete implementation of that methodbar. You can also leave the method arguments empty using `_`. - An arbitrary expression
foo, in which case it will try to bring you to the implementation offoo's runtime class
src works on both Scala and Java APIs, both the standard library as well as third-party dependencies. src opens source files using the less pager by default; if you wish to change this, you can pass in a replacement command as a second argument e.g. src(..., "vim") or e.g. src(..., Seq("vim", "--flag"))
When used within a SBT project src requires the following SBT setting in order to make the source code of third-party dependencies available:
// Optional, required for the `source` command to work (fullClasspath in Test) ++= { (updateClassifiers in Test).value .configurations .find(_.configuration.name == Test.name) .get .modules .flatMap(_.artifacts) .collect{case (a, f) if a.classifier == Some("sources") => f} } Ammonite also automatically downloads the source jars of any libraries you import via import $ivy, and makes them browsable via src.
src is experimental: it may not always be able to find the source code of a particular method or class, and the source location it brings you to may be a few lines away from the source you really want. Furthermore, src also does not find sources that are within your own local scripts or SBT project: you likely already have access to those via your text editor anyway.
Nevertheless, it should work in the bulk of cases, so try it out and come by the Gitter Channel if you face any issues!
time
bash$ time ls -a. .. .git .git-blame-ignore-revs .github .gitignore .mill-version .scalafmt.conf LICENSE amm amm-template.sh build.mill build.sbt ci deploy_key integration internals-docs mill out project readme readme.md sshd target terminal typescript
@ time{ls!}
Just as bash provides a time command that you can use to see how long a command took to run, Ammonite-Shell provides a time function which serves the same purpose.
While the bash version spits out the time in an ad-hoc table format, stuck together with the output of the command, Ammonite-Shell's time instead returns a tuple containing the expression that was evaluated, and the time taken to evaluate it.
grep
bash$ ls -a . | grep re.git-blame-ignore-revs .gitignore readme readme.md
@ ls! wd || grep! "re"
bash$ ls -a . | grep re.git-blame-ignore-revs .gitignore readme readme.md
@ ls! wd |? grep! "re"
Ammonite provides its own grep command, which lets you easily perform ad-hoc searches within a list.
As shown above, Ammonite's grep can be used via || (flatMap) or |? (filter). In the case of ||, it displays the matches found, highlighted, with some additional context before and after the match. When used with |?, it simply returns the relevant items. In general, || is useful for manual exploration, while |? is useful in scripts where you want to deal with the list of matched results later.
By default, Ammonite's grep matches a string as a literal. If you want to match via a regex, append a .r to the string literal to turn it into a regex:
bash$ ls -a . | grep -G "re[a-z]\+".git-blame-ignore-revs readme readme.md
@ ls! wd || grep! "re[a-z]+".r
Ammonite's grep isn't limited to "filesystem"-y things; any collection of objects can be piped through grep! For example, here's grep being used to quickly search through the JVM system properties:
@ // I'm only interested in OS-related properties, show them to me! @ sys.props || grep! "os|OS".r
You can even use Ammonite's grep to dig through the methods of an object, even large messy objects with far-too-many methods to go over by hand hunting for what you want:
@ typeOf(repl.compiler).members.size // Too many methods to dig through! res0: Int = 1630 @ // I forgot what I want but I think it has Raw in the name @ typeOf(repl.compiler).members || grep! "Raw"
In general, Ammonite's grep serves the same purpose of grep in the Bash shell: a quick and dirty way to explore large amounts of semi-structured data. You probably don't want to build your enterprise business logic on top of grep's string matching. While you're working, though, grep can be a quick way to find items of interest in collections of things (anything!) too large to sift through by hand, when you're not yet sure exactly what you want.
browse
browse is a utility that lets you open up far-too-large data structures in the less pager, letting you page through large quantities of text, navigating around it and searching through it, without needing to spam your terminal output with its contents and losing your earlier work to the output-spam. Simple call browse on whatever value you want, e.g. this 50 thousand line ls.rec result show above.
If you're dealing with large blobs of data that you want to dig through manually, you might normally format it nicely, write it to a file, and open it in vim or less or an editor such as Sublime Text. browse makes that process quick and convenient.
You can customize the browse call like you would a show call or pprint.pprintln call, e.g. setting an optional width, colors or indent. You can also choose a viewer program in case you don't want to use less: e.g. here's a command that would open it up in vim:
haoyi-Ammonite@ browse(res0, viewer="vim", colors = pprint.Colors.BlackWhite) Apart from using viewer="vim", we also set the colors to black and white because Vim by default doesn't display ANSI colors nicely. You can also pass in a Seq of strings to viewer if you want to pass additional flags to your editor, and of course use any other editor you would like such as "emacs" or "nano" or "subl"
desugar
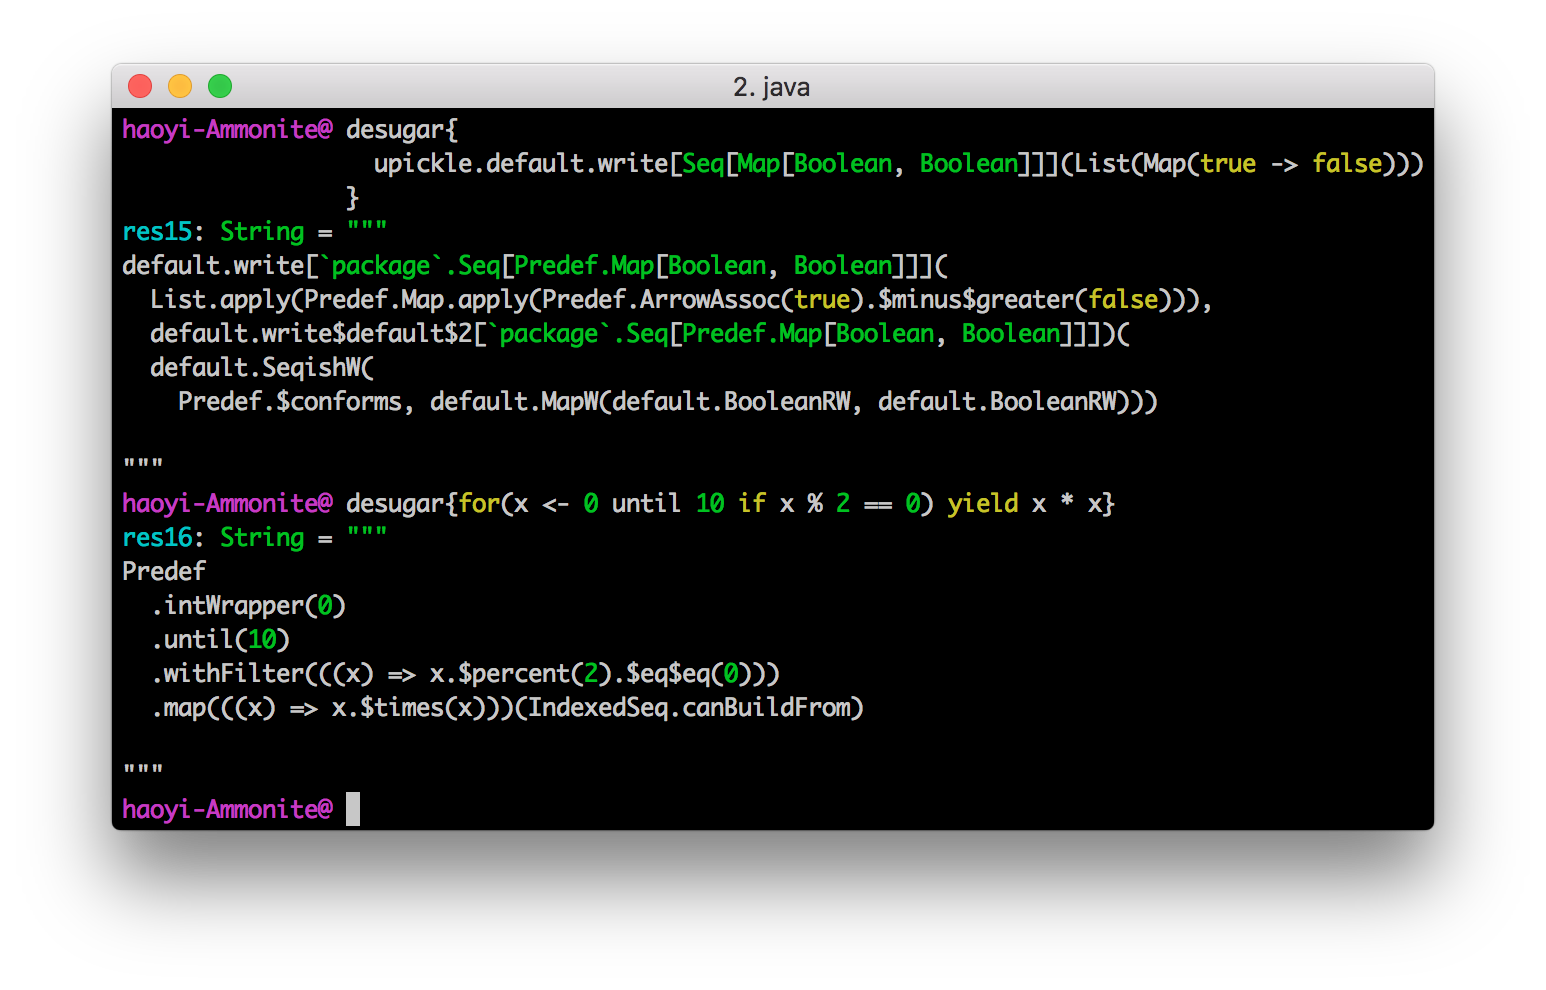
desugar allows you to easily see what the compiler is doing with your code before it gets run. For example, in the above calls to desugar, you can see:
-
List(...)being converted toList.apply(...) -
true -> falsebeing converted toPredef.ArrayAssoc(true).$minus$greater(false) -
default.write$default,default.SeqishW, etc. being injected as implicits -
forcomprehensions withiffilters being converted into the relevantwithFilterandmapcalls
In general, if you are having trouble understanding the combination of implicit parameters, implicit conversions, macros, and other odd Scala features, desugar could you see what is left after all the magic happens.
Save/Load Session
Ammonite allows you to save your work half way through, letting you discard any future changes and returning to the state of the world you saved.
Defined some memory-hogging variable you didn't need? Loaded the wrong version of some third-party library? Reluctant to reload the REPL because reloading is slow? Fear not! With Ammonite, you can save your important work, do whatever you want later, and simply discard all the jars you loaded, variables you defined
@ val veryImportant = 1 veryImportant: Int = 1 @ repl.sess.save() @ val oopsDontWantThis = 2 oopsDontWantThis: Int = 2 @ // Let's try this new cool new library @ import $$ivy.`com.lihaoyi::scalatags:0.7.0 compat` @ veryImportant res4: Int = 1 @ oopsDontWantThis res5: Int = 2 @ import scalatags.Text.all._ @ div("Hello").render res7: String = "<div>Hello</div>" @ // Oh no, maybe we don't want scalatags! @ repl.sess.load() @ veryImportant res9: Int = 1 @ oopsDontWantThis error: ${check.notFound("oopsDontWantThis")} @ import scalatags.Text.all._ error: ${check.notFound("scalatags")} """ Apart from plain saves and loads, which simply discard everything after the most recent save, you can also provide a name to these functions. That lets you stop working on a branch, go do something else for a while, and be able to come back later to continue where you left off:
@ val (x, y) = (1, 2) x: Int = 1 y: Int = 2 @ repl.sess.save("xy initialized") @ val z = x + y z: Int = 3 @ repl.sess.save("first z") @ repl.sess.load("xy initialized") @ val z = x - y z: Int = -1 @ repl.sess.save("second z") @ z res7: Int = -1 @ repl.sess.load("first z") @ z res9: Int = 3 @ repl.sess.load("second z") @ z res11: Int = -1 """) Lastly, you have the repl.sess.pop() function. Without any arguments, it behaves the same as repl.sess.load(), reseting you to your last savepoint. However, you can pass in a number of session frames which you'd like to pop, allow you to reset your session to even earlier save points. repl.sess.pop(2) would put you two save-points ago, repl.sess.pop(3) would put you three save-points ago, letting you reach earlier save-points even if you did not give them names. Passing in a large number like repl.sess.pop(999) would reset your session all the way until the start.
Ammonite's save and load functionality is implemented via Java class-loaders.
Superior Autocomplete
The original Scala REPL provides no autocomplete except for the most basic scenarios of value.<complete>. In the Ammonite-REPL, you get the same autocomplete-anywhere support that you get in a modern IDE.
@ Seq(1, 2, 3).map(x => x.) getClass ## asInstanceOf isInstanceOf toString hashCode equals != == % / * - + ^ & | >= > <= < >> >>> << unary_- unary_+ unary_~ toDouble toFloat toLong toInt toChar toShort toByte compareTo doubleValue ... @ Futu scala.collection.parallel.FutureThreadPoolTasks scala.collection.parallel.FutureTasks scala.concurrent.impl.Future$PromiseCompletingRunnable scala.concurrent.impl.Future scala.concurrent.Future scala.concurrent.FutureTaskRunner scala.concurrent.Future$InternalCallbackExecutor scala.concurrent.Future$class java.util.concurrent.Future java.util.concurrent.FutureTask$WaitNode java.util.concurrent.FutureTask com.sun.corba.se.impl.orbutil.closure.Future Ammonite also allows you to autocomplete third party dependencies pulled in via import $ivy, to make it easy for you to navigate the public package repositories and find the name and version of a dependency that you want:

None of these examples work in the standard Scala REPL.
Interrupting run-away execution with Ctrl-C
@ while(true) () ... hangs ... ^Ctrl-C Interrupted! @ The traditional Scala REPL doesn't handle runaway code, and gives you no option but to kill the process, losing all your work. Ammonite-REPL lets you interrupt the thread, stop the runaway-command and keep going.
Compiler-crash Robustness
@ val x = 1 x: Int = 1 @ /* trigger compiler crash */ trait Bar { super[Object].hashCode } error: java.lang.AssertionError: assertion failed @ 1 + x res1: Int = 2 The default Scala REPL throws away all your work if the compiler crashes. This doesn't make any sense, because all the compiler is is a dumb String => Array[Byte] pipe. In the Ammonite, we simply swap out the broken compiler for a new one and let you continue your work.
Other Fixes
Apart from the above features, the Ammonite REPL fixes a large number of bugs in the default Scala REPL, including but not limited to:
Configuration
Ammonite is configured via Scala code, that can live in the ~/.ammonite/predef.sc file, passed in through SBT's initialCommands, or passed to the command-line executable as --predef='...'.
Anything that you put in predef.sc will be executed when you load the Ammonite REPL. This is a handy place to put common imports, setup code, or even call import $ivy to load third-party jars. The compilation of the predef is cached, so after the first run it should not noticeably slow down the initialization of your REPL.
Some examples of things you can configure:
@ // Set the shell prompt to be something else @ repl.prompt() = ">" @ // Change the terminal front end; the default is @ // Ammonite on Linux/OSX and JLineWindows on Windows @ repl.frontEnd() = frontEnd("unix") @ repl.frontEnd() = frontEnd("windows") @ repl.frontEnd() = frontEnd("ammonite") @ // Changing the colors used by Ammonite; all at once: @ interp.colors() = ammonite.util.Colors.BlackWhite @ interp.colors() = ammonite.util.Colors.Default @ // or one at a time: @ interp.colors().prompt() = fansi.Color.Red @ interp.colors().ident() = fansi.Color.Green @ interp.colors().`type`() = fansi.Color.Yellow @ interp.colors().literal() = fansi.Color.Magenta @ interp.colors().prefix() = fansi.Color.Cyan @ interp.colors().comment() = fansi.Color.Red @ interp.colors().keyword() = fansi.Bold.On @ interp.colors().selected() = fansi.Underlined.On @ interp.colors().error() = fansi.Color.YellowRefs
By default, all the values you're seeing here with the () after them are Refs, defined as
trait StableRef[T] { /** * Get the current value of the this [[StableRef]] at this instant in time */ def apply(): T /** * Set the value of this [[StableRef]] to always be the value `t` */ def update(t: T): Unit } trait Ref[T] extends StableRef[T] { /** * Return a function that can be used to get the value of this [[Ref]] * at any point in time */ def live(): () => T /** * Set the value of this [[Ref]] to always be the value of the by-name * argument `t`, at any point in time */ def bind(t: => T): Unit } As you can see from the signature, you can basically interact with the Refs in two ways: either getting or setting their values as values, or binding their values to expressions that will be evaluated every time the Ref's value is needed.
As an example of the latter, you can use bind to set your prompt to always include your current working directory
repl.prompt.bind(os.pwd.toString + " @ ") As is common practice in other shells. Further modifications to make it include e.g. your current branch in Git (which you can call through Ammonite's subprocess API or the current timestamp/user are similarly possible.
Compiler Flags
Apart from configuration of the rest of the shell through Refs, configuration of the Scala compiler takes place separately through the compiler's own configuration mechanism. You have access to the compiler as compiler, and can modify its settings as you see fit. Here's an example of this in action:
@ // Disabling default Scala imports @ List(1, 2, 3) + "lol" res0: String = "List(1, 2, 3)lol" @ interp.configureCompiler(_.settings.noimports.value = true) @ // interp.preConfigureCompiler(ctx => ctx.setSetting(ctx.settings.YnoImports, true)) // Dotty @ List(1, 2, 3) + "lol" // predef imports disappear error: not found: value List @ interp.configureCompiler(_.settings.noimports.value = false) @ List(1, 2, 3) + "lol" res3: String = "List(1, 2, 3)lol" @ // Disabling Scala language-import enforcement @ object X extends Dynamic error: extension of type scala.Dynamic needs to be enabled @ interp.configureCompiler(_.settings.language.tryToSet(List("dynamics"))) @ object X extends Dynamic defined object X @ 1 + 1 // other things still work @ // Enabling warnings (which are disabled by default) @ List(1) match { case _: List[Double] => 2 } res7: Int = 2 @ interp.configureCompiler(_.settings.nowarnings.value = false) @ List(1) match { case _: List[Double] => 2 } warning: $fruitlessTypeTestWarningMessageBlahBlahBlah @ // Note you can refer to `repl.compiler` when interactive in the REPL @ // But you should use `interp.configureCompiler` in your scripts/predef @ // because `repl.compiler` may be `null` if the script is cached. @ repl.compiler.settings.nowarnings.value res10: Boolean = false If you want these changes to always be present, place them in your ~/.ammonite/predef.sc.
JVM Flags
Ammonite also supports the JAVA_OPTS environment variable for passing arguments to the JVM that it runs inside, e.g. you can pass in a custom memory limit via
bash$ JAVA_OPTS="-Xmx1024m" amm To start the REPL while letting it use only up to 1024 megabytes of memory
Embedding
The Ammonite REPL is just a plain-old-Scala-object, just like any other Scala object, and can be easily used within an existing Scala program. This is useful for things like interactive Debugging or hosting a Remote REPL to interact with a long-lived Scala process, or Instantiating Ammonite inside an existing program to serve as a powerful interactive console.
Instantiating Ammonite
To use Ammonite inside an existing Scala program, you need to first add it to your dependencies:
libraryDependencies += "com.lihaoyi" % "ammonite" % "3.0.2" cross CrossVersion.full Then instantiate it with this code anywhere within your program:
package ammonite.integration object TestMain { def main(args: Array[String]): Unit = { val hello = "Hello" // Break into debug REPL with ammonite.Main( predefCode = "println(\"Starting Debugging!\")" ).run( "hello" -> hello, "fooValue" -> foo() ) } def foo() = 1 } You can configure the instantiated REPL by passing in arguments to the Main() call, e.g. to redirect the input/output streams or to run a predef to configure it further.
Debugging
Ammonite can be used as a tool to debug any other Scala program, by conveniently opening a REPL at any point within your program with which you can interact with live program data, similar to pdb/ipdb in Python. To do so, first add Ammonite to your classpath, e.g. through this SBT snippet:
libraryDependencies += "com.lihaoyi" % "ammonite" % "3.0.2" cross CrossVersion.full Note that unlike the snippet given above, we leave out the % "test" because we may want ammonite to be available within the "main" project, and not just in the unit tests. Then, anywhere within your program, you can place a breakpoint via:
package ammonite.integration object TestMain { def main(args: Array[String]): Unit = { val hello = "Hello" // Break into debug REPL with ammonite.Main( predefCode = "println(\"Starting Debugging!\")" ).run( "hello" -> hello, "fooValue" -> foo() ) } def foo() = 1 } And when your program reaches that point, it will pause and open up an Ammonite REPL with the values you provided it bound to the names you gave it. From there, you can interact with those values as normal Scala values within the REPL. Use Ctrl-D or exit to exit the REPL and continue normal program execution. Note that the names given must be plain Scala identifiers.
Here's an example of it being used to debug changes to the WootJS webserver:
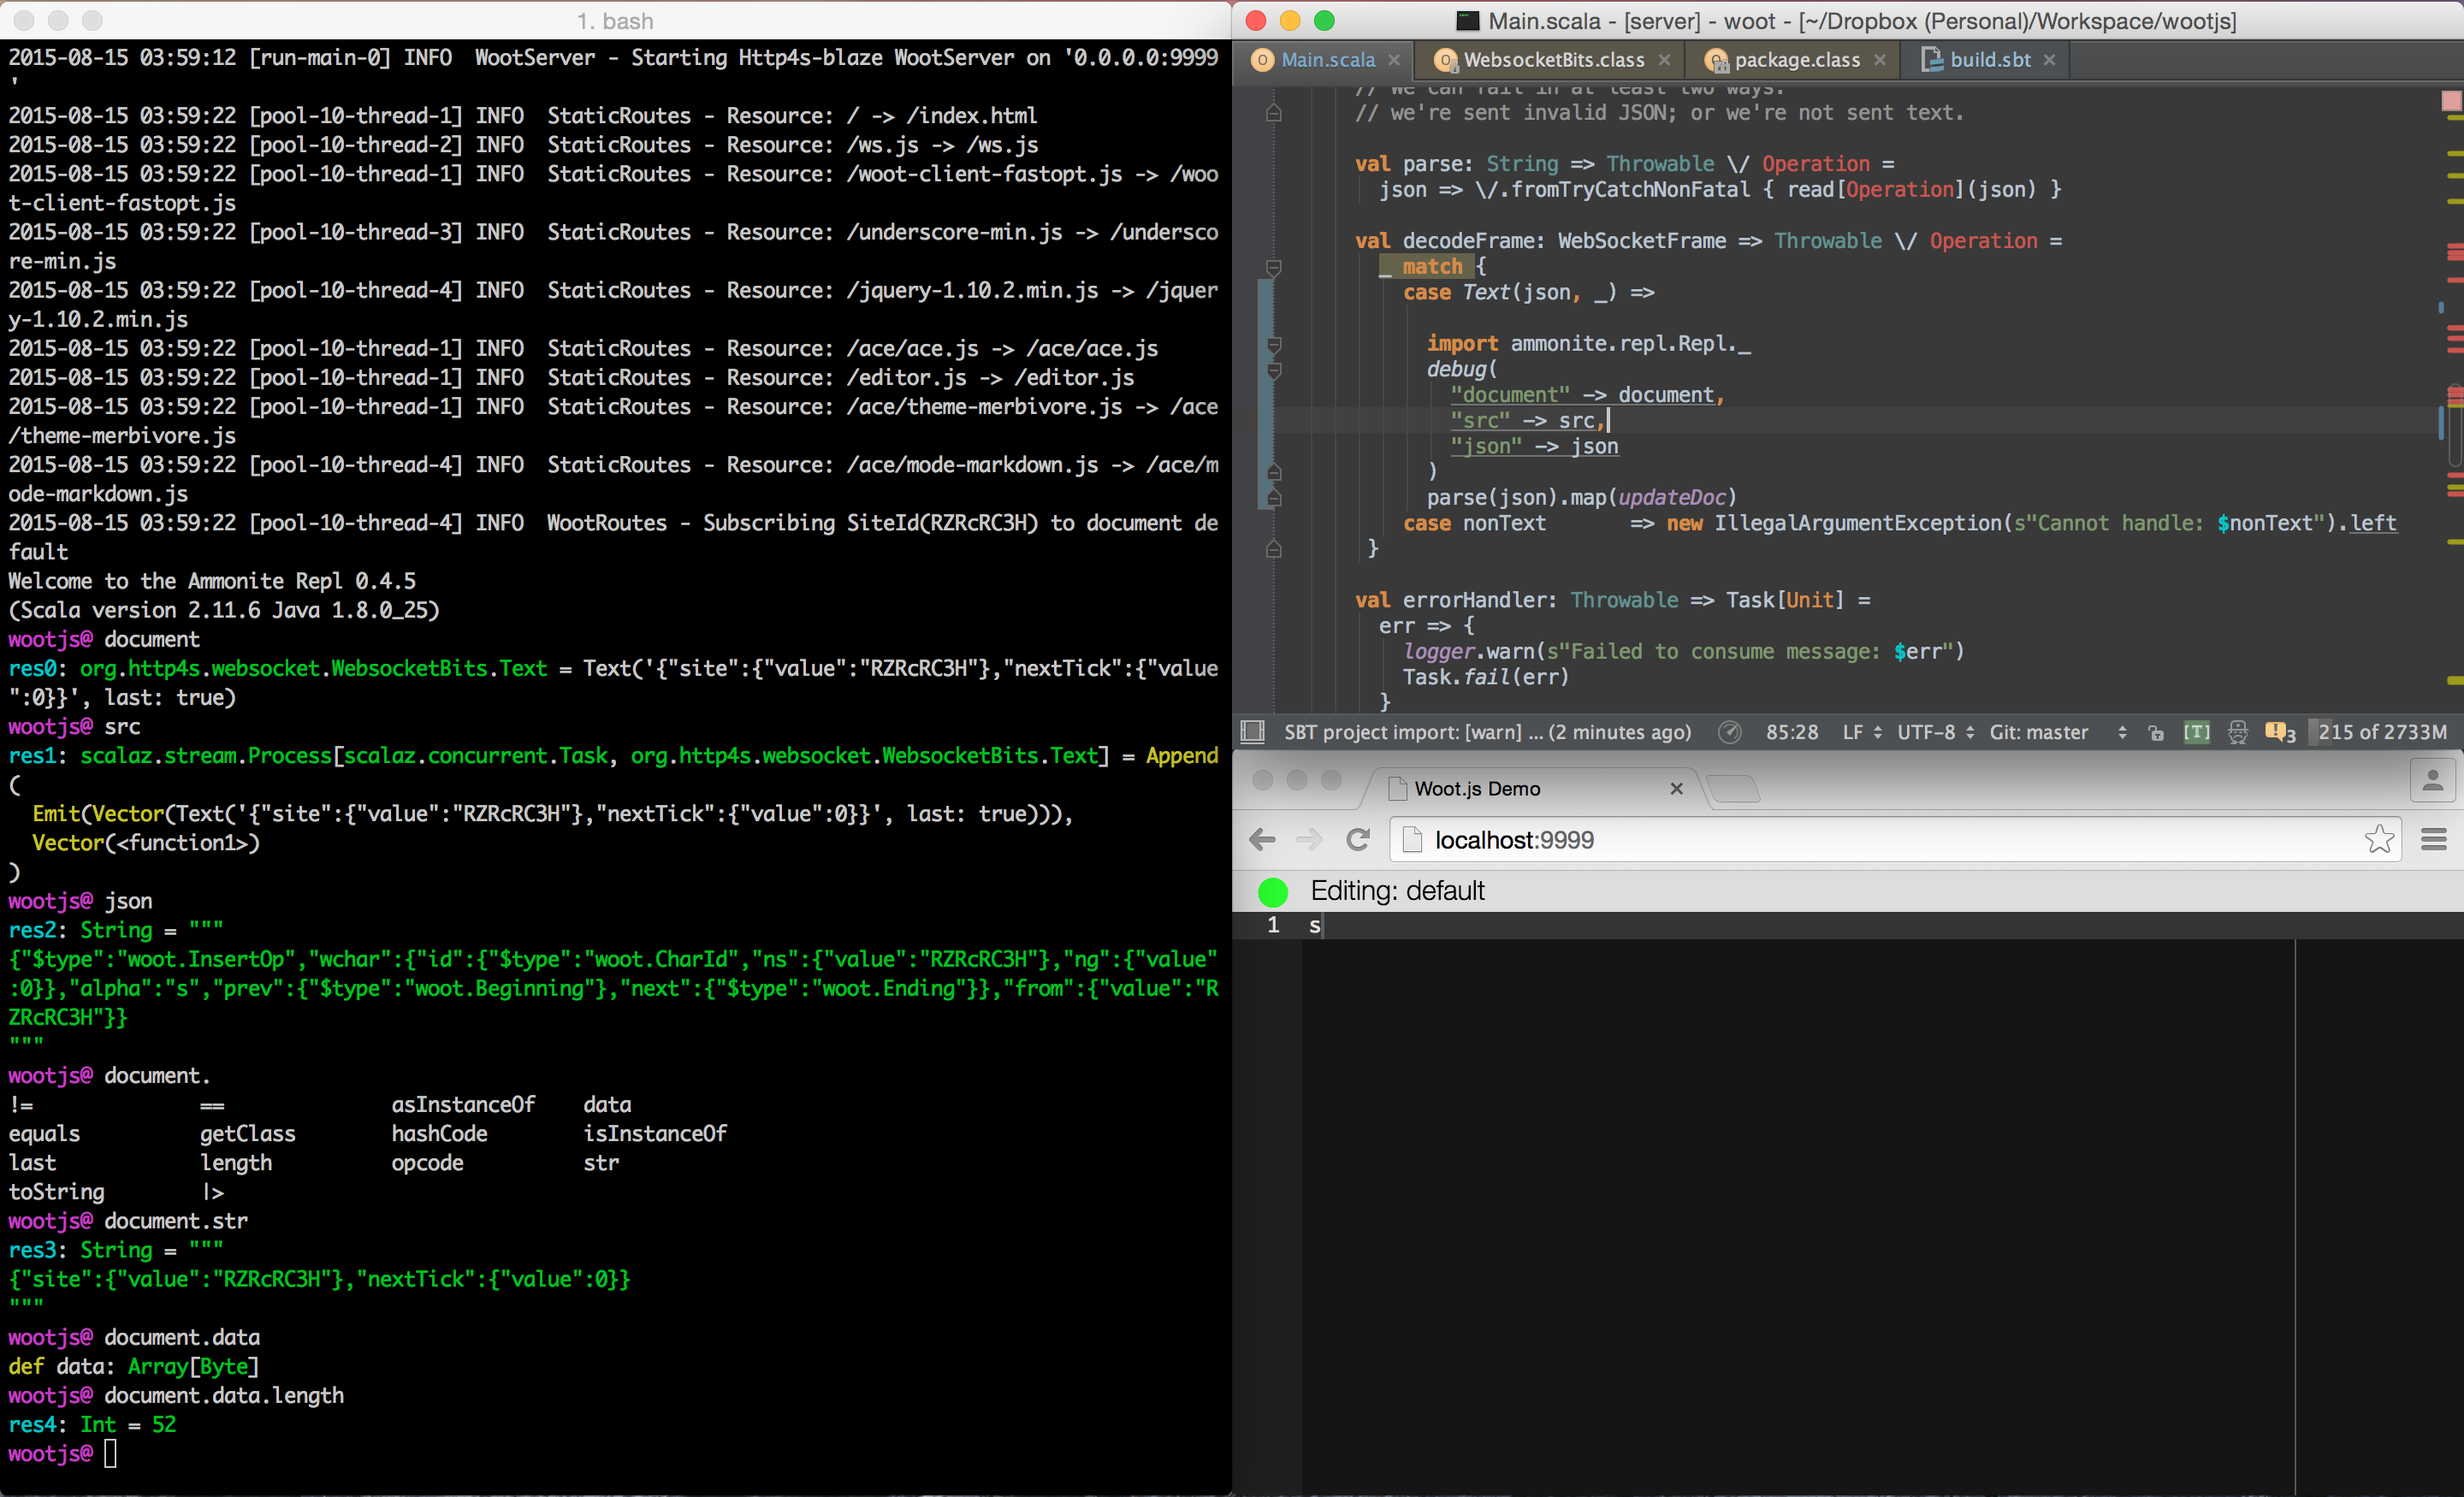 In this case, we added the
 debug statement within the websocket frame handler, so we can inspect the values that are taking part in the client-server data exchange. You can also put the run statement inside a conditional, to make it break only when certain interesting situations (e.g. bugs) occur. As you can see, you can bind the values you're interested in to names inside the debug REPL, and once in the REPL are free to explore them interactively.
The debug() call returns : Any; by default, this is (): Unit, but you can also return custom values by passing in an argument to exit(...) when you exit the REPL. This value will then be returned from debug(), and can be used in the rest of your Scala application.
Remote REPL
Ammonite can also be used to remotely connect to your running application and interact with it in real-time, similar to Erlang's erl -remsh command.
This is useful if e.g. you have multiple Scala/Java processes running but aren't sure when/if you'd want to inspect them for debugging, and if so which ones. With Ammonite, you can leave a ssh server running in each process. You can then and connect-to/disconnect-from each one at your leisure, working with the in-process Scala/Java objects and methods and classes interactively, without having to change code and restart the process to add breakpoints or instrumentation.
To do this, add ammonite-sshd to your classpath, for example with SBT:
libraryDependencies += "com.lihaoyi" % "ammonite-sshd" % "3.0.2" cross CrossVersion.full Now add repl server to your application:
import ammonite.sshd._ val replServer = new SshdRepl( SshServerConfig( address = "localhost", // or "0.0.0.0" for public-facing shells port = 22222, // Any available port passwordAuthenticator = Some(pwdAuth) // or publicKeyAuthenticator ) ) replServer.start() And start your application. You will be able to connect to it using ssh like this: ssh repl@localhost -p22222 and interact with your running app. Invoke stop() method whenever you want to shutdown ammonite sshd server. Here for example sshd repl server is embedded in the Akka HTTP microservice example:
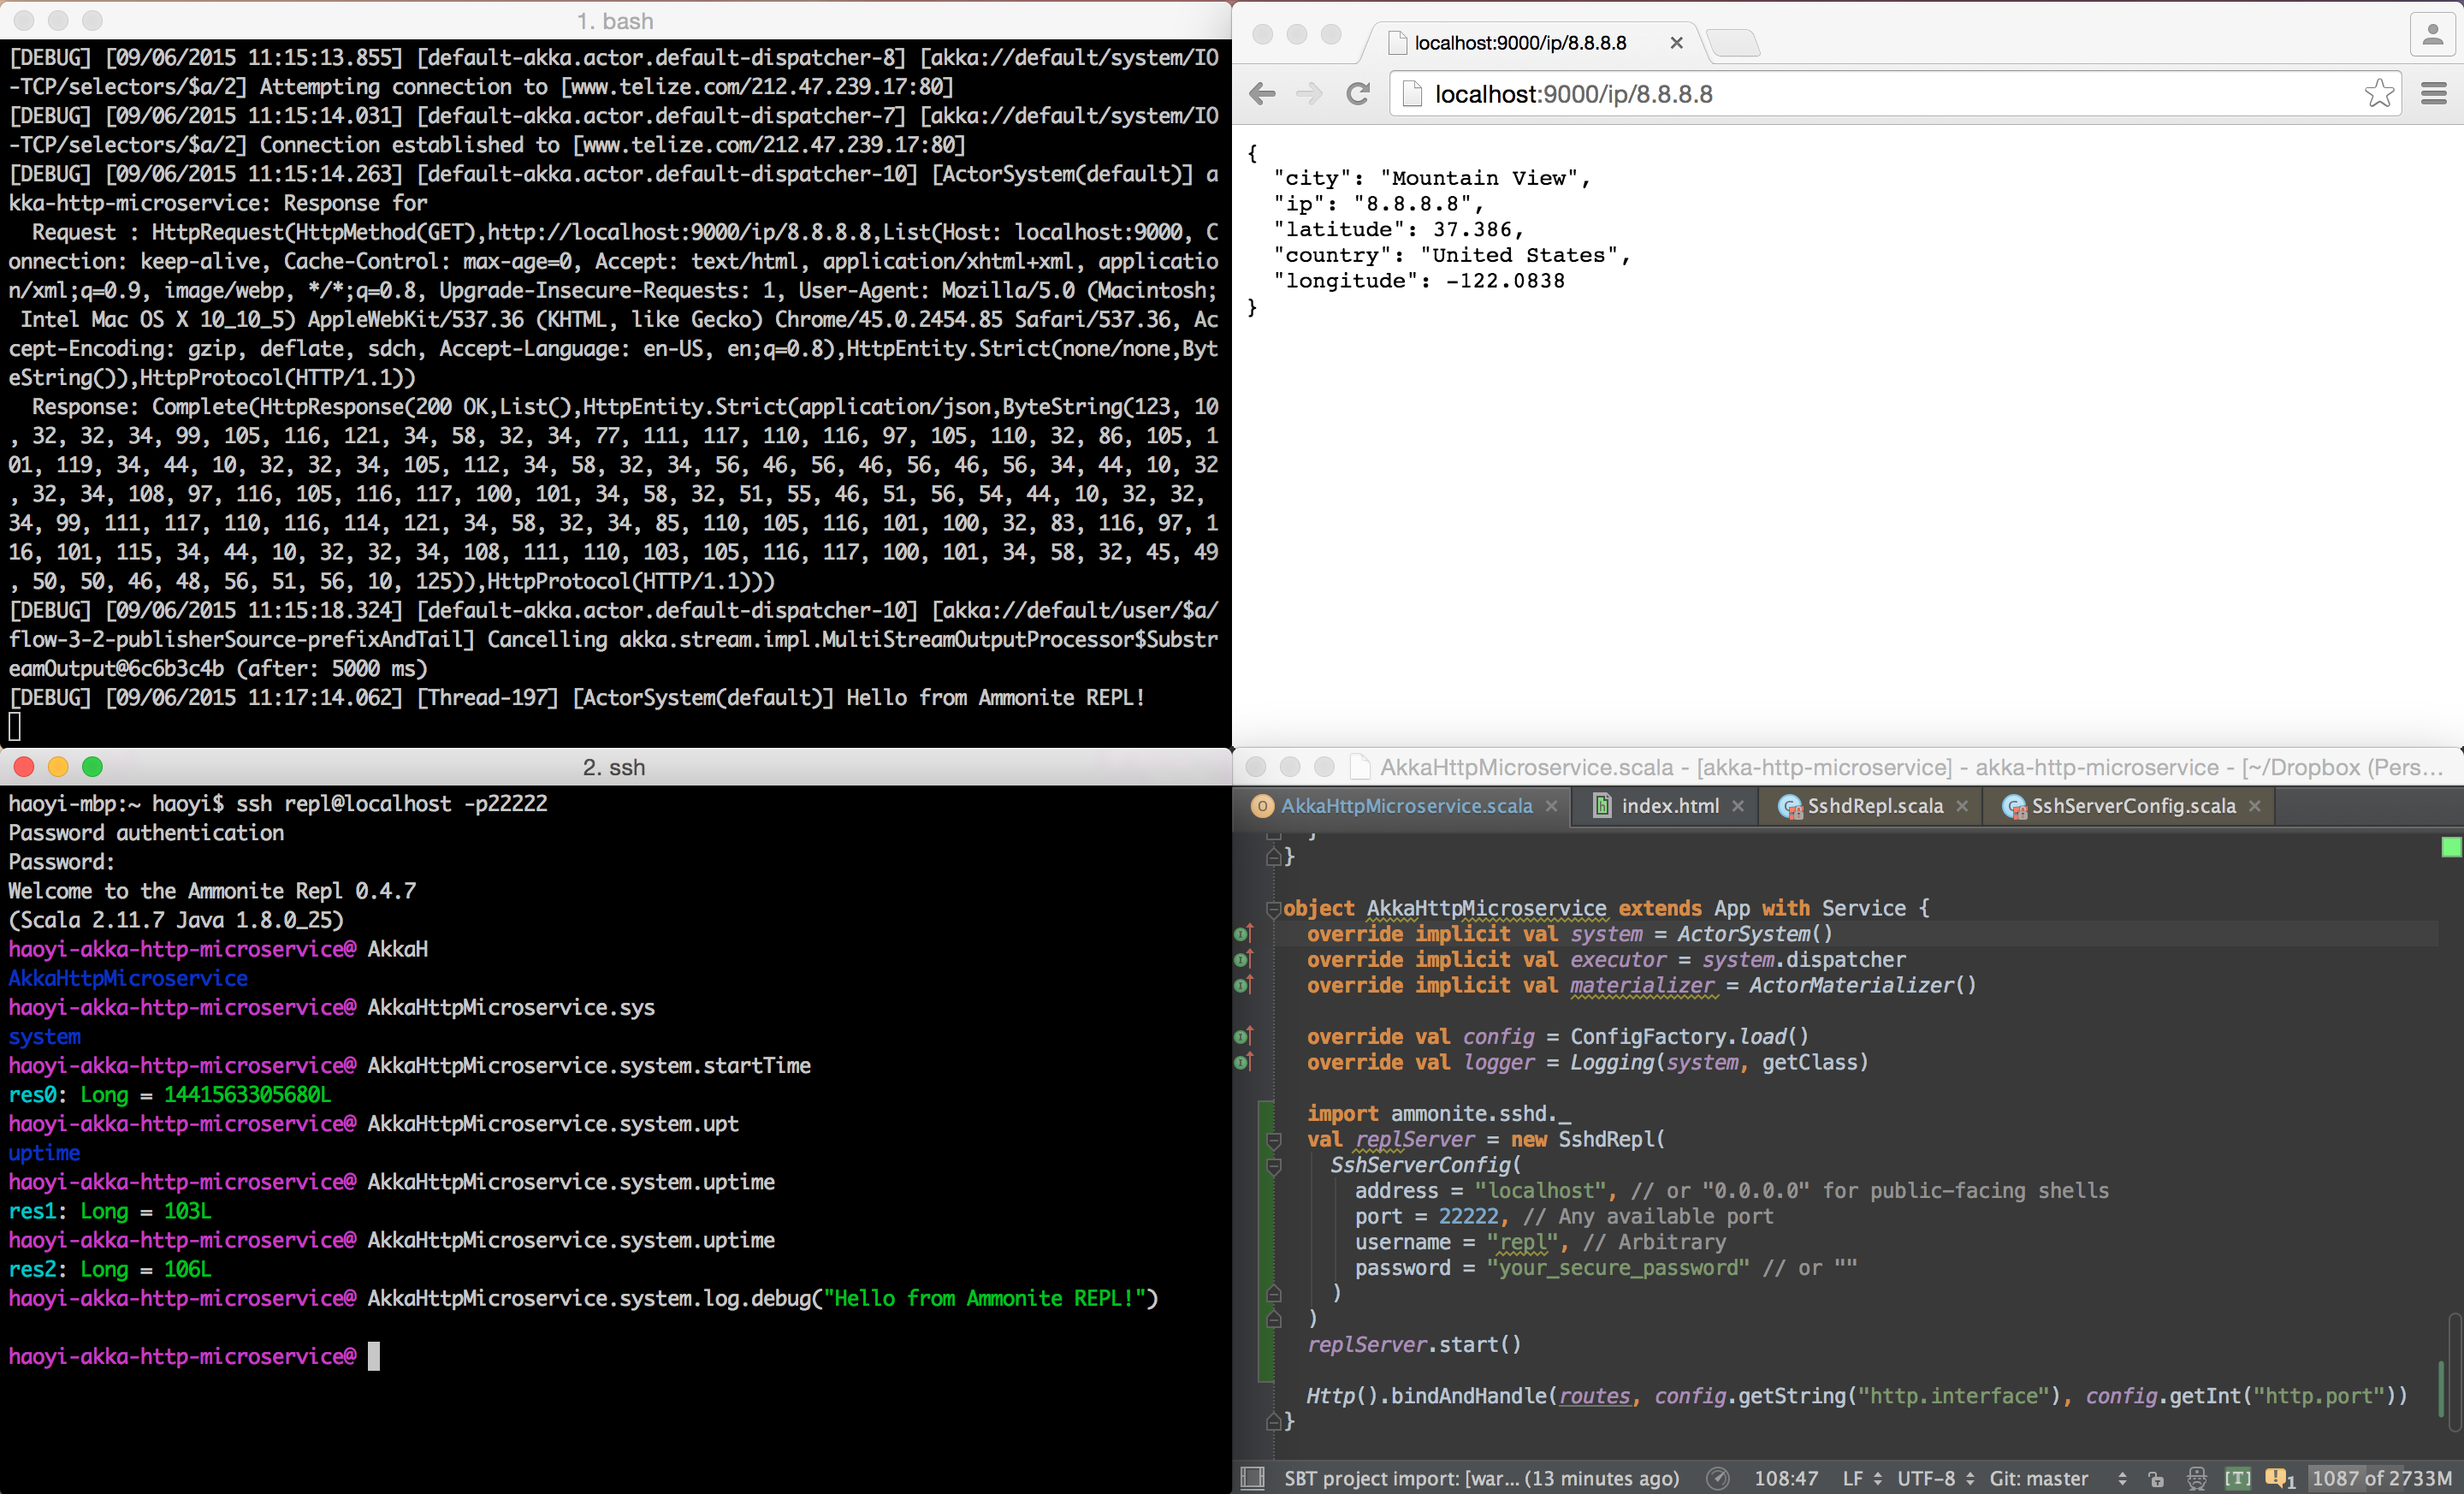
Here we can interact with code live, inspecting values or calling methods on the running system. We can try different things, see which works and which not, and then put our final bits in application code. In this example app is located on local machine, but you are free to connect to any remote node running your code.
Security notes: It is probably unsafe to run this server publicly (on host "0.0.0.0") in a production, public-facing application. If you insist on doing so, you probably want key-based authentication, available by supplying publicKeyAuthenticator in the SshServerConfig.
Despite this, it is perfectly possible to run these on production infrastructure: simply leave the host set to "localhost", and rely on the machine's own SSH access to keep out unwanted users: you would first ssh onto the machine itself, and then ssh into the Ammonite REPL running on localhost.
Typically most organizations already have bastions, firewalls, and other necessary infrastructure to allow trusted parties SSH access to the relevant machines. Running on localhost lets you leverage that and gain all the same security properties without having to reimplement them in Scala.
Scala scripts are lightweight files containing Scala code that can be directly run from the command line. Unlike normal Scala projects, Scala scripts let you save and run code without setting up a "build-file" or "project". Scala Scripts are useful for writing small pieces of code, and are much quicker to write and deploy than a full-fledged SBT project.
Creating an Ammonite Script is just a matter of creating a MyScript.sc with some Scala code in it, and running it from your terminal. Deploying the script is a matter of copying the script file to wherever you want to run it, and running it. No project/ folder, no worrying about .jar files or uber-jars. No worrying about compiling your code: scripts are automatically compiled the first time they are run, and subsequently start quickly with minimal overhead. Writing and running Scala code doesn't get much easier than that!
As an example, Ammonite's own Continuous Integration Scripts are written as .sc Scala Scripts, as are Haoyi's blog and resume. These are all examples of using Scala Scripts to do some simple (or not so simple!) tasks in just a few files, without the hassle of setting up a heavyweight SBT project.
To begin with, download the Ammonite 3.0.2 script-runner for Scala 2.13 (also available for Older Scala Versions):
$ sudo sh -c '(echo "#!/usr/bin/env sh" && curl -L https://github.com/com-lihaoyi/Ammonite/releases/download/3.0.2/2.13-3.0.2) > /usr/local/bin/amm && chmod +x /usr/local/bin/amm' && amm Or to try out the latest features in our Unstable Release 3.0.2:
$ sudo sh -c '(echo "#!/usr/bin/env sh" && curl -L https://github.com/com-lihaoyi/Ammonite/releases/download/3.0.2/2.13-3.0.2) > /usr/local/bin/amm && chmod +x /usr/local/bin/amm' && amm And read on to learn about how Scala scripts work.
Script Files
Ammonite defines a format that allows you to load external scripts into the REPL; this can be used to save common functionality so it can be used at a later date. In the simplest case, a script file is simply a sequence of Scala statements, e.g.
// MyScript.sc // print banner println("Hello World!!") // common imports import sys.process._ import collection.mutable // common initialization code val x = 123 println("x is " + 123) ... You can write any Scala code you want in an Ammonite script, including top-level statements and definitions (e.g. the println and val x = 123 above) that are not valid in "normal" Scala projects. You do not need to wrap these sorts of top-level statements or expressions in boilerplate object Foo{...} wrappers: this is all done automatically for you by Ammonite.
After that, it's a matter of running the script From the REPL or From Bash, e.g.
bash$ amm MyScript.scHello World!! x is 123 ... Script Imports
No code stands alone; scripts depend on other scripts. Often they depend on third party libraries, as there's so much code out there already written it doesn't make sense to reinvent everything yourself.
Ammonite Scripts allow you to import Other Scripts, just like any Bash or Python scripts do. Furthermore, they let you cleanly depend on third party libraries: since Ammonite runs on the JVM, this means Ivy Dependencies. Ammonite will ensure that the relevant dependencies are always downloaded and used, and you never need to worry about remembering to "install" things before running your scripts!
Other Scripts
Like other scripting languages, Ammonite Scripts allow you to break your script into multiple files, and import them from each other in order to use what is in each file. Unlike "Normal" Scala projects, there is no need to set up a src/main/scala folder, and create a build file, and all these other things: simply split your script into two files, and import one from the other using import $file:
// Basic.sc val basicValue = 31337// FileImport.sc import $file.Basic val fileImportVal = Basic.basicValue + 1 Here, we are defining a simple val in Basic.sc, and then importing it from FileImport.sc. And of course, we can use what we defined in FileImport.sc and import it in another file
// IndirectFileImport.sc import $file.FileImport val indirectFileImportVal = FileImport.fileImportVal + 1 And so on, importing files as many or as deep as you want. You can use ^ segments at the start of your import $file to import things from outside the current script's enclosing folder, e.g. import $file.^.^.foo will import the script file ../../foo.sc and make it available for you to use.
$file imports inside Scala Scripts behave the same as $file imports within the Ammonite-REPL, and have the same characteristics:
- Imported Scripts are Re-used
- Cannot directly import from inside a Script
- Renamed-scripts and multiple-scripts
Ivy Dependencies
You can easily make use of external Ivy/Maven artifacts right in your scripts, without needing to set up a separate build file. Simply use a import $ivy, just as you would in the Ammonite-REPL, and it will be available in the script for you to use, e.g. here we make use of the Scalatags library:
import $ivy.`com.lihaoyi::scalatags:0.7.0 compat`, scalatags.Text.all._ val rendered = div("Moo").render If you need more detailed control over what you are importing, e.g. with attributes, classifiers or exclusions, you can fall back to using the interp.load.ivy(deps: coursierapi.Dependency*) function.
@ import os._ @ interp.load.module($printedScriptPath/"loadIvyAdvanced.sc") @ serializer Note that to use this function, your script needs to be a multi-stage script as listed below, and the interp.load.ivy call needs to be in an earlier block
Multi-stage Scripts
By default, everything in a script is compiled and executed as a single block. While you can use Magic Imports to load other scripts or Ivy/Maven artifacts before your script runs, those can only load "hardcoded" scripts or artifacts, and cannot e.g. load different scripts depending on some runtime variables.
If you want to load different scripts or Ivy/Maven artifacts depending on runtime values, you can use the runtime-equivalent of magic imports:
-
import $cpbecomesinterp.load.cp -
import $filebecomesinterp.load.module -
import $ivybecomesinterp.load.ivy
These are plain-old-Scala-functions that let you pass in a Path to a script to load, or load different Ivy/Maven artifacts depending on runtime values. Additionally, there is an overloaded version of interp.load.cp which takes a Seq[Path] of classpath entries. This variant is much more efficient for adding multiple classpath entries at once.
Since these functions get run *after* the current compilation block is compiled, you need to split your script into two compilation blocks, and can only use the results of the loaded code in subsequent blocks:
// print banner println("Welcome to the XYZ custom REPL!!") val scalazVersion = "7.2.27" interp.load.ivy("org.scalaz" %% "scalaz-core" % scalazVersion) // This @ is necessary for Ammonite to process the `interp.load.ivy` // before continuing @ // common imports import scalaz._ import Scalaz._ // use Scalaz! ... In general, this should not be necessary very often: usually you should be able to load what you want using Magic Imports. Nevertheless, sometimes you may find yourself needing to get "under the hood" and use these loading functions directly. When that happens, using Multi-stage Scripts is the way to go.
Script Arguments
Often when calling a script from the external command-line (e.g. Bash), you need to pass arguments to configure its behavior. With Ammonite, this is done by defining a @main method, e.g.
// Args.sc val x = 1 @main def main(i: Int, s: String, path: os.Path = os.pwd) = { s"Hello! ${s * i} ${path.last}." }When the script is run from the command line:
$ amm Args.sc 3 Moo "Hello! MooMooMoo Ammonite." The top-level definitions execute first (e.g. setting x), and then the @main method is called with the arguments you passed in. Note that the return-value of the script is pretty-printed by default, which quotes strings and may nicely format/indent lists or other data-structures. If you want to avoid this default pretty-printing behavior, annotate your @main method as returning : Unit and add your own printlns:
// Args.sc val x = 1 @main def main(i: Int, s: String, path: os.Path = os.pwd): Unit = { println(s"Hello! ${s * i} ${path.last}.") }$ amm Args2.sc 3 Moo Hello! MooMooMoo Ammonite You can also pass in named arguments using -- to demarcate them:
$ amm Args.sc -i 3 -s Moo "Hello! MooMooMoo Ammonite." Default arguments behave as you would expect (i.e. they allow you to omit it when calling). Arguments are parsed using the mainargs.Parser* parsers, which provides parsers for primitives like Int, Double, String, as well as basic data-structures like Seqs (taken as a comma-separated list) and common types like Paths.
If you pass in the wrong number of arguments, or if an argument fails to deserialize, the script will fail with an error message.
The main method does not get automatically called when you load.module or load.exec a script from within the Ammonite REPL. It gets imported into scope like any other method or value defined in the script, and you can just call it normally.
vararg* arguments work as you would expect as well, allowing one or more arguments to be passed from the command-line and aggregated into a Seq for your function to use:
@main def entrypoint(args: String*) = { ... } in which case Ammonite will take all arguments and forward them to your main method unchecked and unvalidated, from which point you can deal with the raw Seq[String] however you wish. Note that vararg* arguments cannot be passed by-name, e.g. via --args foo
Ammonite Arguments in Scripts
Ammonite passing any arguments that come before the script file to Ammonite itself, while arguments that come after the script file are given to the script:
$ amm --predef-code 'println("welcome!")' Args.sc 3 Moo welcome! "Hello! MooMooMoo Ammonite." Note that on Windows you have to escape the quotes differently:
C:\> amm --predef-code "println(\"welcome!\")" Args.sc 3 Moo Here, "Ammonite Arguments" go on the left of the Args.sc, while Script Arguments go on the right of the Args.sc. The script arguments on the right can also be empty if you don't want to pass any arguments to the script.
If you want to define a script with a Shebang line that runs Ammonite with particular arguments, you can use
#!/bin/bash exec amm --predef 'println("welcome!")' "$0" "$@" !# And which will pass in the --predef flag to Ammonite while running the script via ./Args.sc. If you want to then pass in different sets of arguments, you can run the script using amm e.g. amm --predef 'println("Hello!")' Args.sc 3 Moo as before. (Note that while a single-line #!/usr/bin/env amm --predef '...' shebang may work on some systems such as OS-X, it is not portable and would not work on Linux)
Multiple Main Methods
If you have only a single @main method, any arguments that you pass to the script get used as arguments to that @main. But if you have multiple @main methods, the first argument to the script is used to select which @main method to call. e.g. given:
// MultiMain.sc val x = 1 @main def mainA() = { println("Hello! " + x) } @main def functionB(i: Int, s: String, path: os.Path = os.pwd) = { println(s"Hello! ${s * i} ${path.relativeTo(os.pwd)}.") }You can call it via
amm MultiMain.sc mainA Or
amm MultiMain.sc functionB 2 "Hello" Script Usage Docs
You can document your scripts with the @arg annotation. By default, a script such as
// MultiMain.sc val x = 1 @main def mainA() = { println("Hello! " + x) } @main def functionB(i: Int, s: String, path: os.Path = os.pwd) = { println(s"Hello! ${s * i} ${path.relativeTo(os.pwd)}.") }Will result in a usage message:
| -i <int> | --path <path>You can add docs via
// MultiMainDoc.sc val x = 1 @main def mainA() = { println("Hello! " + x) } @arg(doc = "This explains what the function does") @main def functionB(@arg(doc = "how many times to repeat the string to make " + "it very very long, more than it originally was") i: Int , @arg(doc = "the string to repeat") s: String , path: os.Path = os.pwd) = { println(s"Hello! ${s * i} ${path.relativeTo(os.pwd)}.") }Which will be shown as part of the usage message
| -i <int> | --path <path>Bundled Libraries
While Ammonite allows you to load any Java or Scala library for use via the import $ivy syntax, it also comes bundled with some basic libraries, e.g. Requests-scala for making HTTP calls, or the uPickle library with its JSON Api for dealing with the common JSON format.
For example, here's a tiny script that offers two main methods, one to shorten a github link using Requests-Scala and the git.io API, and one that pulls out a list of release-names from a given github project using Requests-Scala, uPickle's JSON package, and the Github API:
#!/usr/bin/env amm // HttpApi.sc import $ivy.{ `com.lihaoyi::requests:0.2.0 compat`, `com.lihaoyi::ujson:0.7.5 compat` } lazy val jsonPlaceHolderBase = Option(System.getenv("JSONPLACEHOLDER")).getOrElse { "http://jsonplaceholder.typicode.com" } @main def addPost(title: String, body: String) = { ujson.read( requests.post( s"$jsonPlaceHolderBase/posts", data = Seq( "title" -> title, "body" -> body, "userId" -> "1" ) ).text() ).obj.get("id").map(_.num.toInt).getOrElse(0) } @main def comments(postId: Int) = { val json = ujson.read( requests .get(s"$jsonPlaceHolderBase/comments?postId=$postId") .text() ) val names = for{ item <- json.arr name <- item.obj.get("name") } yield name.str names.mkString(",") } You can run amm on the script to see what it can do
> amm HttpApi.sc Need to specify a sub command: addPost, comments And you can run the two functions (after using chmod +x to make the file executable) via
> ./HttpApi.sc addPost MyTitle MyContentOr
> ./HttpApi.sc comments 100 "et occaecati asperiores quas voluptas ipsam nostrum,doloribus dolores ut dolores occaecati,dolores minus aut libero,excepturi sunt cum a et rerum quo voluptatibus quia,ex eaque eum natus" Script Builtins
Apart from bundling some third-party libraries for convenience, Ammonite also provides some builtins you can use from scripts to inspect and manipulate the interpreter itself. Note that this is a much smaller set of functionality than the set of Builtins available to the REPL: it won't have things like the repl.prompt, repl.history, and other things that only really make sense in the interactive REPL.
trait InterpAPI { /** * When running a script in `--watch` mode, re-run the main script if this * file changes. By default, this happens for all script files, but you can * call this to watch arbitrary files your script may depend on */ def watch(p: os.Path): Unit /** * A generalization of [[watch]], allows watching arbitrary values and not * just the contents of file paths. */ def watchValue[T](v: => T): T /** * The colors that will be used to render the Ammonite REPL in the terminal, * or for rendering miscellaneous info messages when running scripts. */ val colors: Ref[Colors] /** * Tools related to loading external scripts and code into the REPL */ def load: InterpLoad /** * resolvers to use when loading jars */ def repositories: Ref[List[Repository]] /** * Functions that will be chained and called on the coursier * Fetch object right before they are run */ val resolutionHooks: mutable.Buffer[Fetch => Fetch] /** * Exit the Ammonite REPL. You can also use Ctrl-D to exit */ def exit = throw AmmoniteExit(()) /** * Exit the Ammonite REPL. You can also use Ctrl-D to exit */ def exit(value: Any) = throw AmmoniteExit(value) /** * Functions that will be chained and called on the * exitValue before the repl exits */ val beforeExitHooks: mutable.Buffer[Any => Any] implicit def scalaVersion: ScalaVersion def _compilerManager: ammonite.compiler.iface.CompilerLifecycleManager } trait LoadJar { /** * Load a `.jar` file or directory into your JVM classpath */ def cp(jar: os.Path): Unit /** * Load a `.jar` from a URL into your JVM classpath */ def cp(jar: java.net.URL): Unit /** * Load one or more `.jar` files or directories into your JVM classpath */ def cp(jars: Seq[os.Path]): Unit /** * Load a library from its maven/ivy coordinates */ def ivy(coordinates: Dependency*): Unit } trait InterpLoad extends LoadJar { def module(path: os.Path): Unit def plugin: LoadJar }Script Predef
If you want code to be loaded before you run any script, you can place it in ~/.ammonite/predefScript.sc. This is distinct from the REPL pre-defined code which lives in ~/.ammonite/predef.sc.
Running Scripts
There are two way main ways to run Ammonite scripts: From the REPL and From Bash.
From Bash
Apart from loading scripts within the Ammonite-REPL, You can also run scripts using the Ammonite executable from an external shell (e.g. bash):
$ sudo sh -c '(echo "#!/usr/bin/env sh" && curl -L https://github.com/com-lihaoyi/Ammonite/releases/download/3.0.2/2.13-3.0.2) > /usr/local/bin/amm && chmod +x /usr/local/bin/amm' && amm $ amm path/to/script.sc All types, values and imports defined in scripts are available to commands entered in REPL after loading the script.
You can also make an Ammonite script self-executable by using a shebang #!. This is an example script named hello. There is no need to add the .sc extension. The amm command needs to be in the PATH:
#!/usr/bin/env amm println("hello world")make it executable and run it from an external shell (e.g. bash):
$ chmod +x /path/to/script $ /path/to/script Ammonite also supports the JAVA_OPTS environment variable for passing arguments to the JVM that it runs inside, e.g. you can pass in a custom memory limit via
bash$ JAVA_OPTS="-Xmx1024m" amm path/to/script.sc To let it use only up to 1024 megabytes of memory
Watch and Reload
Ammonite provides the -w/--watch flag, which tells it to not exit when a script completes, but instead watch the files that were run, and re-run them when any of them change. You can use this flag via
$ amm -w foo.sc Within your scripts, you can also flag other files you want Ammonite to watch, via the interp.watch(p: Path) function. This is useful if you are iterating on a script together with some external data files the script depends on, and you want to
Script Debug REPL
When a script is not working as intended, it is useful to be able to poke around in a REPL after the script has run, in order to see what values are stored in which variables or what methods are available via autocomplete. To do so, you can run the script using the --predef/-p flag.
$ amm --predef foo.sc This will run the script as normal, but on completion open up a REPL which has all the values defined in that script imported and ready to use. You can then poke around within the REPL as you wish.
Using --predef/-p to run a script and then open an interactive REPL can be combined with the --watch/-w flag:
$ amm --watch --predef foo.sc This will open up a REPL after the script runs, and when you exit the REPL it will watch the script file and the files that the script depends on, re-running the script and REPL if any of them change.
--predef/-p can be used to include a script file as a predef before running any script or REPL, which is useful for a range of things apart from serving as a debug REPL on any script.
From the REPL
You can load any script into the Ammonite REPL using the import $file syntax, for example here we import the above MyScript.sc file to access its x value:
@ x // doesn't work yet Compilation Failed cmd0.sc:1: not found: value x val res0 = x // doesn't work yet ^ @ import $file.MyScript Welcome to the XYZ custom REPL!! @ MyScript.x // You can refer to definitions from that module res1: Int = 123 @ import MyScript._ @ x // works res2: Int = 123 You can also import the module, and any associated definitions you want, in the same import:
@ x // doesn't work yet Compilation Failed cmd0.sc:1: not found: value x val res0 = x // doesn't work yet ^ @ import $file.MyScript, MyScript._ Welcome to the XYZ custom REPL!! @ x res1: Int = 123 Note that by default, scripts imported via $file are encapsulated, so any imports inside that MyScript performs are not available outside of MyScript.sc:
@ import $file.MyScript, MyScript._ Welcome to the XYZ custom REPL!! import $file.$ @ mutable.Buffer(x) cmd1.sc:1: not found: value mutable val res1 = mutable.Buffer(x) ^ Compilation Failed As you can see, even though collection.mutable was imported inside MyScript.sc, you cannot use them outside after importing it.
If you want to make everything (both imports and definitions) available by default after importing, you can use an $exec import instead of $file:
@ import $exec.MyScript Welcome to the XYZ custom REPL!! import $exec.$ @ mutable.Buffer(x) res1: mutable.Buffer[Int] = ArrayBuffer(123) As you can see, now mutable is available, and so is x even though we did not directly import it.
While $file imports are useful for defining re-usable modules with common functions and definitions, $exec imports are useful as aliases for common setup to get your REPL environment just the way you want it. Of course, any files you import via import $file or import $exec can themselves import other Scala scripts in the same way, and the same rules apply.
Execution Model
Ammonite's Scala Scripts run as normal Scala code, though with some simple source-to-source transformations applied first to turn the script syntax (which allows top-level expressions, defs, vals, etc.) into valid Scala syntax (which doesn't). What happens is roughly:
- A script file is read off disk
- If the script file has been compiled/executed before, the previously compiled bytecode and metadata is loaded from the
~/.ammonite/cache. If not, the script is parsed but not yet compiled. - Multi-stage Scripts are split into multiple individual scripts, to be handled separately/sequentially.
- Any Magic Imports are resolved: any Ivy/Maven dependencies are downloaded, or any imported scripts are themselves run. Any imported scripts are themselves handled in the same way, as are any scripts they import, etc.
- If the script has already been previously compiled and cached, the cached bytecode that was read off of disk earlier is executed.
- Otherwise, the source code for this script is then wrapped in a
package/objectwrapper, corresponding to the path to the script from the current script's enclosing folder. For example, a script at pathfoo/bar/baz/Qux.scwill be wrapped in:package foo.bar.baz object Qux{ // script code } - The script is then compiled and executed.
In general, due to Scala's slow compiler, Scala Scripts rely heavily on caching to achieve reasonable performance. While the first run of a modified script has a few-seconds overhead due to the Scala compiler, subsequent runs of the same script should be fast-ish, with only a few 100ms overhead for spinning up a JVM.
Although this is much slower than other scripting languages like Bash (which starts up in ~4ms) or Python (~30ms), in practice it is acceptable for many use cases. You probably do not want to find . | xargs amm Foo.sc on large numbers of files, where the 100ms overhead will add up, but for individual scripts it should be fine.
Furthermore, Ammonite makes it really easy to include that sort of recursive/iterative logic inside a single script: you can use ls! or ls.rec! from Ammonite-Ops to traverse the filesystem and work on multiple files all within the same process, which avoids duplicating the startup overhead on all the files you are manipulating.
SBT Integration
If you have an existing SBT project and you'd like to access those classes from an ammonite script, you can achieve this by running your script through SBT itself. This requires adding ammonite to your SBT project and creating a "bridge" class to pass arguments from SBT into an ammonite Main class.
Add the ammonite 3.0.2 dependency to build.sbt:
libraryDependencies += "com.lihaoyi" % "ammonite" % "3.0.2" % "test" cross CrossVersion.full In your test directory, create a class like:
package ammonite.integration object AmmoniteBridge { def main(args: Array[String]): Unit = { ammonite.AmmoniteMain.main(args) } } Run your script using sbt "test:run /path/to/script.sc arg1 arg2 arg3".
If you have already started an SBT repl, then you can run the above without the quotes: test:run /path/to/script.sc arg1 arg2 arg3
Running a script from your SBT project can be achieved with ammonite.AmmoniteMain.main(Array("--predef-code", """println("welcome!")""", "file.sc"))
The Ammonite Scala REPL and Scripts are meant to be extended: you can load in arbitrary Java/Scala modules from the internet via import $ivy. Using this third-party code, you extend the REPL to do anything you wish to do. Simple install Java, download Ammonite onto any Linux/OSX machine, and try out one of these fun snippets! They work directly in the Ammonite-REPL, or you can save them to Scala Scripts if you want something more permanent.
HTTP Requests
Ammonite does not come with a built-in way to make HTTP requests, but there are Java /Scala modules that do this quite well! Here's an example:
Welcome to the Ammonite Repl @ val resp = requests.get("https://api.github.com/repos/scala/scala") @ val parsed = upickle.json.read(resp.text()).asInstanceOf[upickle.Js.Obj] parsed: upickle.Js.Obj = Obj( ArrayBuffer( ("id", Num(2888818.0)), ("name", Str("scala")), ("full_name", Str("scala/scala")), ( "owner", Obj( ArrayBuffer( ("login", Str("scala")), ... @ for((k, v) <- parsed.value) os.write(os.pwd/'target/'temp/k, upickle.json.write(v)) @ os.list(os.pwd/'target/'temp) res6: LsSeq = LsSeq( /Users/haoyi/Dropbox (Personal)/Workspace/Ammonite/target/temp/archive_url, /Users/haoyi/Dropbox (Personal)/Workspace/Ammonite/target/temp/assignees_url, /Users/haoyi/Dropbox (Personal)/Workspace/Ammonite/target/temp/blobs_url, /Users/haoyi/Dropbox (Personal)/Workspace/Ammonite/target/temp/branches_url,, ... In this example, we use the Requests-Scala library to download a URL, and we use uPickle and OS-Lib to parse the JSON and write it into files. uPickle and Ammonite-Ops are bundled with the Ammonite REPL and are used internally.
This is a small example, but it illustrates the potential: if you find yourself needing to scrape some website or bulk-download large quantities of data from some website's HTTP/JSON API, you can start doing so within a matter of seconds using Ammonite. The results are given to you in nicely structured data, and you can deal with them using any Java or Scala libraries or tools you are used to rather than being forced to munge around in Bash. Sometimes, you may find that you need to get data from somewhere without a nice JSON API, which means you'd need to fall back to Scraping HTML...
Scraping HTML
Not every website has an API, and not every website is meant to be accessed programmatically. That doesn't mean you can't do it! Using libraries like JSoup, you can quickly and easily get the computer to extract useful information from HTML that was meant to humans. Using the Ammonite REPL, you can do it interactively and without needing to set up annoying project scaffolding.
@ import $ivy.`org.jsoup:jsoup:1.7.2` @ import org.jsoup._ // import Jsoup @ import collection.JavaConversions._ // make Java collections easier to use @ val doc = Jsoup.connect("http://en.wikipedia.org/").get() @ doc.select("h1") res54: select.Elements = <h1 id="firstHeading" class="firstHeading" lang="en">Main Page</h1> @ doc.select("h2") // this is huge and messy res55: select.Elements = <h2 id="mp-tfa-h2" style="margin:3px; background:#cef2e0; font-family:inherit; font-size:120%; font-weight:bold; border:1px solid #a3bfb1; text-align:left; color:#000; padding:0.2em 0.4em;"><span class="mw-headline" id="From_today.27s_featured_article">From today's featured article</span></h2> <h2 id="mp-dyk-h2" style="margin:3px; background:#cef2e0; font-family:inherit; font-size:120%; font-weight:bold; border:1px solid #a3bfb1; text-align:left; color:#000; padding:0.2em 0.4em;"><span class="mw-headline" id="Did_you_know...">Did you know...</span></h2> ... @ doc.select("h2").map(_.text) // but you can easily pull out the bits you want res56: collection.mutable.Buffer[String] = ArrayBuffer( "From today's featured article", "Did you know...", "In the news", "On this day...", "From today's featured list", "Today's featured picture", "Other areas of Wikipedia", "Wikipedia's sister projects", "Wikipedia languages", "Navigation menu" )If you wanted to scrape headlines off some news-site or scrape video game reviews off of some gaming site, you don't need to worry about setting up a project and installing libraries and all that stuff. You can simply load libraries like Jsoup right into the Ammonite REPL, copy some example from their website, and start scraping useful information in less than a minute.
GUI Applications
The Ammonite REPL runs on the Java virtual machine, which means you can use it to create Desktop GUI applications like anyone else who uses Java! Here's an example of how to create a hello-world interactive desktop app using Swing
@ { import javax.swing._, java.awt.event._ val frame = new JFrame("Hello World Window") val button = new JButton("Click Me") button.addActionListener(new ActionListener{ def actionPerformed(e: ActionEvent) = button.setText("You clicked the button!") }) button.setPreferredSize(new java.awt.Dimension(200, 100)) frame.getContentPane.add(button) frame.pack() frame.setVisible(true) }This can be run inside the Ammonite REPL without installing anything, and will show the following window with a single button:
When clicked, it changes text:
Although this is just a small demo, you can use Ammonite yourself to experiment with GUI programming without needing to go through the hassle of setting up an environment and project and all that rigmarole. Just run the code right in the console! You can even interact with the GUI live in the console, e.g. running this snippet of code to add another action listener to keep count of how many times you clicked the button
@ { var count = 0 button.addActionListener(new ActionListener{ def actionPerformed(e: ActionEvent) = { count += 1 frame.setTitle("Clicks: " + count) } }) } Which immediately becomes visible in the title of the window:
Even while you're clicking on the button, you can still access count in the console:
@ count res12: Int = 6This is a level of live interactivity which is traditionally hard to come by in the world of desktop GUI applications, but with the Ammonite REPL, it's totally seamless
You can also import JavaFX applications, using ScalaFX. This is easiest if you create a file `jfx.sc` to contain the relevant imports:@ { import $ivy.{ `org.scalafx::scalafx:16.0.0-R24` } lazy val osName = System.getProperty("os.name") match { case n if n.startsWith("Linux") => "linux" case n if n.startsWith("Mac") => "mac" case n if n.startsWith("Windows") => "win" case _ => throw new Exception("Unknown platform!") } val javaFXModules = Seq("base", "controls", "fxml", "graphics", "media", "swing", "web") javaFXModules.map(m => interp.load.ivy(coursierapi.Dependency.of("org.openjfx", s"javafx-$m", "15.0.1").withClassifier(osName)) ) }@ { import $file.jfx import scalafx.application.JFXApp3 import scalafx.application.JFXApp3.PrimaryStage import scalafx.geometry.Insets import scalafx.scene.Scene import scalafx.scene.layout.HBox import scalafx.scene.paint.Color._ import scalafx.scene.paint._ import scalafx.scene.text.Text import scala.language.implicitConversions @main def main() { JFXApp3Demo.main(Array()) } object JFXApp3Demo extends JFXApp3 { override def start(): Unit = { stage = new PrimaryStage { title = "ScalaFX Hello World!" scene = new Scene { fill = Color.rgb(38, 38, 38) content = new HBox { padding = Insets(50, 80, 50, 80) children = Seq( new Text { text = "Hello World!" style = "-fx-font: normal bold 100pt sans-serif" fill = new LinearGradient(endX = 0, stops = Stops(Red, DarkRed)) } ) } } } } } } Office Automation
Apart from writing code, you very often find yourself dealing with documents and spreadsheets of various sorts. This is often rather tedious. Wouldn't it be cool if you could deal with these things programmatically? It turns out that there are open-source Java libraries such as Apache POI that let you do this, and with the Ammonite-REPL you can quickly and easily load these libraries and get to work on your favorite documents. Here's an example extracting some data from my old Resume, in .docx format:
@ import $ivy.`org.apache.poi:poi-ooxml:3.13` @ import org.apache.poi.xwpf.usermodel._ // Bring Ms-Word APIs into scope @ import collection.JavaConversions._ // Make use of Java collections easier @ val path = pwd/'amm/'src/'test/'resources/'testdata/"Resume.docx" @ val docx = new XWPFDocument(new java.io.ByteArrayInputStream(os.read.bytes(path))) @ docx.get<tab> getAllEmbedds getParagraphArray getAllPackagePictures getParagraphPos getAllPictures getParagraphs getBodyElements getParagraphsIterator getBodyElementsIterator getParent getClass getPart getCommentByID getPartById getComments getPartType getDocument getPictureDataByID ... @ docx.getParagraphs.map(_.getText) res28: collection.mutable.Buffer[String] = ArrayBuffer( """ Haoyi Li """, """ Education Massachusetts Institute of Technology Cambridge, MA """, """ Bachelor of Science degree in Computer Science, GPA 4.8/5.0 Sep 2010 - Jun 2013 """, """ Work Dropbox San Francisco, CA """ ... @ docx.getHyperlinks.map(_.getURL) res27: Array[String] = Array( "http://vimeo.com/87845442", "http://www.github.com/lihaoyi/scalatags", "http://www.github.com/lihaoyi/scala.rx", "http://www.github.com/lihaoyi/scala-js-fiddle", "http://www.github.com/lihaoyi/metascala", "https://www.github.com/lihaoyi/macropy", "http://www.github.com/lihaoyi", "http://www.github.com/lihaoyi" )As you can see, loading the Apache POI library is just a single command, reading in my resume file is just one or two more, and then you can immediately start exploring the document's data model to see what inside interests you. You even get tab-completion on the methods of the document, making it really easy for you to interactively explore all the things that a word document has to offer!
This is just a small example, but you can easily do more things in the same vein: Apache POI lets you create/modify/save .docx files in addition to reading from them, meaning you can automatically perform batch operations on large numbers of documents. The library also provides mechanisms to load in Excel spreadsheets and Powerpoint slide decks, meaning you have easy, programmable access to the great bulk of any Microsoft-Office files you find yourself dealing with.
Image Processing
You can perform lots of image operations in Java. You can use BufferedImage if you want to access the low-level details or read/write individual pixels, and using Java2D you can draw shapes, perform transforms, or do anything you could possibly want to do with the images.
There are also simple libraries like Thumbnailator if you're doing basic things like renaming/resizing/rotating and don't need pixel-per-pixel access. This is an example of using Thumbnailator to resize a folder of images and put them somewhere else:
@ import $ivy.`net.coobird:thumbnailator:0.4.8` @ import net.coobird.thumbnailator._ import net.coobird.thumbnailator._ @ val images = ls! pwd/'amm/'src/'test/'resources/'testdata/'images images: LsSeq = LsSeq( /Users/haoyi/Dropbox (Personal)/Workspace/Ammonite/repl/src/test/resources/testdata/images/GettingStarted.png, /Users/haoyi/Dropbox (Personal)/Workspace/Ammonite/repl/src/test/resources/testdata/images/Highlighting.png, /Users/haoyi/Dropbox (Personal)/Workspace/Ammonite/repl/src/test/resources/testdata/images/SystemShell.png ) @ val dest = pwd/'target/'thumbnails dest: Path = /Users/haoyi/Dropbox (Personal)/Workspace/Ammonite/target/thumbnails @ mkdir! dest @ for(i <- images) { Thumbnails.of(i.toString).size(200, 200).toFile(dest/i.last toString) } @ val thumbnails = ls! dest thumbnails: LsSeq = LsSeq( /Users/haoyi/Dropbox (Personal)/Workspace/Ammonite/target/thumbnails/GettingStarted.png, /Users/haoyi/Dropbox (Personal)/Workspace/Ammonite/target/thumbnails/Highlighting.png, /Users/haoyi/Dropbox (Personal)/Workspace/Ammonite/target/thumbnails/SystemShell.png ) @ images.map(_.size) // Original image files are pretty big res44: Seq[Long] = List(180913L, 208328L, 227570L) @ thumbnails.map(_.size) // Thumbnailed image files are much smaller res45: Seq[Long] = List(11129L, 11790L, 11893L) Machine Learning
The word "Machine Learning" sounds big and intimidating, like something you'd need to spend 6 years getting a PhD before you understand. What if you could "do some machine-learning" (whatever that means) in your spare time, in a minute or two? It turns out there are many Java libraries that can help you with basics, and with the Ammonite REPL getting started is easy.
Here's one example of how you can get started using the OpenNLP project to do some natural-language processing in just a few minutes. The example was found online, and shows how to extract English names from a raw String using NLP:
@ import $ivy.`org.apache.opennlp:opennlp-tools:1.6.0` // load OpenNLP @ val tokenDataUrl = "http://opennlp.sourceforge.net/models-1.5/en-token.bin" @ val tokenData = requests.get(tokenDataUrl) @ import opennlp.tools.tokenize._ // let's get started with OpenNLP! @ val str = "Hi. How are you? This is Mike. Did you see book about Peter Smith?" @ import java.io.ByteArrayInputStream @ val tokenModel = new TokenizerModel(new ByteArrayInputStream(tokenData.text)) @ val tokenizer = new TokenizerME(tokenModel) @ val tokens = tokenizer.tokenize(str) tplems: Array[String] = Array( "Hi", ".", "How", "are", "you" ... @ import opennlp.tools.namefind._ // Turns out we need more test data... @ val nameDataUrl = "http://opennlp.sourceforge.net/models-1.5/en-ner-person.bin" @ val nameData = Http(nameDataUrl).asBytes nameData: HttpResponse[Array[Byte]] = HttpResponse( Array( 80, 75, 3, 4, 20, ... @ val nameModel = new TokenNameFinderModel(new ByteArrayInputStream(nameData.body)) @ val nameFinder = new NameFinderME(nameModel) nameFinder: NameFinderME = opennlp.tools.namefind.NameFinderME@491eb5ef @ val names = nameFinder.find(tokens) names: Array[opennlp.tools.util.Span] = Array([8..9) person, [15..17) person) @ opennlp.tools.util.Span.spansToStrings(names, tokens) // Woohoo, names! res96: Array[String] = Array("Mike", "Peter Smith") This took a while, but only in comparison to the earlier cookbook recipes: this one is still less than 20 steps, which is not bad for something that installs multiple third-party modules, pulls down training data off the internet, and then does natural language processing to extract the English names from a text blob!
Obviously we did not go very deep into the field. If you did, it would definitely be a lot more reading and understanding than just blindly following tutorials like I did above, and you probably would find it worth the time to set up a proper project. Nevertheless, this quick 5-minute run through of how to perform the basics of NLP is a fun way to get started whether or not you decide to take it further, and is only possible because of the Ammonite REPL!
Play Framework Server
/** * Single-file play framework application! */ import $ivy.{ `com.typesafe.play::play:2.5.0`, `com.typesafe.play::play-netty-server:2.5.0`, `com.lihaoyi::requests:0.2.0` } import play.core.server._, play.api.routing.sird._, play.api.mvc._ val server = NettyServer.fromRouter(new ServerConfig( rootDir = new java.io.File("."), port = Some(19000), sslPort = None, address = "0.0.0.0", mode = play.api.Mode.Dev, properties = System.getProperties, configuration = play.api.Configuration( "play.server.netty" -> Map( "maxInitialLineLength" -> 4096, "maxHeaderSize" -> 8192, "maxChunkSize" -> 8192, "log.wire" -> false, "eventLoopThreads" -> 0, "transport" -> "jdk", "option.child" -> Map() ) ) )) { case GET(p"/hello/$to") => Action { Results.Ok(s"Hello $to") } } try { println(requests.get("http://localhost:19000/hello/bar").text()) } finally{ server.stop() }Ammonite's script-running capabilities can also be used as a way to set up lightweight Scala projects without needing SBT or an IDE to get started. For example, here is a single-file Play Framework test that
- Spins up a HTTP server and
- Makes a single HTTP request against it and prints the response
- Shuts down the server.
And can be run via
./amm PlayFramework.sc Although this is just a hello world example, you can easily keep the server running (instead of exiting after a test request) and extend it with more functionality, possibly splitting it into multiple Script Files.
SQL Database
Ammonite is great for those database jobs that are too complicated for SQL alone. This example uses ScalikeJDBC to update some rows.
@ import $ivy.{ `org.scalikejdbc::scalikejdbc:3.0.0`, `ch.qos.logback:logback-classic:1.2.3`, `mysql:mysql-connector-java:5.1.6` } @ Class.forName("com.mysql.jdbc.Driver") @ import scalikejdbc._ @ ConnectionPool.singleton("jdbc:mysql://localhost/database", "root", "") @ implicit val session = AutoSession @ val users = sql"""select id, email from users""" .map(rs => rs.long("id") -> rs.string("email")).list.apply() users: List[(Long, String)] = List((1L, "foo@bar"), (2L, "bar@baz")) @ def isNormalised(email: String): Boolean = ??? @ def normaliseEmail(email: String): String = ??? @ val usersWithInvalidEmail = users.filterNot { case (id, email) => isNormalised(email) } usersWithInvalidEmail: List[(Long, String)] = List((1L, "foo@bar"), (2L, "bar@baz")) @ usersWithInvalidEmail.foreach { case (id, email) => val updatedEmail = normaliseEmail(email) sql"""update users set email = ${updatedEmail} where id = ${id};""".update.apply() }Community
Ammonite is primarily maintained by Li Haoyi, with a lot of help from Laszlo Mero over the summer through Google Summer of Code, and help from many other contributors. We have an active Gitter channel and a mailing list:
Older Scala Versions
While most people would be using Ammonite for the latest version of Scala, 3.2, Ammonite also provides standalone executables for older versions of Scala:
Scala 3.0.2/2.12-3.0.2$ sudo sh -c '(echo "#!/usr/bin/env sh" && curl -L https://github.com/com-lihaoyi/Ammonite/releases/download/3.0.2/2.12-3.0.2) > /usr/local/bin/amm && chmod +x /usr/local/bin/amm' && amm Ammonite can also be used in old versions of Scala, embedded in an SBT project, without any special modifications.
Talks
I've also given a number of talks about Ammonite at conferences:
- Rock-solid Shell Scripting in Scala, at Scala Exchange 2015
- Shell scripting in a typed, OO language, at New Object Oriented Languages 2015.
- Beyond Bash: shell scripting in a typed, OO language, at Scala by the Bay 2015. Slides
- Maxim Novak gave a talk Rock solid shell-scripting with Ammonite at Scalapeno 2016 in Tel Aviv.
- Wojtek Pituła gave a talk That's enough bash. That's enough at ScalaWave 2018 in Gdańsk.
In the Wild
- Ammonite's terminal module is being used as a base for the Dotty REPL, which is the finishing school for new Scala concepts.
- Michael Pilquist used Ammonite for his Introduction to Functional Streams for Scala screencasts.
- Eugene Burmako used Ammonite for his Scala Meta talk at Scaladays 2016 in New York.
- Yeghishe Piruzyan has an Ammonite Modules project that tries to assemble common "modules" to be loaded into the Ammonite REPL
- Jupyter-Scala, by Alex Archambault, uses a fork of Ammonite as its Jupyter kernel
- The DynaML Machine-Learning REPL uses Ammonite as its REPL
- The Shapeless project has a try-shapeless.sh instant-REPL built using Ammonite
- Seems Twitter now uses Ammonite within their monorepo (monorepi?) codebase
- Yang Bo from ThoughtWorks created an sbt plug-in to export the classpath of an sbt project to Ammonite Script.
- Elastic uses Ammonite as a management repl inside their Elastic Cloud Enterprise product.
Scaladoc
Here's the Scaladoc for the various projects:
Although it's best to read the documentation on this page to learn how to use these projects, the Scaladoc is still useful as a reference.
Changelog
3.0.1
- Support for Scala 2.13.16, 3.3.4, 3.3.5
3.0.0
- Support for Scala 2.13.15, 3.5.1
- Added more Scala 3 keywords to the internal parser
- API facing dependency updates: geny 1.1.0, os-lib 0.10.0, pprint 0.9.0, requests 0.8.2, sourcecode 0.4.1, uPickle 4.0.1
- Various other dependency updates
3.0.0-M1
- This release is not binary compatible with Ammonite 2.5!
- Support for Scala 2.12.18, 2.12.19, 2.13.11, 2.13.12, 2.13.13, 3.3.1, 3.3.2, 3.3.3
- The Scala 3 version now no longer depends on dependencies built with Scala 2.13
- Various dependency updates
- Internal fixes and improvements
2.5.11
- Support for Scala 2.13.12
2.5.9
- Support for Scala 2.13.11 and 2.12.18
2.5.8
- Fixed Release Process. This release is otherwise identical to
2.5.7.
2.5.7
- Added support for Scala 3.2.2
- Ensured Java 8 compatibility
- Improved internal macros hygiene
2.5.6
- Update coursier to 2.1.0-RC1 which also closes some potential security vulnerabilities
- Improved Scala 3 support including
@mainannotation support - Added support for Scala 3.2.1
2.5.5
- Improved Scala 3 support
- Fixed line numbers in stack traces in Scala 3
- Added more supported Scala version: 2.12.16, 2.12.17, 2.13.9, 2.13.10, 3.1.3, 3.2.0
- Various dependency version bumps
2.5.4
- Bump uPickle to 2.0.0
2.5.3
- Print error positions in Scala 3
- Added support for Scala 3.1.2
- Bump uPickle to 1.6.0
2.5.2
- Added support for Scala 3.1.0 and 3.1.1
2.5.1
- Added support for Scala 2.13.8
- Re-added old Main entry point for better compatibility with Ammonite 2.4 and older
2.5.0
- Updated to latest versions of OS-Lib (0.8.0) Requests-Scala (0.7.0) PPrint (0.7.0) Fansi (0.3.0) uPickle (1.4.3)
- Fix `sourcecode.File()` to return full file path #1233
- Allow users to re-run watched scripts by pressing enter #1232
- Fix handling of imports using synthetic case objects #1231
- Rename main entrypoint to
ammonite.AmmoniteMain#1229 - EOL Ammonite-Ops and Ammonite-Shell 1227
2.4.1
- Support for more Scala versions: 2.12.14, 2.12.15, 2.13.7, 3.0.1, and 3.0.2
- Improved Scala 3 support and pretty-print
given-s as such - Traps
System.exitin scripts when running in--watch-mode (for Java versions below 17)
2.4.0
- Bump version of uPickle to 1.4.0
- Internal preparation for basic Scala 3 support
2.3.8
- Replace the built in
@mainmethod functionality with the MainArgs library - Note that the MainArgs replacement has some backwards incompatibilities: Short flags like
-ican no longer be passed via--i, the@doc("")is now@arg(doc = ""),Seq[T]parameters are now passed via repeated--fooflags rather than comma-separated.
2.2.0
- Support for Scala 2.12.12, 2.13.3
- Handle SIGINT when reading user input
- BSP support for Ammonite scripts
- Fix position update for first line of script
- Inline hardcoded predef metadata to avoid compiling them every time
2.0.5
- Support for Scala 2.12.11
2.0.1
- Bump PPrint to 0.5.7, FastParse to 2.2.2, uPickle to 0.9.6, Requests to 0.4.7
1.9.1
- Fix
@mainmethod handling in scripts run via--class-based
1.9.0
- Bump OS-Lib, uPickle and Requests-Scala versions, for compatibility with the geny.Writable interface
1.8.2
- Started publishing bootstrap scripts, that can be easily committed to version control and download/launch Ammonite via `./amm`
1.8.1
- Bump PPrint to 0.5.6
1.8.0
- Bump OS-Lib to 0.4.2
1.7.4
- Bump uPickle to 0.8.0
- Support for Scala 2.13.1
1.7.1
- Support for Scala 2.12.9, 2.12.10
1.6.9
- Added a `--thin` flag, providing user code with a cleaner classpath without all of Ammonite's own dependencies (#984, #941)
1.6.8
- Support for Scala 2.13.0
1.6.7
1.6.6
- Add support for scala
2.13.0-M5
1.6.5
- Don't keep resolutions involving snapshot artifacts or version intervals in the resolution cache of Ammonite
- Switch to coursier
1.1.0-M13 - Fix various issues with class-based wrapper (
--class-based)
1.6.4
- Don't print things marked as private
- Replace Scalaj-HTTP with Requests-Scala as bundled HTTP library
1.6.3
- Fix some regressions in stty handling, preventing Ctrl-C to interrupt user code, or making running sub-commands from the Ammonite prompt seem buggy.
1.6.2
- Fix
MissingRequirementErrorwhen starting Ammonite
1.6.1
- Fix
NoSuchFileExceptionwhen starting Ammonite on a clean machine
1.6.0
- Bump FastParse to 2.1.0.
1.5.0
- Bump OS-Lib version to 0.2.6; note that this has some backwards-incompatible changes:
-
ammonite.ops.writenow no longer creates enclosing folders by default; pass in thecreateFolders = trueflag to make it do so - The order of arguments in
ammonite.ops.ln.sis swapped, for consistency with the underlying Java APIs
1.4.4
- Upgrade uPickle to 0.7.1
1.4.3
- Upgrade uPickle to 0.7.0
1.4.2
- The core of Ammonite-Ops has been extracted into a standalone project OS-Lib. The
ammonite.opsnamespace remains for backwards compatibility, and continues to contain all the extension methods & shorthand syntax that OS-Lib does not, but for general-purpose scripting and programming you should now use OS-Lib
1.3.3
- Bump Fastparse to 2.0.5
1.3.2
- Upgrade to Fastparse 2.0.4, uPickle 0.6.7
- Support for Scala 2.12.7
1.2.1
- Removed Scalaz dependency (#830)
- Fix FrontEndUtils width and height on Windows (#820)
- Fix passing empty parameters to scripts (#747)
- Avoid unnecessarily re-compiling synthetic predef files when changing working directory
- Improve REPL performance by preserving compiler & TTY metadata across commands (#853)
- Improvements to JLine REPL autocomplete (#846)
1.1.2
- Print the correct Ammonite version when the REPL starts
1.1.1
- Bust script caches when
ammis run in different folders, to avoid unwanted caching if script compilation depends on filesystem path - Support for Scala 2.12.6
1.1.0
- Bumped uPickle version to 0.6.0
- Experimental Windows support in the Ammonite REPL using JLine3 (#775), thanks to Sakib Hadziavdic
- Experimental Java 9 support (#761) thanks to robby-phd
- Range-position support (#771) thanks to Olivier Melois
1.0.5
- Hide uninteresting autocomplete options from tab-completion (#755)
- Bump JLine version to 2.14.5 (#754)
- Cross-publish for Scala 2.11.12 (#741)
- Class-based input wrapping for Spark/serialization friendliness (#736)
1.0.3
- Refactor
ammonite-replmodule to be properly usable without the mainammonitepackage, thanks to Alex Archambault - Cross-publish for Scala 2.12.4
1.0.2
- There was an undocumented feature of magic importing URLs in Ammonite REPL 0.8.x. The feauture was removed in Ammonite REPL 0.9.x and 1.0.0. Now it's back, experimentally:
The content at the URL will be wrapped into theimport $url.{`https://raw.githubusercontent.com/lihaoyi/Ammonite/master/amm/src/test/resources/scripts/Annotation.sc` => remote}remoteobject, which can be accessed later:
Note that this functionality is experimental and may be subject to change or removal in future.remote.product(1, List(2, 3, 4)) - Fix for issue #679 when running
ls.recon path including inaccessible files would throwjava.nio.file.AccessDeniedExceptionthanks to Piotr Kwiecinski
1.0.1
- Ammonite is now cross-published to support Scala 2.12.3
- Ammonite REPL now prints an additional newline after the output of each command, which should visually separate each command and make it easier to skim over your command history in the terminal or when copy-pasted elsewhere.
- Fix for issue #668 where comments in identifiers are not properly backticked causing the repl to stop working correctly
1.0.0
- We recently launched a Patreon page to raise money to fund future development of Ammonite. If you've enjoyed using Ammonite, and use it day to day, please chip in to support our project!
- Output now defaults to colored if the console is interactive, and non-colored otherwise. This should be a default most people would be happy with.
- Scripts now have colored output by default if the script-runner is interactive, following the above rules. Much of the script "info" output like "Compiling" or "Watching for changes" messages are now colored.
- There is now a cli-flag
--colorwhich can be set totrueorfalseto force colors on or off if you are not happy with the default behavior. - The
repl.colorsbuiltin has been moved tointerp.colors, and allows you to fine-grained customize colors for e.g. error messages and info messages when running scripts. - Using
import $fileon an empty script files no longer causes spurious errors - Caches are properly invalidated if a script you
import $fileis deleted -
-w/--watchnow watches predef files as well. This means if you make changes to your predef (e.g. if it was crashing and you're trying to fix it), Ammonite will re-run your scripts automatically - Improved error handling of failures within predef; they should no longer show large stack traces containing irrelevant stack frames
- Predef files no longer cause problems with autocomplete in the REPL
- Parse errors within a file will now show the proper file-name, rather than
<console>. -
Ctrl Cinterrupts now place an exception with a useful stack trace inrepl.lastException, which can help debug where your code was at when you interrupted it. -
Ctrl Cno longer crashes the REPL if you perform it after entering a command but before your code starts running - Ammonite's REPL now warms up the compiler while you are typing your first command; this makes it likely that the compilation will be fast if you take a moment to enter your command, and shouldn't significantly effect the time taken otherwise
-
import $ivyno longer fails if it cannot find source dependencies, instead merely printing a warning. -
interp.load.execandinterp.load.applyhave been moved torepl.load.execandrepl.load.apply, and are now not available when running scripts: they never had a really well-defined semantic when run within scripts. Usingrepl.load.execorrepl.load.applywithin thepredef.scof your REPL is still possible - The
interp.watchbuilt-in now works on folders as well as files, watching all files within that folder and restarting your script if any of them change - Fix regression that broke binding of variables in
Main#run - Make
--watchflag more robust against files being deleted duringmtimeing, and make it properly re-run scripts when a file in a watched folder is renamed. - Display
@argannotations on a script's@mainmethods as part of the script's help text, thanks to mgedigian - You can now use
:::as part of yourimport $ivycalls to load Scala libraries cross-published against the full Scala version (e.g.2.12.2rather than just2.12, thanks to aeffrig - Ammonite now supports opening a Script Debug REPL after a script runs, with your script's scope loaded so you can poke around it interactively
- The command line flags
--predef/--predef-fileare now--predef-code/--predefrespectively, to reflect that using a custom predef file is much more common than a custom predef code snippet. -
ammonite.Main's argumentpredefhas been renamed topredefCode, and a new argumentpredefFilehas been added to match the command-line interface -
--predef(previously--predef-file) now adds a file in addition to the existingpredef.scorpredefScript.scin~/.ammonite. If you want it to replace the predef in~/.ammonite, there is a new flag--no-home-predefthat disables the predef in~/.ammoniteso your--predeffile stands alone -
~/.ammonite/predefShared.scis gone; if you want it back, you can do it yourself by addingimport $exec.predefSharedwithin yourpredef.scandpredefScript.scfiles. You can also import any others files into yourpredef.scandpredefScript.scthe same way - Ammonite now loads linux HTTP proxy environment variables into your JVM's
sys.propsby default, when running as a standalone executable. When using Ammonite within a SBT project, you will need to do this manually, e.g. callingammonite.main.ProxyFromEnv.setPropProxyFromEnv()within thepredefCodethat you pass toammonite.Main
0.9.9
- Ammonite scripts now show their usage text in Bash/Linux format, rather than in Scala format, to better fit into the scripting ecosystem
0.9.8
- Modified the way Ammonite Arguments in Scripts get passed. Rather than separating Ammonite's args and a script's args with a
--, now any arguments before the script file are used by Ammonite and any arguments after the script file get forwarded to the script's@mainmethod - Renamed
srcbuiltin tosourceto reduce chance of name collisions - You can now pass Script Arguments via both
--fooand-foo - Error messages for scripts are now consistently not colored, rather than mostly being uncolored but sometimes turning up red
- Scripts without a main method now properly show an error if arguments are passed
- Error messages from scripts are now more reliably sent to
stderrrather thanstdout - All code within Ammonite's REPL and scripts now run within the context of the
ammonitepackage; this lets us avoid littering the top-level package namespace with miscellaneous names like$fileand$sess - Remove
foo ! bar ! bazimplicit syntax, andChainableConversionsimplicit. They're cool, but not simple enough to be worth including by default - Re-enable
foo |> showsyntax in the REPL, which regressed in 0.9.0
0.9.7
- Fix crashes in autocomplete subsystem (#620) caused by regression in 0.9.6
0.9.6
- Fixed an issue where down-stream scripts would not properly recompile when the scripts they import changed
- Ensure that importing the same script twice via a diamond-dependency does not end up compiling it twice, and instead uses the first version that was compiled
-
Path(...)no longer automatically expands~to your home directory, for consistency with other filesystem APIs. UsePath.expandUserto do so manually. - Add the
-w/--watchWatch and Reload flag, which lets you run a script repeatedly every time you change its code, viaamm -w foo.sc. This is useful when you are actively working on the script and greatly reduces the iteration time. You can also manually include files you wish to watch, e.g. if you are iterating on external data or config files.
0.9.5
- Fix scalac/classpath errors when loading typelevel/cats #617
0.9.4
- Experimental support for the source built-in, which brings you to the source code for a method or class so you can see the implementation or read the doc-string.
- Importing
$files from within your predef now properly makes them available within your REPL, the same way other imports are #616 - The predef required for Ammonite-Shell was tweaked slightly; if you are using it please update your
~/.ammonite/predef.scwith the new predef code.
0.9.3
- Fix regression in
showandbrowsebuilt-ins, which caused their default configuration to be un-usable #613 - Force pretty-printing
scala.xml.Elemto use its XML.toStringrather than treating it as a case class, since the case-class representation is borked due to weirdness in that class. - Improve pretty-printing of
Paths,RelPaths and the result of sub-processes and file-listings in the default REPL (previously these improved-pretty-printers were limited toammonite-shell)
0.9.2
- When pasting multiple separate multi-line statements, subsequent statements no longer stomp over earlier ones in the terminal output #609
0.9.1
- Fix error message when running a script and Ammonite cannot find the main method you specify because your first non-script arg starts with
-- - Fix crash when trying to pretty-print values whose
toStringis the empty string.
0.9.0
- Ammonite now uses Alex Archambault's Coursier library for dependency resolution and downloading. This should hopefully fix many of our perennial, non-deterministic Ivy resolution problems, and provide greater flexibility for loading ivy dependencies (e.g. with excludes, classifiers, etc.). Fixes #300, #387, #455, #473, #484, #523, #573, #583.
- Experimental Apache Spark support! You can now run basic Spark commands in Ammonite scripts, as well as in the REPL. To do so, look up the
Spark.scandSpark2.scscripts in the repository as examples to get started. Spark support is currently experimental, so feel free to contribute fixes when you notice something missing or wrong! - Upgrade to PPrint 0.5.1, which fixes a large number of issues in the previous implicit/macro based pretty-printer #208 #306 #313 #575
- Introduced a new
interp.configureCompilerbuiltin, which lets you configure the compiler in a way that's robust in the case of caching and late/lazy initialization, fixing #472. You should useinterp.configureCompilerinstead ofrepl.compilerto configure it safely. - Properly run import hooks in multi-block scripts in the block that they are defined, allowing you to add resolvers/repositories before performing
import $ivys in subsequent blocks. Fixes #491 - Revamped how Script Arguments are passed. When running scripts, now the script file must *always* be the first argument to the
ammcommand. Any arguments after the script file get delegated to the script's@mainmethod(s) unless there is a--present, in which case arguments after the--get delegated to the script while those before get passed to Ammonite. This allows you to define a@mainmethod with a varargString*that accepts in all arguments by default, letting you use your own custom arg parsers on the input strings. Fixes #423, #479, #538 - The return values of Ammonite scripts'
@mainmethods orexit(...)calls now gets pretty-printed by default when the script completes. This make composing scripts much more convenient: the same@mainmethods you use when printing output to the command-line can also be used from Scala code when imported from other scripts. To disable this, annotate your main method as returning: Unit -
exitcan now be cleanly used in Scripts without failing with aNullPointerException, in addition to its existing use in the REPL. - Avoid crashes when non-existent paths are on the classpath, thanks to Olivier Roland
- Default to RSA in Ammonite's Remote REPL and enable key-based auth (#594) thanks to Espen Wiborg
- Ammonite now anonymously logs the times you start a REPL session and the count of how many commands get run. This is to allow the author to understand usage patterns and prioritize improvements. If you wish to disable it, pass in the
--no-remote-loggingcommand-line flag or theremoteLogging=falseargument toMain.
0.8.x
0.8.5
- Fix classLoader related problem in Multi-stage scripts with
@main(#591) - A nicer error message when you try to run a non-existent script (#522)
-
ammonite.ops.Path(s: String)now resolves~to the home directory of the current user - Many improvements to classpath scanning and re-compilation logic (#542) which should greatly reduce the time taken start Ammonite in an SBT project, and avoid many existing problems with stale compilation caches.
- Fix crash when you try to run an empty script
- Miscellaneous info messages now go to stderr rather than stdout, so they don't get mixed into your script output if you pipe into a file (#574)
0.8.4
- Make startup banner configurable via a command line flag
0.8.3
- Cross-publish for Scala 2.12.2, 2.11.11
- Bump version of apache-sshd (#545), by emanresusername
- Avoid
FileAlreadyExistsExceptionwhen compiling scripts in parallel (#567), by armanbilge - Add
beforeExitHooksso you can register cleanup code (#581), by emanresusername - Add a sleep in
Shellout.executeStreamto reduce spinning. (#578), by rorygraves - Add an overloaded version of LoadJar.cp that takes a sequence of paths, by mallman
0.8.2
- Automatically publish standalone executable for Scala 2.10 and 2.11, thanks to jhnsmth
- Bytecode of classes defined in the REPL is now accessible via
getClass.getClassLoader.getResource, thanks to jhnsmth - Fix crash in working with Hadoop in Ammonite (#535), thanks to Tom Dyas
-
Ctrl-uandCtrl-know cut to the beginning/end of the current line (#514), rather than the entire input block, thanks to Jordan Gwyn
0.8.1
- Cross-published for Scala 2.12, with the help of Roman Tkalenko who investigated and fixed a gnarly classpath bug #515
- Handle multi-line shebang lines, thanks to Greg Dorrell
- Fix
NullPointerExceptionon no-save-then-load situation in REPL, thanks to Roman Tkalenko - Use Console for SSHD stream redirection to avoid inter-thread spillage of stdout, thanks to Timothy Dettrick
0.8.0
- Tweak default imports to avoid ambiguous imports reported in #500
- Allow configuration of SSHD console classloader #486
- Use RSA host keys instead of DSA #485
0.7.x
0.7.9
- Fix #496 by properly setting context classloader when running cached scripts
- Make
.iterversions of file operations return genyGenerators rather thanIterators, which should avoid problems with leaking file handles - Fix a hole in
ammonite.ops.Paththat was allowing invalid paths with empty segments to be constructed.
0.7.8
- Fix #397 and #430, thanks to Roman Tklalenko
- Upgrade to Fansi 0.2.2, which should reduce memory usage by 134mb
- Update FastParse/Scalaparse dependency to 0.4.1
0.7.7
- #461 avoid loading the same compiler plugin more than once, thanks to Roman Tklalenko
- Allow
cd!ing into sym-links, thanks to Roman Tklalenko and Sergei Winitzki - Bump Fansi dependency to 0.2.1 and bump Fastparse dependency to 0.4.0
0.7.6
- When running scripts, Ammonite now prints out a "Compiling foo.sc..." message if they're being compiled for the first time. If you want this to not be the case, you can silence it using the same
-sswitch, thanks to coderabhishek - The
--predef-fileswitch now allows multiple inputs, allowing you to pass in multiple files that all get evaluated as the predef -
import.$ivyno longer caches-SNAPSHOTversions, thanks to Julie Pitt - #448 Deprecate
ammonite.ops.cwdin preference toammonite.ops.pwd, to help clear up confusion betweencwdand localwds, thanks to Julie Pitt - Set a default heap limit of 500 megabytes to the
ammstandalone executable, so it no longer grows to the "default" of 1/4 your system memory (typically multiple gigabytes) unnecessarily. If you need to give it more memory, start it withJAVA_OPTS=-Xmx1500M amm - #453 Avoid un-wrapping
{...}blocks in scripts, leaving the unwrapping of Block Input only a feature of the interactive REPL
0.7.5
-
-scmd line switch makes ivy logs silent, though failures will still be thrown as exception. Thanks to coderabhishek. - Added
showandtypeOfback into the default REPL imports, since they are pretty useful -
write.overin Ammonite-Ops should now properly truncate files if the thing being written is shorter than the original #441 - Ammonite no longer incorrectly allows multiple expressions to be evaluated on the same line #446
- Compilation errors when there are multiple statements in a block will no longer have redundant semicolons prefixed onto them #439
- Improved the line-number-reporting in certain cases where you use
import $file.*
0.7.4
- Fix publication of artifacts for non-{2.11.8, 2.10.5} Ammonite versions
0.7.3
- Actually avoid importing all the Repl API functions into local scope, for reals
0.7.2
- Hygienified the default namespace by avoiding importing all the Repl API functions into local scope, instead leaving them inside the
replobject. This is a backwards incompatible change! - Separated the APIs available from scripts (
load.*andresolversin theinterpobject) from those available from the REPL (in thereplobject).replis not available when running scripts, unless you pass in the--repl-apiflag at the command line. - If you want to maintain the old behavior, e.g. for backwards-compat, put a
import repl._in your~/.ammonite/predef.scandimport interp._in your~/.ammonite/predefShared.scto bring everything back into scope again. -
predef.scnow only applies to the interactive REPL. If you want predef code that applies to scripts usepredefScript.sc, or if you want predef code that applies to both you can usepredefShared.sc. - Added a version of desugar to Scala 2.10.x. It doesn't print things as prettily/accurately as the 2.11.x version, but it's better than nothing.
- Changed the syntax for
import $filesegments outside your current directory fromimport $file.`..`.footoimport $file.^.foo. This makes it a lot shorter and mitigates a problems caused by the file-name being too long. - You can now use a
JAVA_OPTSenvironment variable to pass flags to the JVM when starting Ammonite, thanks to Simon Scarduzio - Running scripts outside the current working directory tree, as well as scripts with non-alphanumeric symbols in their file path, now works thanks to coderabhishek
- Scripts without the
.sccan now be run directly from the command line rather than throwing anIndexOutOfBoundsException, thanks to coderabhishek - Modularized Ammonite's internals; the main module
ammonitehas now been broken into 5 smaller modules for maintainability. This in itself should not be visible to the outside world, but be sure to report any bugs!
0.7.0
- Backwards incompatibly changes the extensions from Scripts and Predef files from
.scalato.sc, to avoid problems with SBT discovering and trying (and failing) to compile them as normal Scala files. - Script files vastly faster to run once cached (~0.5s fixed overhead, instead of ~5s I was seeing before): faster classpath scanning, with much more aggressive and robust caching, thanks to coderabhishek who is working on this over GSOC
- Fixed a performance regression and greatly sped up pasting text into the REPL
- The behavior of
Ctrl pandCtrl nhave been tweaked to be more consistent with other readline implementations. - Magic Imports now exist! This should provide a much more intuitive way of importing other files and depending on ivy artifacts, without all the fumbling with
@that the oldload.foofunctions required -
load.module,load.exec,load.ivyare now largely superseded byimport $file,import $exec, andimport $ivy - The way you pass in Script Arguments to a script, has been totally revamped, and should be faster, more intuitive, and provide better error messages when things go wrong
- Added a new top-level doc-site chapter on Scala Scripts. This reflects their promotion from "quick hack that was a pain in the neck to actually use" to "something that actually feels pretty nice to use". If you've tried running Ammonite scripts earlier and was totally turned off, it's worth another shot.
- Most of Ammonite now works on Windows, with the exception of the interactive REPL using
AmmoniteFrontEnd, thanks to coderabhishek who worked on this over GSOC. - Started doing Continuous Deployment of the Ammonite project's artifacts and executables; now, any set of commits that get pushed or merged into master will be published immediately, with this documentation-site being updated, the standalone executable being uploaded to Github Releases, the Ivy artifacts being uploaded to maven central, and instructions for downloading/installing it shown in the Unstable Versions section below. Any PRs that get merged are published and become available within an hour or two, so the author and anyone else can begin using them.
0.6.x
0.6.2
- Fix #403: Errors are silently swallowed in 0.6.1
0.6.1
- Fixed #400: load.exec in predef.scala causes NPE in 0.5.9 or 0.6.0
- Fixed #398: by default, using Ammonite inside a SBT project uses the old
~/.ammonite/storage folder, not theInMemorystorage system. This restores the pre-0.5.9 behavior - Fix regression causing BACKSPACE to not work while performing a history-search
- More internal refactoring
0.6.0
- Made browse use the process current working directory if there's no implicit path in scope, since most times it doesn't matter
- Make the welcome banner "Welcome to the Ammonite Repl..." customizable
- Fixed bug where triggering autocomplete resulted in a broken REPL session
0.5.x
0.5.9
- Introduced the desugar helper to Ammonite-REPL, letting you easily see what the compiler is transforming your code into before it gets run.
- Prefix
_root_to imports from packages, which should reduce the chance of naming collisions - Improved source locations for error messages: now failures in scripts have a filename matching the name of the script (instead of
Main.scala), and line numbers matching the original line numbers (instead of the line numbers in the synthetic code) thanks to coderabhishek - Failures in scripts run using Ammonite from the command line or via
load.moduleshould show only the meaningful error and not irrelevant internal stacktraces - Wrapper names are now greatly simplified; now the names of wrapper objects for scripts match the name of the script (e.g.
MyScript) rather than based on the code hash (e.g.cache5a8890cd7c2ab07eea3fe8d605c7e188) - Placed most synthetic code into packages; loaded scripts go into
ammonite.scriptsand code entered at the REPL goes inammonite.session. - Wrote some basic Internals Documentation in case people want to read about the internal workings of Ammonite in a way that's easier than digging through tons of code.
- Changed the interface for Embedding Ammonite to make configuring the Ammonite REPL before invoking it programmatically much more consistent.
- Moved tools such as grep, time, browse from Ammonite-Shell into the base Ammonite-REPL, and made them imported by default, so everyone can enjoy them by default.
- Imported the various pipe operations from Ammonite-Ops: aliasing
.mapas|,.filteras|?, etc. to make it more convenient to use tools like grep from the base REPL - Massive internal refactors to try and clean up the Ammonite codebase and get it ready for future work; if you find any bugs please report them!
- Fixed #393: REPL requires two carriage returns to move to a new line
- Compiler settings set in the predef now get preserved when the session starts, and when replacing compilers, thanks to Rob Norris
- Fixed #395: Fixed resolver pattern for local ivy, thanks to Aish Fenton
- Fixed the
killcommand in Ammonite-Ops, thanks to 杨博 - Unknown Ansi escape codes now have their
'\u001b'escape character removed, rather than messing up the REPL rendering
0.5.8
-
writehas been generalized to work on any combination ofArray,TraversableandIterator. e.g.write(foo: Iterator[Iterator[Array[String]]]) -
writeno longer inserts newlines between items by default. - Introduced the browse helper to Ammonite-Shell, letting you easily open up large data structures in external editors like Vim or Emacs to browse them without spamming the console
- Improved the error messages for invalid
Pathsegments to make them more specific and suggest alternatives to what a user is trying to do. - Broke out the
FilePathsub-trait from theBasePathtrait, to differentiate thoseBasePaths are filesystem paths and can be constructed fromjava.nio.file.Pathorjava.io.Files (RelPathandPath)from those which can't (ResourcePath) -
Path.makeTemphas been renamedtmp()andtmp.dir() - Arrow-keys now work properly in the previously odd case where they were creating
\u033O{A,B,C,D}" codes instead of\u033[{A,B,C,D}codes - Converted all string-encoding methods to take a
scala.io.Codecinstead of aStringorCharset, letting you pass in either of those types and having it be implicitly converted.
0.5.7
- Improved performance of various
read!commands to be competitive withjava.nio(#362) -
read!andread.lines!now take an optional charset, passed viaread(file, charSet: String)orread.lines(file, charSet: String)which defaults to"utf-8" - Make
read! resourceread from theThread.currentThread.getContextClassLoaderby default, fixing #348 - Re-organize Reading Resources in Ammonite-Ops to allow proper handling of absolute and relative resources by passing in
Classs orClassLoaders - Make
read!work onInputStreams - Renamed
InputPathtoReadable, a more appropriate name now that it works on two different non-path entities (resources andInputStreams) - Bump uPickle and PPrint to 0.3.9
- Now published for Scala 2.11.8, thanks to Clark Kampfe
0.5.6
- Fixed #341: stack overflow when
lsing large directories - Fixed regression preventing you from running scripts via
./ammusing relative paths #353 - Ammonite should be more robust when interacting with other compiler plugins
- Fixed #352: imports now don't get improperly collapsed, and defining a value called
replno longer borks your session. - Improved readline-emulation of
AmmoniteFrontEnd:Ctrl-TandAlt-Tnow properly transpose characters and words, and the kill-ring now properly aggregates multiple consecutive kills. - Added asserts to
rmcpandmvto prevent you from removing the root folder, or copying/moving folders into themselves. - Command-line-undo via
Ctrl -and redo viaEsc/Alt -are now supported. - Page-up and Page-down (fn-up and fn-down on Macs) scrolls through history when used at the start/end of input, allowing you to use page-up/page-down to quickly scroll through history with lots of multi-line blocks.
0.5.5
- Experimental support for Ammonite-Ops in Windows! I haven't tested it but basic CI passes here, so try it out and let me know if there are problems (#120)
- Changes around Ammonite-Ops's definition of
Paths: they now wrap ajava.nio.file.Path(#346), and thus can be used on Windows, on multiple drives, or with virtual filesystems such as JimFS. - Construction of
Paths from various types (Strings,java.nio.file.Path,java.io.File) is much more well behaved & consistent now. -
read.resource! root/'foois nowread! resource/'foo - Parser improvements which fix bugs when trying to write some multi-line snippets #343
-
cpandmvnow have.intoand.overmodes #206 - Wrapping content is automatically shifted onto a new line, to avoid problems when copying and pasting #205
- Thrown exceptions are now made available to you in the REPL under the
repl.lastExceptionvariable #289, in case you need more metadata from it or you want the stack-trace of a non-printed-by-default exception (e.g.ThreadDeathdue toCtrl-C). Thanks to coderabhishek! - Fixed #280: Ammonite REPL confused by singleton types
0.5.4
- Improve the pretty-printing for
Range.Inclusive#337, thanks to Saheb - More fixes to shadowing behavior of
types andvals #199 - Pressing
BACKSPACEnow drops you out of history-browsing properly, preserving your edits if you then pressENTERwithout entering any other characters #338
0.5.3
- Added support for multi-line prompts, thanks to thirstycrow
- Fix #312 lsing empty directory gives error, thanks to coderabhishek
- Implemented History Search, also known as reverse-i-search/Ctrl-R
- Fixed #325: error due to function types with by-name parameters
- Fixed #258: java.util.NoSuchElementException: head of empty list in Ammonite-REPL
- Fixed #198: NoSuchElementException thrown in REPL when using a type alias to refer to a shapeless coproduct
- Warnings can now be enabled with the flag
compiler.settings.nowarn.value = false - Stopped Ivy from spitting out countless useless
unknown resolver nullwarnings when resolving dependencies (#144) - Fixed edge cases around import shadowing and sequencing (#199, #248)
- Started the Ammonite Cookbook, examples of using the Ammonite REPL to do useful work.
0.5.2
- Fixed #80 Support artifact resolvers to load libraries not published to maven central , by Eric Torreborre
- Fixed #310: java.util.NoSuchElementException: None.get on Shift+Tab without selection f, by senia-psm
0.5.1
- Fix performance regression causing slowness when C&Ping large snippets #274
- Added the ability to pass Script Arguments to Ammonite scripts from an external command line (e.g. bash) #277
- Iterator-returning commands like
ls!!ls.rec!!andread.lines!!have been renamedls.iter!ls.rec.iter!andread.lines.iter!, to help cut down on cryptic operators - Added the time command to Ammonite-Shell, roughly equivalent to the bash
timecommand, allowing easy timing of simple commands -
ls.recnow exposes basic configurability of the recursion, allowing you to skip directories or controlling the pre/post-order of results -
Paths andRelPaths no longer permit"."or".."as a path segment #215 -
Paths andRelPaths now usVector[String]instead ofSeq[String]as thesegmentsdata-structure, promising more consistent semantics - Pretty-printing of the results of
ls!now properly gets truncated when too large #209 - Cross-build for 2.10.6 #282
- Refactor of the
CommandResulttype being returned from the%%operator, to now properly capture the raw byte output, stdout, stderr, exit code. #207 - Added a new grep command.
- Added support for word navigation with Ctrl+Arrow in Linux (#217), thanks to Ian McIntosh
- Moved the initialization calls from
ammonite.Repl.runandammonite.Repl.debugintoammonite.Main.runandammonite.Main.debug
0.5.0
- Fixed
def<tab>auto-complete crasher #257, thanks to Matthew Edwards! - Fixed input-height bug around multi-line selection that would case the prompt to fly up the console
- Multi-line-select tab-indent (and shift-tab-dedent) now works!
- Pressing
[Enter]now only submits the input if your cursor is at the bottom - Added a powerful Save/Load Session API, letting you save your work at any point in time and return to it later.
- Compiled-code-caches are now properly invalidated when you change project-code while using Ammonite as a REPL for an existing SBT project.
- Simplify the way shelling to to run files as subprocesses works, and align with documentation (#234)
0.4.x
0.4.9
- Update to fastparse/scalaparse 0.3.1
- Fix for perennial classpath problems, thanks to Johannes Rudolph!
- Fix wildcard-imports from Java libraries like Joda or Guava #213
- Added an MIT license
- Slightly more robust tab completion #252, thanks to Sanjiv Sahayam!
- Properly handly EOF in standard input #242, thanks to Patrick Premont!
0.4.8
- Swapped to G1 garbage collector to reduce unnecessary memory footprint
- Allow splicing
Seq[String]s into subprocess arguments - Fix source packaging which was causing problems with ensime
- Allow shebang line to make Ammonite scripts more conveniently executable
- Robustify line-breaking-logic
0.4.7
- Path-completion now works when using Ammonite as a filesystem shell
- Ammonite's filesystem functionality (
cd!,wd, path-completion) has been pulled out of Ammonite-REPL, and is now available separately as Ammonite-Shell. - Improve the pretty-printing of the
lsandls.reccommands - Ammonite can now be used as a Remote REPL into an already-running Scala process, letting you SSH in to poke around at any time while it's running, thanks to Viacheslav Blinov
- Fix execution of files via symbols in the current working directory.
-
Load.ivynow properly attempts to load artifacts from the local~/.ivy/cache,~/.ivy/localand~/.m2folders, before fetching from maven central - Wrote up a good amount of documentation for Ammonite-Shell: using Ammonite as a Bash replacement
0.4.6
- Provide a way of Invoking Files and passing Environment Variables
- Documented existing approach for setting Compiler Flags
- Fixed a bug in the readline re-implementation causing barely-full lines in the terminal to mess up cursor positioning and line re-drawing
- Remove
cache1234567890abcdef1234567890abcdefobjects from the autocomplete list, because they're not helpful - Trim all the useless members of
Anyfrom the default import lists. - Fix a file-handle-leak for most usages of
read.linesandls/ls.rec - Fix bugs #186, #152, #149, #180
0.4.5
- Fix for running Ammonite using OpenJDK, thanks to Johannes Rudolph
- Support for HOME and END keys, thanks to Johannes Rudolph
- Fix for incorrect syntax highlighting (#159)
- Support for loading compiler plugins, thanks to Alexandre Archambault
- You can now use Ammonite as a Debugging tool like Python's pdb, placing an interactive breakpoint anywhere within a normal Scala application
0.4.4
- Lots and lots of terminal improvements, courtesy of Erik Osheim
- Only the last
@-delimited block in a script loaded viaload.modulegets its names dumped into the REPL's environment now, letting you create some semblance of hygiene, thanks to Laszlo Mero
0.4.3
- Remove embarrassing debug println left behind in autocomplete code
- Fix
pathSeparatorso Ammonite-REPL is at least basically-runnable on windows, although buggy - Update to more robust version of pprint to fix #140
0.4.2
- Fix #139: Can't fix typos?
- Fix bad wrapping of long lines in ammonite-repl
0.4.1
- Fix crasher running the REPL on new machines
0.4.0
- Re-added support for 2.10.x, minus features that don't work in it (e.g. scope-aware type-printing)
- Added a standalone distributable that comes bundled with Scala 2.10.4 or 2.11.7, letting you quickly load and experiment with libraries without SBT
- User input now has Syntax Highlighting by default!
- Exception stack traces are now highlighted as well, to make them easier to read
- Pretty-printing has been extracted into a separate project, and aside from that is greatly improved. Many more common cases (e.g. sealed trait hierarchies) are now pretty-printed rather than falling back to
toString - Exposed the show function by default, letting you pretty-print any value with custom configuration (wrapping-width, truncation-height, colors, ...)
- Fixed cases where PPrint/TPrint was causing compilation errors
- Persistent data is now stored in a
~/.ammonitefolder. This includes~/.ammonite/history,~/.ammonite/predef.scala, and various cache, thanks to Laszlo Mero - You can now define a
~/.ammonite/predef.scalaConfiguration file which will be executed the first thing when the Ammonite REPL is loaded. This is useful for common imports,load.ivying libraries, or other configuration for your REPL - Added the ability to load arbitrary Script Files via
load.execandload.module, thanks to Laszlo Mero - Configuration that was previously passed into the
REPLs constructor is now done in-REPL, - Multi-line editing and other features via a custom terminal interface that should behave just like readline, but with added conveniences.
- Removed the ability to reload classes; using
load.ivyno longer causes all existing values to be lazily recomputed. - Added the cd! and wd built-ins to make working with filesystem operations via Ammonite-Ops more pleasant
- Evaluated values of type
Unitare no longer echo-ed to the user - Performance improvements to the startup time of the REPL, with more to come
- Third-party library resolution via
load.ivyis now cached after the first call, letting you e.g. load libraries in your~/.ammonite/predef.scalawithout waiting for the slow ivy-resolution every startup - Standardized the use of Refs for configuration, including the ability to bind them "live" to the value of an expression.
- Allows you to trivially spawn subprocesses, letting you run
gitcommands, edit files viavim, opensshsessions or even startSBTorPythonshells right from your Scala REPL
0.3.x
0.3.2
- Fix pretty-printing of higher-kinded types.
- Drop support for 2.10.x; ammonite is 2.11.x-only now
0.3.1
- Many of the collection
PPrints are much lazier and will avoid stringifying the whole collection if it's going to get truncated anyway. - Types now get printed semi-qualified (depending on what's in scope), with simple highlighting.
- You can define custom
TPrint[T]s to provide custom printing for any type. - Operator-named two-param generic types are now printed infix by default.
0.3.0
- allow
predefparameter to be passed intoMain.run()call, letting you configure initialization commands or imports - Compilation errors in expressions no longer show synthetic code in the message
- Ivy module loading now lets you configure verbosity level
- Defining macros in the REPL and using them in subsequent lines now works
- Output lines are now truncated past a certain length, which is configurable, thanks to Laszlo Mero
0.2.x
0.2.9
- Lots of improvements to
Ctrl-CandCtrl-Dhandling, to make it behave more like other REPLs
0.2.8
- Fix #47: PPrint derivation fails with nested case class
- Fix #14: Exception when trying to use Ammonite REPL #15 by cross building against Scala 2.10.{3,4,5} and 2.11.{3,4,5,6}
- Autocomplete results are sorted alphabetically (Fixed #42)
- Fix #39: nothing echoed on multiple import
- Importing things from Java packages now works properly
- Capture Exceptions and expose them to repl as repl.lastException including exceptions causing Failures
Unstable Versions
The page above contains the documentation for the latest stable version of Ammonite, 3.0.2. Ammonite also publishes unstable versions, the latest of which is 3.0.2 and is available for direct download:
$ sudo sh -c '(echo "#!/usr/bin/env sh" && curl -L https://github.com/com-lihaoyi/Ammonite/releases/download/3.0.2/2.13-3.0.2) > /usr/local/bin/amm && chmod +x /usr/local/bin/amm' && amm On Cygwin, run the following after the above:
$ sed -i '0,/"\$0"/{s/"\$0"/`cygpath -w "\$0"`/}' /usr/local/bin/amm The latest build can also be run as Windows batch; just save the following as amm.bat:
https://github.com/com-lihaoyi/Ammonite/releases/download/3.0.2/2.13-3.0.2
For usage in a SBT project:
libraryDependencies += "com.lihaoyi" % "ammonite" % "3.0.2" % "test" cross CrossVersion.full Ammonite also provides standalone unstable executables for older versions of Scala:
Scala 3.0.2/2.12-3.0.2$ sudo sh -c '(echo "#!/usr/bin/env sh" && curl -L https://github.com/com-lihaoyi/Ammonite/releases/download/3.0.2/2.12-3.0.2) > /usr/local/bin/amm && chmod +x /usr/local/bin/amm' && ammThese unstable versions will contain any brand-new features that are currently being worked on, with the caveat that they are unstable and these features are subject to change or experimentation. They will generally work - the automated test suite is pretty comprehensive - but they are still more-likely to have bugs than numbered releases.
Any pull-request that gets merged into the main branch is published as an unstable version automatically within an hour or two of being merged, so if you notice some problem and know how to fix it, send a PR, get it merged, and you can use the published unstable version with your fix until the next numbered release.