
Hello readers, In this article you will learn a complete email verification process. We will implement this using Java, Spring Boot, and Mongo DB. You find the completed code at the end. Also, the video version is below.
Let us split this process into two parts.
- Generating email verification link with the token.
- Rest endpoint to verify the token from the link.
Workflow
As the first process, we will generate the token, Store it in DB, and send an email with the confirmation link. This will be included after we persist the user details in the registration.
Additionally you can also create an endpoint that can be utilized when there is an email update.
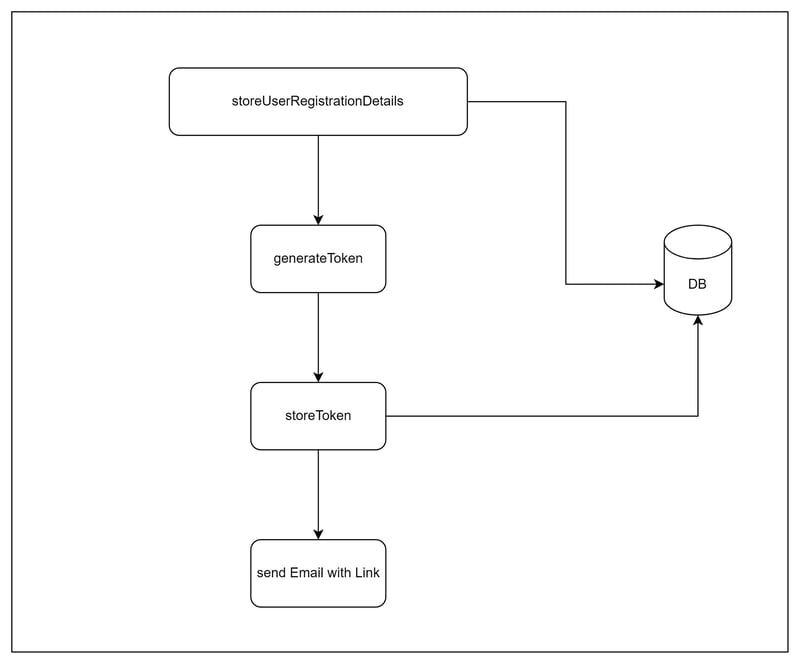
An endpoint that verifies the token by querying the DB and updating the user record that the email has been verified.

Code Implementation
Let's create an entity that stores the token. This can be leveraged for future use when there is a business requirement for token expiration and many more.
@Data @Document public class EmailConfirmationToken { @Id private String id; @Indexed private String token; @CreatedDate @ReadOnlyProperty private LocalDateTime timeStamp; @DBRef private User user; } Below is the repository that will interact with DB.
@Repository public interface EmailConfirmationTokenRepository extends MongoRepository<EmailConfirmationToken, String> { EmailConfirmationToken findByToken(String token); } Now repository is ready, Let's create a service that generates the token,
We will make use of "KeyGenerators" from spring security to generate a random 15-byte token.
private static final BytesKeyGenerator DEFAULT_TOKEN_GENERATOR = KeyGenerators.secureRandom(15); private static final Charset US_ASCII = Charset.forName("US-ASCII"); Now use the DEFAULT_TOKEN_GENERATOR to generate the token and add it to the entity to store it using the repository we created above.
String tokenValue = new String(Base64.encodeBase64URLSafe(DEFAULT_TOKEN_GENERATOR.generateKey()), US_ASCII); EmailConfirmationToken emailConfirmationToken = new EmailConfirmationToken(); emailConfirmationToken.setToken(tokenValue); emailConfirmationToken.setTimeStamp(LocalDateTime.now()); emailConfirmationToken.setUser(user); emailConfirmationTokenRepository.save(emailConfirmationToken); At this point, the token has been generated and stored in DB. Now let's send out a registration email.
To Configure the email server we are going to use Gmail. Let's move to Gmail-> Manage Accounts -> Security -> click on 2 Step Verification -> Scroll to the end and click on App Passwords -> Enter the application name and get the password.
After you get the password add it to the configuration below,
spring: mail: host: smtp.gmail.com port: 587 username: YOUR_EMAIL password: "YOUR APPPLICATION PASSWORD" properties: mail: smtp: auth: true starttls: required: true enable: true Now the email server configuration is ready let's implement the email service as below,
Email service makes use of JavaMailSender API. As we are planning to use HTML messages, I am using the MIME message type and its helper to set the email properties.
We can also isolate the HTML message to a separate file and include it as a stream instead of an inline string.
@Service public class EmailServiceImpl implements EmailService { private final JavaMailSender sender; public EmailServiceImpl(JavaMailSender sender) { this.sender = sender; } @Override public void sendConfirmationEmail(EmailConfirmationToken emailConfirmationToken) throws MessagingException { //MIME - HTML message MimeMessage message = sender.createMimeMessage(); MimeMessageHelper helper = new MimeMessageHelper(message, true); helper.setTo(emailConfirmationToken.getUser().getUsername()); helper.setSubject("Confirm you E-Mail - MFA Application Registration"); helper.setText("<html>" + "<body>" + "<h2>Dear "+ emailConfirmationToken.getUser().getFirstName() + ",</h2>" + "<br/> We're excited to have you get started. " + "Please click on below link to confirm your account." + "<br/> " + generateConfirmationLink(emailConfirmationToken.getToken())+"" + "<br/> Regards,<br/>" + "MFA Registration team" + "</body>" + "</html>" , true); sender.send(message); } private String generateConfirmationLink(String token){ return "<a href=http://localhost:8080/confirm-email?token="+token+">Confirm Email</a>"; } } Let's add the token generation and send an email after saving user details in your application.
Let's see how it works in action.
Open the UI and register a User with a valid email address,

Upon registration, let's look at the DB.


Here is the email we received.


The first part is completed.
- Let's implement the rest endpoint that validates the token,
If there is a security config that limits the authenticated endpoints then add this endpoint to whitelists.
@GetMapping("/confirm-email") public ResponseEntity<?> confirmEmail(@RequestParam("token") String token) throws InvalidTokenException { try{ if(userService.verifyUser(token)){ return ResponseEntity.ok("Your email has been successfully verified."); } else { return ResponseEntity.ok("User details not found. Please login and regenerate the confirmation link."); } } catch (InvalidTokenException e){ return ResponseEntity.ok("Link expired or token already verified."); } } Below is the service implementation that will validate the token and update the user record.
Code retries the token from DB with the token received from the endpoint. if there is a token then validate update the user record and delete the token from DB.
@Override public boolean verifyUser(String token) throws InvalidTokenException { EmailConfirmationToken emailConfirmationToken = emailConfirmationTokenRepository.findByToken(token); if(Objects.isNull(emailConfirmationToken) || !token.equals(emailConfirmationToken.getToken())){ throw new InvalidTokenException("Token is not valid"); } User user = emailConfirmationToken.getUser(); if (Objects.isNull(user)){ return false; } user.setAccountVerified(true); userRepository.save(user); emailConfirmationTokenRepository.delete(emailConfirmationToken); return true; } Let's check the endpoint by clicking on the email link.


This endpoint also updated the record and deleted the token,


We have successfully implemented the registration workflow. Great for reading till the end. Check out the GitHub repository & do comment if have any questions, I am happy to answer all.
Backend code
MFA Server
Application for 2FA demo.
APIs Involved
- login
- register
- verifyTotp
- confrim-email
Dependencies
- Spring Security
- Spring Web
- dev.samstevens.totp
Angular UI
Mfaapplication
Application developed using Angular 14 and Bootstrap.
Components involved.
- Login
- Register
- TOTP
- Home Module

Top comments (0)